
Asana AI Studio Explained: Features, Use Cases, and Setup

If you’ve used Asana rules before, you know they’re great for automation but not really for decision-making.
Asana AI Studio changes that. You can now build workflows that rename tasks based on their content, flag missing details, summarize long updates, or even decide who a task should go to, all with simple, natural-language instructions.
We’ve been using AI Studio at Cirface since its beta, and have compiled all what we learned about this new addition in this quick guide.

What is Asana AI Studio?
AI Studio is a no-code feature inside Asana that lets you build smarter workflows that go beyond simple automation. Instead of just moving a task or assigning it to someone, you can now add an AI step that actually thinks based on the context of the work.
We’ve been using AI Study to streamline a lot of the messy and repetitive work such as naming tasks when a form is submitted and checking for missing information. You write a short prompt like you would in ChatGPT, but it runs automatically as part of a rule inside your project.
“AI Studio is like rules on steroids. It lets you take the kind of logic you already use in Asana and layer intelligence on top without needing to code anything.”
What I like about it is this: it’s not some separate AI tool. It’s built right into the Asana workflows you’re already using. You don’t need to code anything. And you can design it around how your team actually works.
It’s a simple way to take the manual tasks off your plate so your team can stay focused and keep things moving.
How AI Studio Works
AI Studio builds on the same rule system you’re already using in Asana, but adds one smart layer in the middle.
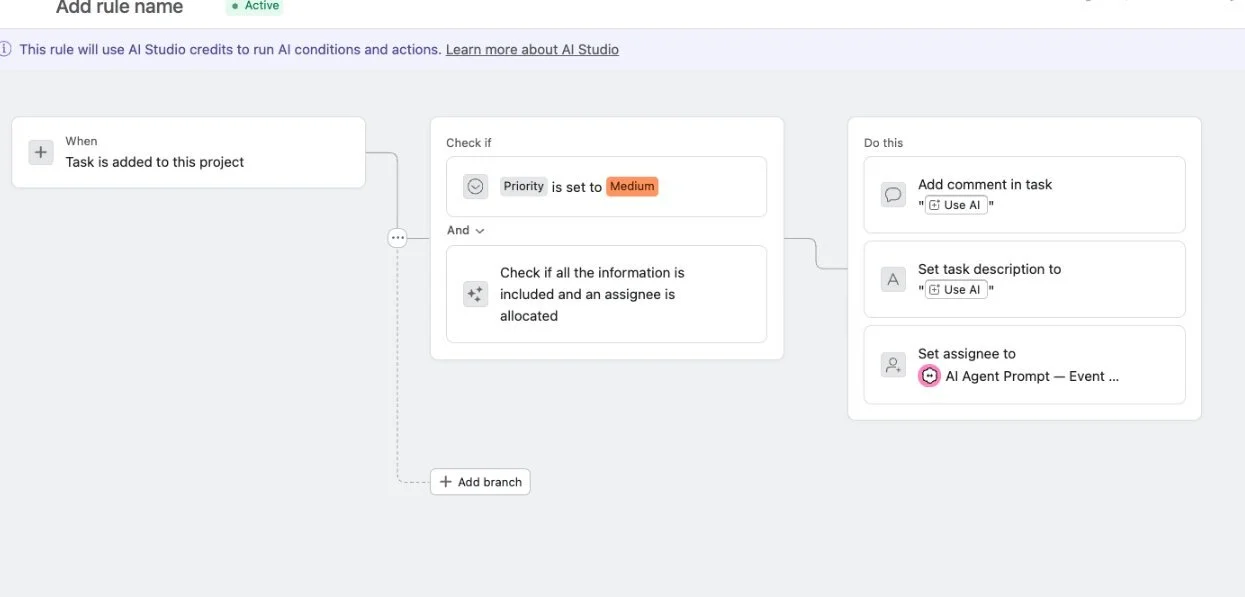
You still start with a trigger such as “When a new task is added to this project.” But now, before jumping straight to the action, you can insert an AI step. That’s where intelligence comes in.
Let’s say you’re using the prebuilt Check for Duplicates rule. When someone submits a task, AI scans your project for anything that looks similar, like maybe it’s the same request phrased a little differently. If it finds a match, it drops a comment with a link to the duplicate.
What’s happening behind the scenes is this:
Trigger fires: A task is created, updated, or moved (whatever event you’ve set.)
AI runs your instructions: The AI reads the task’s details, any comments or fields you’ve scoped in, and follows the instructions you’ve written like “If this task looks similar to anything else in the project, drop a comment with links.”
Action happens: The AI output then drives the next step. That could be renaming the task, filling a field, posting a comment, or moving it to another section just like a normal rule, but smarter.
Activity gets logged: You’ll see exactly what happened in the task’s activity feed to learn when the rule ran and what the AI did.
Optional human review: We always advocate for human oversight when it comes to working with AI so we recommend you build in approval steps for a person to check the AI’s output before it moves forward.
AI Studio Pricing Explained
Asana AI Studio is available in three pricing tiers to match the level of complexity and scale your team needs. Here's how each one works:
Basic (included with Starter+ plans)
Basic is best for teams just starting to explore AI-powered automation. It’s included with all non-legacy Starter+ plans and gives you a limited number of credits to experiment with simple, routine workflows like auto-naming tasks or flagging missing fields. This tier is ideal if you want to validate a specific use case before investing more heavily in AI automation. It's suitable for teams of any size working within low monthly usage limits.
Ideal for teams just exploring AI in their workflows
Includes a pre-set credit limit per billing account
Access to core AI Studio features like web search and compliance
No additional cost
| Asana plan | AI Studio Basic credits (per billing account, per month) |
|---|---|
| Starter | 50,000 |
| Advanced | 75,000 |
| Enterprise | 200,000 |
| Enterprise+ | 200,000 |
Plus (includes 100K monthly credits)
The Plus tier is designed for individuals and small teams who are ready to adopt production-ready workflows. It supports more advanced use cases and provides a metered approach to scale up automation over time. With 100,000 credits per month and a cost of $1.35 per 1,000 credits, it's a solid option for teams under 1,000 employees who expect moderate AI Studio usage, typically under 1M credits per month.
Best for small teams looking to scale productivity
Includes 100,000 credits per month
About $135 per account per month billed annually ($150 month to month) for 100,000 credits per month
More credits available in 100,000-credit increments. (100,000, 200,000, 300,000, etc.)
Can be purchased directly in side of your Asana’s Admin Console (admin or billing owner)
NOTE: Credits do not roll over month to month.
Pro (includes 5M quarterly credits)
Pro is built for large teams running high-volume or complex workflows across departments. This tier is optimized for enterprise-scale operations and includes advanced billing controls, onboarding services, and access to usage monitoring. You’ll get 5 million credits per quarter (plus the option to purchase 2.5M more for $499), making it ideal for companies with 1,000+ employees or those automating across multiple teams and systems. It’s the best fit if your team regularly consumes over 1 million credits per month and needs robust governance.
Designed for large, complex workflows across organizations
Includes 5 million credits per quarter
$1.00 per 1,000 credits
Additional 2.5 million credits available for $499
Ability to pick and chose specific members to consume their Pro credits (other uses in their domain will continue using AI Studio Basic)
Includes advanced billing controls and full onboarding services through FSPs
| Tier | Included on | Credits | Cost | Best for |
|---|---|---|---|---|
| Basic | All paid plans | 50K/mo Starter, 75K/mo Advanced, 200K/mo Enterprise & Enterprise+ (per billing account) | Included, no extra cost | Testing AI on real workflows |
| Plus | All paid plans | 100K/mo per account, more in 100K increments | ~$135/account/mo annual (~$150 month to month) | Small to mid teams running production workflows |
| Pro | Annual package | 5M/quarter, choose which members use Pro credits | Annual, via Asana sales | High-volume or complex, multi-team |
We recommend choosing your plan based on how your team actually works, not just company size. Consider the volume of inputs, frequency of rule runs, and level of AI support you’ll need before selecting a tier.
How Asana AI Studio Credits Work (and How Not to Burn Through Them)

When we first started testing AI Studio, one of the biggest questions we had was how much will this actually cost us to run?
The short answer: it depends on how complex your prompts are, how often your rules run, and which model you use.
Each time an AI-powered rule runs, it consumes credits. And while the system handles most of the backend complexity, here’s what actually affects your usage:
Model size: GPT-5.2 and Claude Opus 4.6 are more powerful, but also more “expensive” than lighter options like GPT-5 Mini or Claude Haiku.
Input volume: The more fields, comments, or linked tasks you feed into the rule, the more tokens it needs to process.
Output size: Asking it to generate a 2-sentence status update will cost less than drafting a full creative brief.
Frequency: A rule that runs 5x a week costs far less than one that triggers every time a task is created.
“Think of AI models like cars. Credits are your fuel, and the more powerful the model, the more fuel it burns. Claude Opus for example, that’s your luxury Maserati. It’s fast, high-performing, but not always necessary. Most of the time, a compact model like Claude Sonnet or GPT-5 Mini gets the job done just fine and uses a lot less fuel. ”
Real Credit Usage Examples
AI Intake Rule (e.g. rename task, check missing fields): ~1,200–2,200 credits
Brief Drafting Rule: ~300–500 credits
So if you're using 38–40 AI-powered rules a day, every day, for a quarter you’ll just start to hit the 5 million credit cap that comes with the Pro tier.
Most teams we work with don’t even come close.
Tips to Use Credit Efficiently
Start with Mini or Haiku models before upgrading because often than not they’re good enough.
Keep prompts tight. The UI flags you when your instructions are too long.
Limit the scope by using task description + key fields only.
Pilot new rules in a sandbox project to monitor usage first.
Bottom line: You don’t need to worry about hitting limits if your rules are well-designed. AI Studio gives you flexibility but being intentional is what makes it scalable.
The “Use AI” Variable
One of the most powerful things about AI Studio (and what makes it feel like a real assistant) is something called the “Use A”I variable.
Now, this isn’t your typical variable like {Task Name} or {Assignee}. Those only pull existing data from the task. “Use AI”, on the other hand, actually generates new content or makes a decision based on your instructions. It’s as if you telling Asana to “figure it out.”
What does “Use AI” do?
Let’s say you’re building a rule that posts a comment when a task is submitted. Normally, you’d just drop in a canned response or pull a field. But with Use AI, you can say:
“Summarize the task description in two bullet points and highlight any deadlines mentioned.”
Now instead of a static comment, you get a dynamic summary written by the AI based on the real content of the task.
Where to use “Use AI”
You’ll find Use AI anywhere you’re setting a value:
Task description
Comments
Assignees
Custom fields (like Priority or Approval Status)
Section moves
Due dates
Even when creating subtasks or approvals
Just select “Use AI” as the value and you’ll see a box open up where you can write the instructions.

Standard variable vs. Use AI (and how to mix them)
Here’s the difference:
Standard variable → only pulls info
Use AI variable → reads context and generates a new response
And yes, you can combine both. Example:
“Using the task’s {Custom Field: Request Type} and the description, classify this as Urgent or Normal and give a one-line reason.”
The field is pulled in, but the reasoning comes from the AI. That’s how AI-powered rules work in a nutshell.
Use cases that work really well
Here are a few ways we’ve seen teams use the Use AI variable effectively:
Smart routing: AI reads the request and assigns it to Legal if it mentions “contract,” or to IT if it says “bug.”
Auto-commenting: When a task is marked “Done,” AI drops a note summarizing what was completed.
Content drafting: Use AI to generate a first draft of an email or a project brief based on form inputs.
Quality checks: When a task moves to “In Review,” AI checks if the description is complete and pings the assignee if something’s missing.
3 AI Studio Rules to Build First
If you’re just getting started with Asana AI Studio, don’t overthink it. Start small, start useful, and start with things your team touches daily.
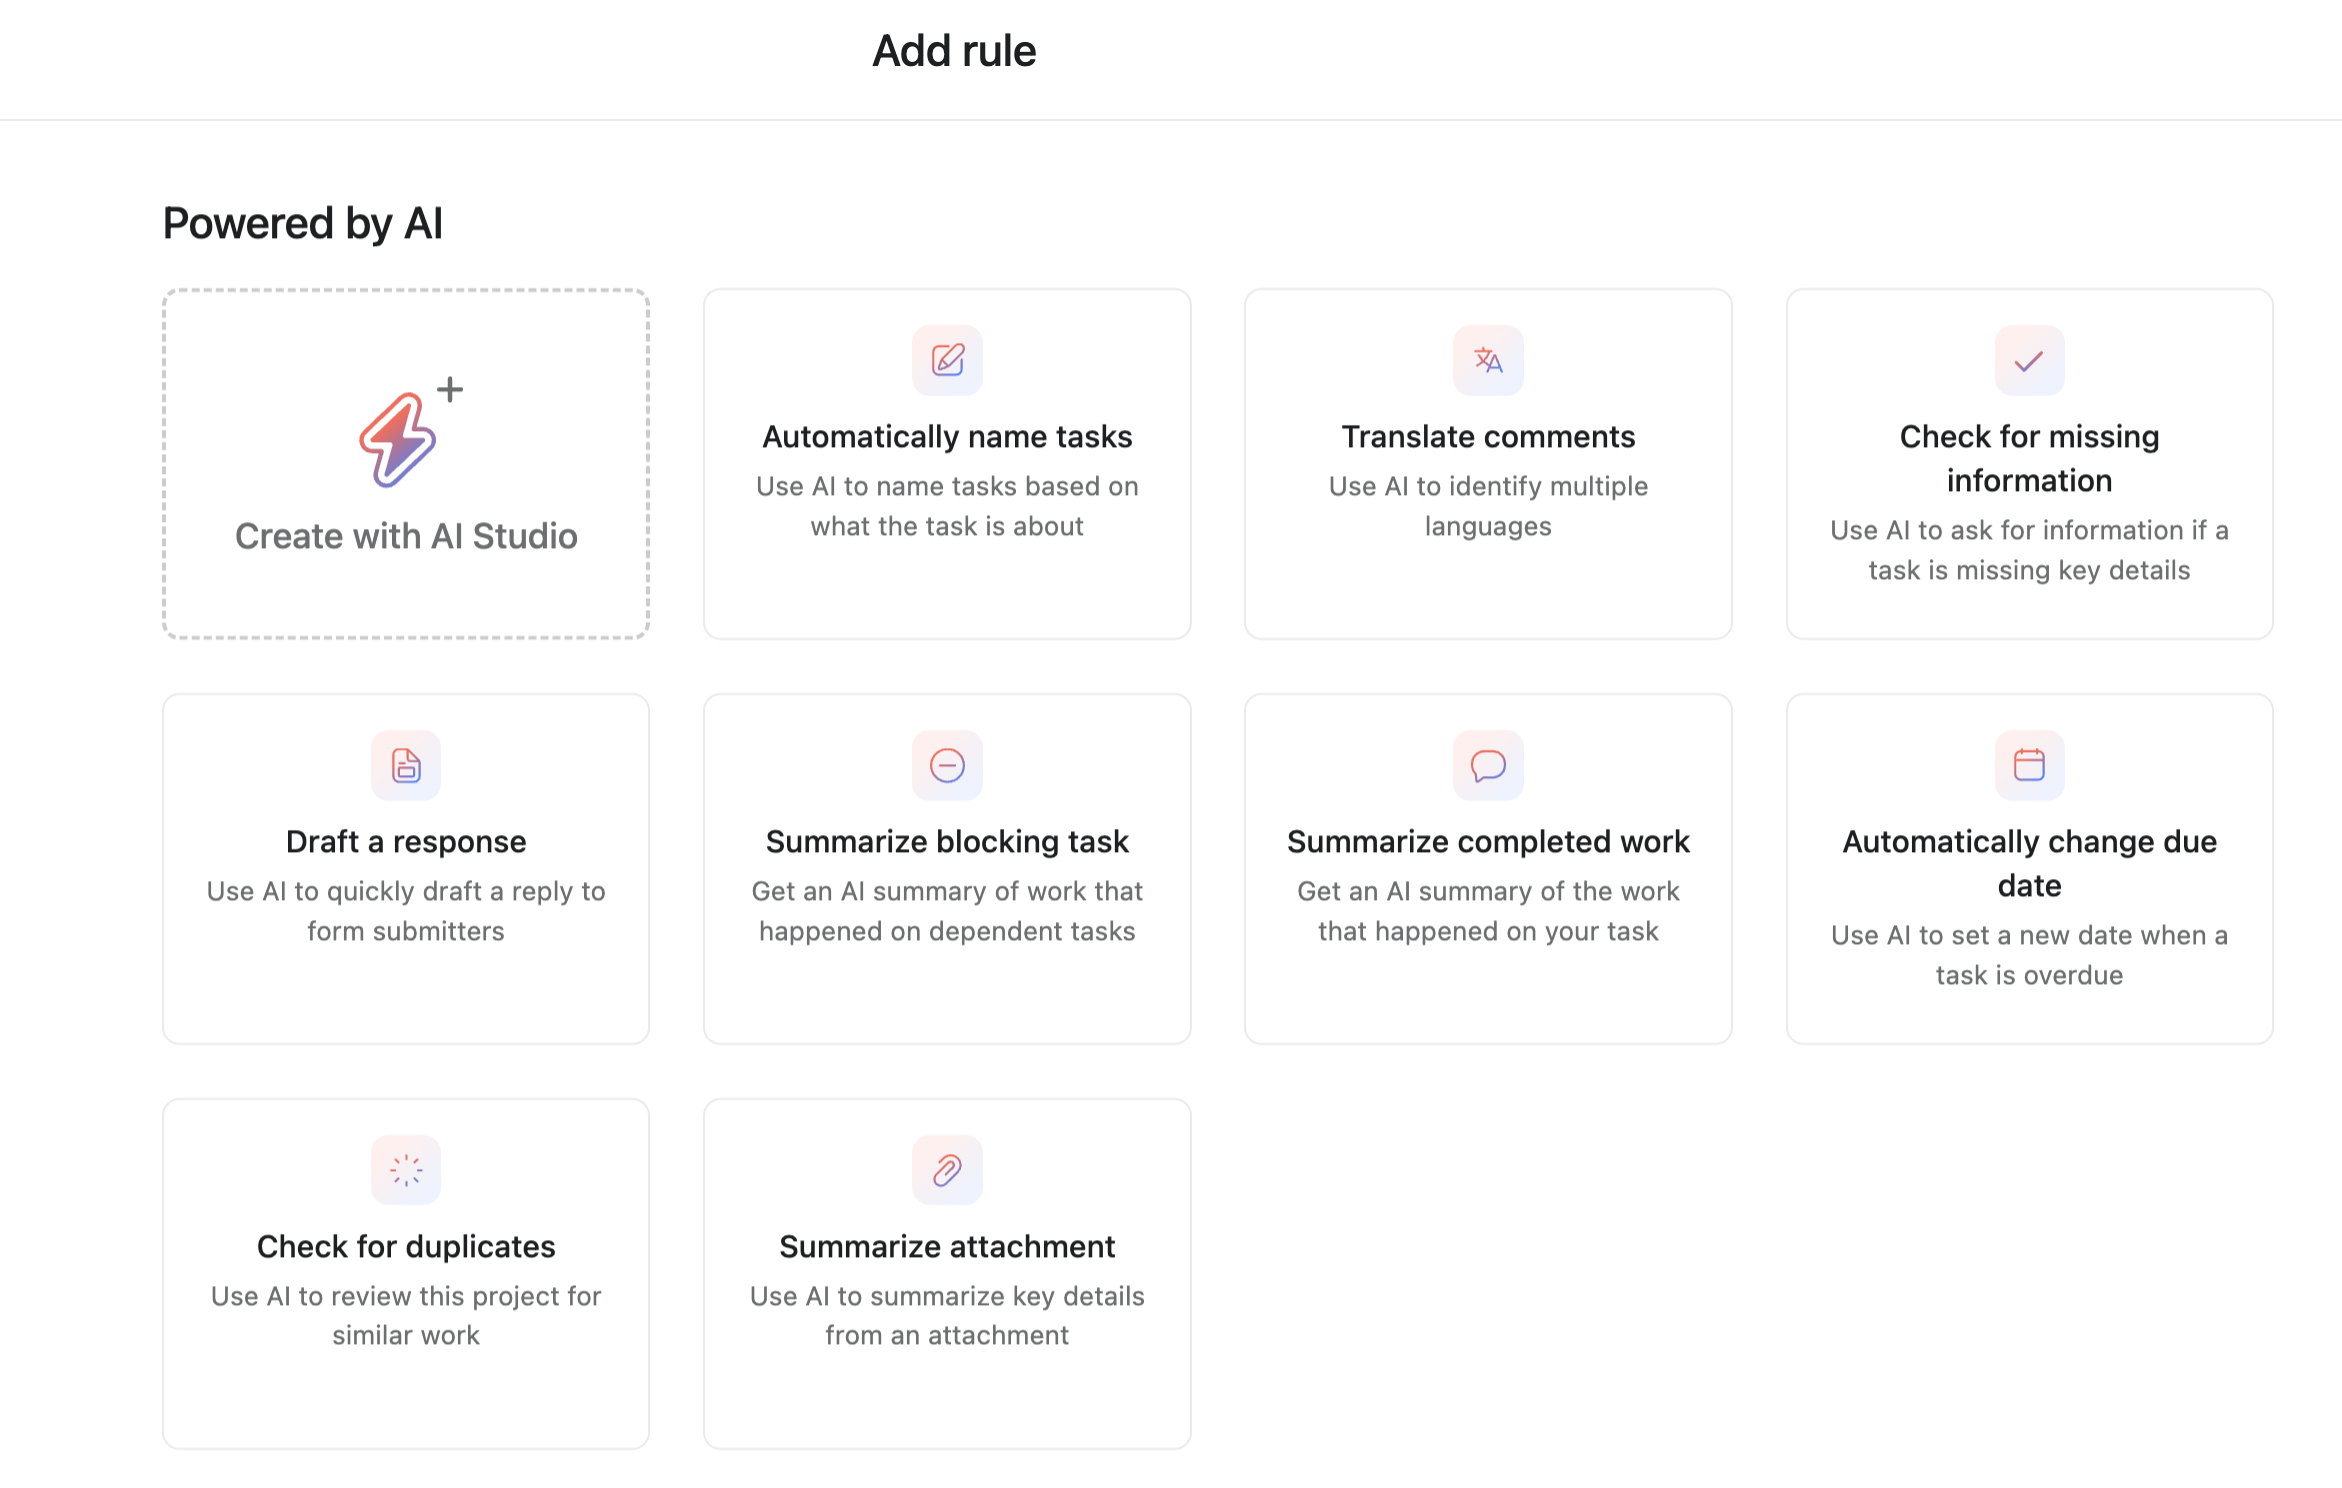
When you click into “Rules” under the Customize menu in any Asana project, you’ll now see a growing list of preconfigured AI rules including smart task naming, form validation, and status summaries. These templates make it easy to get started without writing your own prompts from zero.
1. Smart Task Naming on Form Intake
This AI-powered rule renames tasks when a form is submitted using key form fields (like campaign name + due date). While this doesn’t seem too important, it’s much needed to avoid “Untitled creative request” cluttering your project. It enforces naming standards without needing to train your team.
Bonus: Add a second AI step to set priority or request type based on form responses.
Credit impact: ~1,200–2,200 credits per run
Great for: Marketing or creative request queues, IT support desks, intake-heavy teams
2. Missing Info Checker (with Comment Reply)
This rule checks new tasks for missing or vague information, like empty fields or unclear descriptions, and automatically posts a clarifying comment. It saves project managers from chasing people down and keeps work from stalling at the intake stage.
Credit impact: ~1,500–2,000 credits per run
Great for: Teams struggling with incomplete briefs, project managers tired of chasing details
3. Check for Duplicated Tasks
AI Studio automatically and without prompting finds duplicate tasks in your project and notifies you. AI leaves a comment in the task with links to its duplicate so that you can easily merge the tasks. It’s a simple concept, but one that could save your team hours of rework and miscommunication, especially in fast-moving projects where requests pile up quickly.
Credit impact: ~300–600 credits per run
Great for: Cross-functional projects, intake boards, teams managing high volumes of requests
Don’t build 10 rules at once. Start with one, test it in a duplicate project, and share results with your team. Once they see the time savings, adoption becomes easy.
Get Started With AI Studio Today
1. Make sure AI Studio is enabled
If you’re on Advanced (annual), Enterprise, or Enterprise+, an admin needs to enable AI Studio from the admin console. It’s just a toggle. Once it’s on, members in your org will be able to access AI actions inside the rule builder.
2. Pick a project to test
Open the project where you want to add your rule. This could be a real workflow (like your creative requests board) or just a scratch project to play around.
Either way, you need to have edit access to the project to create rules.
3. Open the rule builder
Click Customize and then scroll down to Rules, and hit + Add Rule.
In the gallery, you’ll see the option “Create with AI Studio.” Click that to start building your first Smart Workflow. If you want to use one of Asana’s pre-built rules instead (like Smart Task Naming or Missing Info Checker), scroll to the 🔮 icons and choose one of those. You can always customize the prompt later.
4. Set the trigger
This is the “when” that kicks off your rule.
Some examples:
Task added to project – great for intake rules
Status field changes to X – good for summaries or routing
Task moves to a section – helpful for quality checks or approvals
Pick whatever fits the moment you want AI to step in.
5. Add an action with Use AI
Choose what you want the rule to do like adding a comment or renaming a task, and then select Use AI as the value. Once you do that, an instruction box will appear where you’ll write what the AI should do.
6. Write your prompt
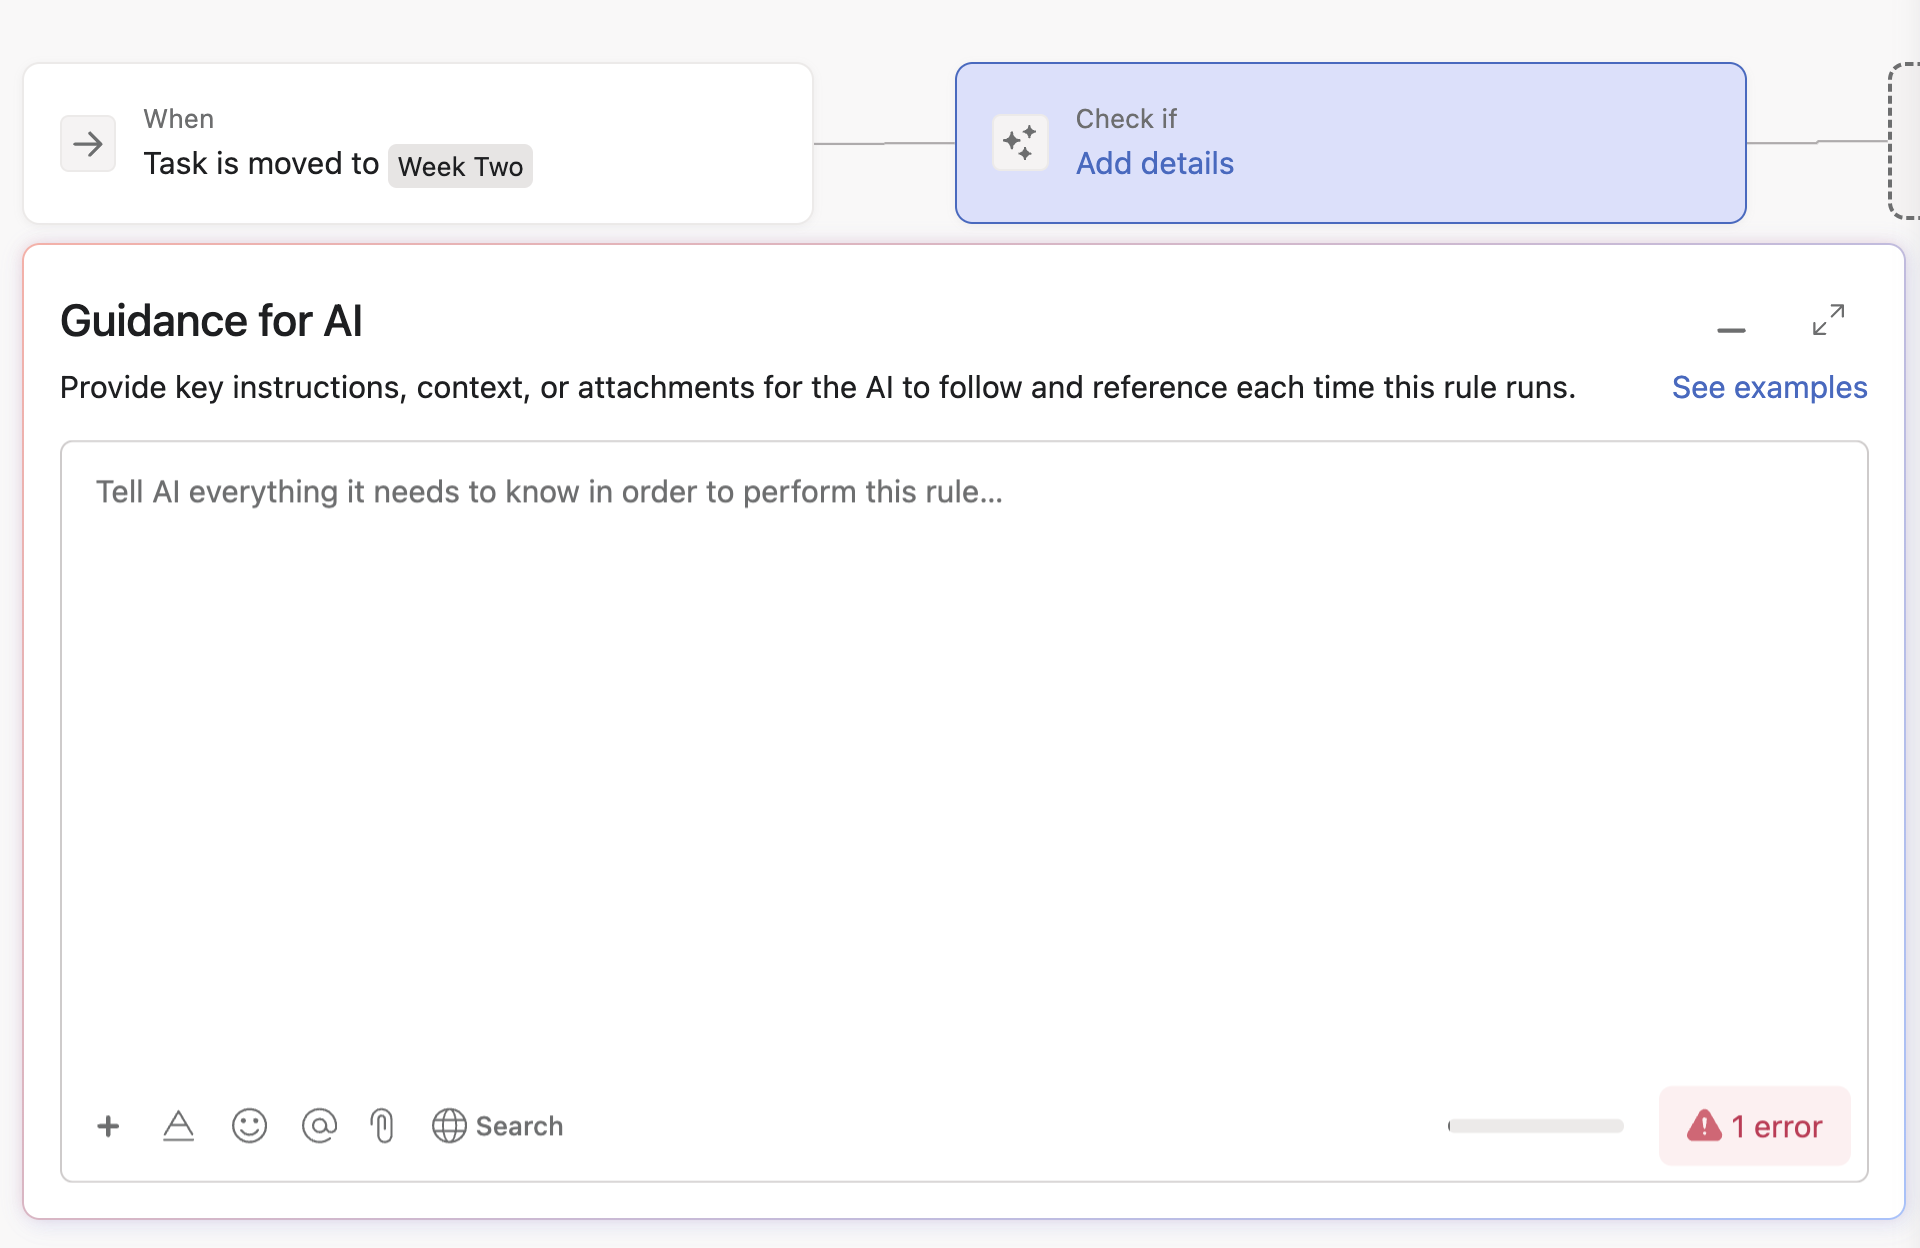
I highly recommend, regardless of your AI prompt-writing prowess, that you make use of Asana’s “Instructions for AI” feature. It’s exactly what the name suggests… AI writing your AI prompt.

Instructions for AI helps you engineer the right prompt for your smart rule.
In the bottom-left corner or the rule builder, you’ll find the “Instructions” gold button. Click on it, and type in everything you need the AI rule to perform without worrying about correct prompt hygiene or structure.
You’ll also find at the bottom of the instruction window a “Recommended “ drop down window, where Asana AI recommends the right AI model for the size and complexity of the automation needed to fulfill the task.
Keep it simple and clear. You’re just telling the AI what you want it to output.
Some examples:
Smart Task Naming:
“Use the task description to create a clear, concise title. Include the request type and subject. Avoid using ‘Form response.’”Missing Info Checker:
“Check if the task has a description, due date, and dependencies. If anything’s missing, post a comment listing what’s missing.”
The clearer you are, the better your results.
8. Test it
Trigger the rule! Add a test task and see what happens.
Did the AI rename the task? Add a smart comment? If not, check the task’s activity feed to confirm the rule ran. If it didn’t work how you expected, no problem. Go back, tweak the prompt, and try again.
And that’s it.
You’ve just shipped your first smart workflow and saved your team from another repetitive task.

FAQs
Is Asana AI Studio worth it?
For most teams already on a paid Asana plan, yes, because AI Studio Basic is included at no extra cost, so you can test real workflows before spending anything. It pays off fastest on repetitive, high-volume work: intake and request naming, checking briefs for missing details, routing tasks to the right owner, and summarizing updates. It is less useful if your projects are simple or low-volume, since you may not run enough rules to notice the difference.
The value also depends on setup. A poorly scoped rule burns credits and produces noise, while a well-designed one saves hours. That is the part Cirface builds for teams, so the workflow is tight, the credit use is controlled, and the output is something people trust.
What can Asana AI Studio do?
Asana AI Studio lets you add an AI step inside your normal Asana rules, so a workflow can read a task and make a decision, not just move it. In practice, teams use it to run intake (rename and tag incoming requests from a form, then flag anything missing), manage campaigns (draft briefs from form inputs, summarize status, and keep tasks named consistently), and handle routing (read a request and send it to the right team, such as Legal for a contract or IT for a bug). It can also summarize long updates, check tasks for completeness before they move forward, and draft first-pass comments or replies. Everything runs on natural-language prompts, so there is no code involved.
How much does Asana AI Studio cost?
Asana AI Studio comes in three tiers, and the base tier is free.
AI Studio Basic is included with every paid Asana plan and runs on a shared monthly credit pool per billing account: 50,000 credits on Starter, 75,000 on Advanced, and 200,000 on Enterprise and Enterprise+. When those credits run out, AI rules pause until the next cycle.
AI Studio Plus adds 100,000 credits per month for about $135 per account per month billed annually (or $150 month to month), with more credits available in 100,000 increments. This is a per-account cost, not per user, so a 10-person team pays one flat rate.
AI Studio Pro is an annual package with 5 million credits that reset every quarter, plus advanced billing controls and the option to choose which team members use the Pro credits. Credits themselves are variable: each rule run costs more with a heavier model, more input, longer output, or web access, so a light summarizing rule can cost a few hundred credits while a complex intake rule can cost a couple of thousand.