How to Create a Content Calendar in Asana: Marketing Calendar Template Guide

Asana's content calendar features let you plan and manage multi-channel marketing campaigns in one place. After using this system at Cirface for our own content operations, we've streamlined workflows across blog posts, social media, podcasts, and email campaigns. This guide shows you how to build a master marketing calendar in Asana that connects all your content channels with automated workflows and forever say good back to scattered (and frankly, antiquated) Google Sheets.
📋 Table of Contents
Jump to any section of this guide to learn how to build your Asana content calendar
What Is a Marketing Calendar in Asana and Who Needs It?
A marketing calendar in Asana is a centralized hub where all your content activities such as blog posts, videos, social media campaigns live. Instead of managing each channel in separate spreadsheets, you create individual projects for each content type (blog, social, podcast, video, email) and connect them to one master calendar view.
Who benefits most:
Marketing teams managing 3+ content channels
Remote teams needing shared visibility
Operations managers coordinating cross-functional campaigns
Small businesses scaling their content output
In the early Ditto days (before we rebranded to Cirface), we made the switch from Google Sheets to Asana's content calendar system because we needed real-time updates, task assignments, and automation, all of which are features spreadsheets just can't deliver when you're publishing daily across LinkedIn, YouTube, and other client channels.
Why Use Asana for Your Content Calendar Instead of Google Sheets?
Okay, here’s the thing. Google Sheets works fine for simple lists but it breaks down fast when you're coordinating:
Multiple team members with different responsibilities
Content moving through review stages (draft → edit → approve → schedule)
Cross-channel campaigns that need timeline visualization
Recurring content like weekly newsletters or daily social posts
Asana's advantages with content calendars:
Calendar view shows all deadlines across channels at once
Board view tracks content through production stages (backlog → in progress → published), great when you need to track work and not just ideas
Automation and AI Studio rules move tasks automatically based on status changes
Custom fields tag content by channel, campaign, or content type
Subtasks break down complex content into assignable steps
We have a very lean marketing team here at Cirface (like extremely lean), so our time and resources are pretty limited. However, with our automated workflows for each content streams, we’re able to leverage every valuable minute our team’s time and produce three to four more times of our marketing content compared to competitive teams our size. We've actually cut our content planning meetings in half since implementing this system because everyone can see what's happening without status update requests.
How to Set Up Your Asana Marketing Calendar: Step-by-Step
Below is a comprehensive visual guide that will show you how to build projects for each content type/channel and connect them all to one Marketing Calendar. We've also added a few easy-to-apply automations to streamline your processes and save you time.
Step 1: Create Your Master Marketing Calendar Project
As mentioned earlier, the master Marketing Calendar will be linked to the different marketing activities and content you produce. This becomes your single source of truth where all content from every channel appears in one timeline.
To create your master calendar, apply the following steps:
On the home screen, navigate to the project section on the left bar.
Press “+” icon.
Select “Blank project” from the drop-down menu.
Name your project “Marketing Calendar”.
Pick your team and your preferred privacy setting.
Select “Calendar” as the default view.
Click “Continue”.
Add sections for each marketing activity: Blog, Social Media, Email, Podcast, Video, etc. (Use Tab +N to create sections)

Step 2: Create Individual Projects for Each Content Channel
Now that you have a master calendar to link all your activities, it’s time to start a project for each channel you’ll be posting to.
Example channel projects and their workflows:
Blog Content (draft → edit → source images → schedule → published)
Social Media Posts (ideas → create → review → schedule → posted)
Podcast Episodes (outline → record → edit → publish notes → live)
Email Newsletters (draft → design → test → schedule → sent)
For each project:
Click "+" → Blank project
Name it clearly (e.g., "Social Media Content" not just "Social")
Select Board view as default (easier to see content moving through stages)
Choose a colour and icon that represents the channel
>>Pro tip: Add a Status custom field to each channel project with values like "To Do," "In Progress," "In Review," and "Published." In Calendar view, you can colour-code tasks by status to quickly see where each piece of content is in the workflow. You’ll find it super helpful when scanning your master calendar during weekly planning.
To add status custom fields:
Create a "Status" custom field (if you don’t already have one in your org’s library) with options like: To Do, In Progress, In Review, Published
Add this same field to each channel project for consistency
In Calendar view, colour-code by Status instead of project. This will let you instantly see which posts are stuck in review vs ready to publish
At Cirface, we use status colour-coding during weekly planning to spot bottlenecks (like if 8 blog posts sitting in "In Review", we’ll need more editor capacity).

Step 3: Set Up Each Channel Project with Board Workflows
The Kanban board view is a great way to visualize your work in Asana and get a better understanding of your team’s progress. You can see all the tasks for a project in one place, and you can easily drag and drop them to move them from one stage of the project to the next.
To establish a workflow for each project, list the phases that the content goes through from inception to publishing. Once you lock the process down, label each board in accordance with these phases from start to finish.
For example, your process for your “Blog” project might include:
Backlog (where you add all blog post ideas).
To do.
In progress.
Review
Ready to schedule
Published
Social media workflow:
Ideas
Creating
Needs Approval
Scheduled
Posted
These are just examples; feel free to adapt these to your actual process. For instance, if you don't have a review stage, don't create one. The goal is to reflect reality and not create extra bureaucracy.

Helpful automation rules to add at this stage:
Once your workflow columns are set up, add these rules to eliminate manual work:
Auto-convert to approval task when ready for review
Trigger: Task moved to "Review" section
Action: Convert to approval task and assign to your blog/marketing manager
This creates a proper approval workflow instead of just comments
Auto-complete parent task when all subtasks are done
Trigger: All subtasks marked complete
Action: Mark parent task complete
Saves clicking through each finished piece of content
AI-powered content generation (available for all paid Asana plans)
Trigger: Task created or moved to "In Progress"
Action: Use AI rule to generate first-draft social captions, email subject lines, or blog outlines
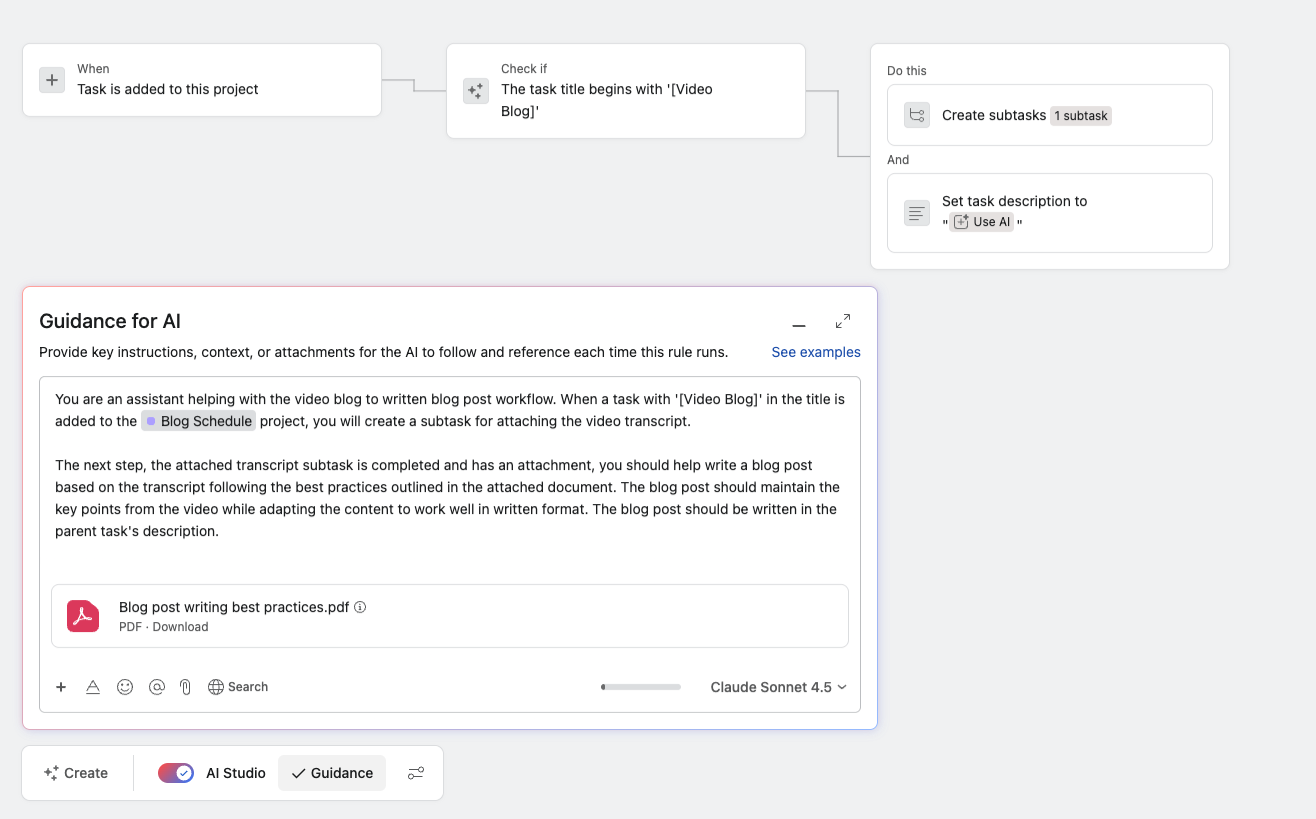
Below is the a screenshot of the AI Studio rule we use at Cirface:
When a video blog task (repurposing our video content) is created, a subtask is automatically created for us to attach the video transcript.
We then attach the transcript and complete the subtask
The completion of the subtask then triggers AI Studio to draft a copy of the blog post in minutes!
These automation rules save our teams hours of content repurposing and manual status updates. Of course, we always put a human in the loop to verify and validate content before anything goes live.
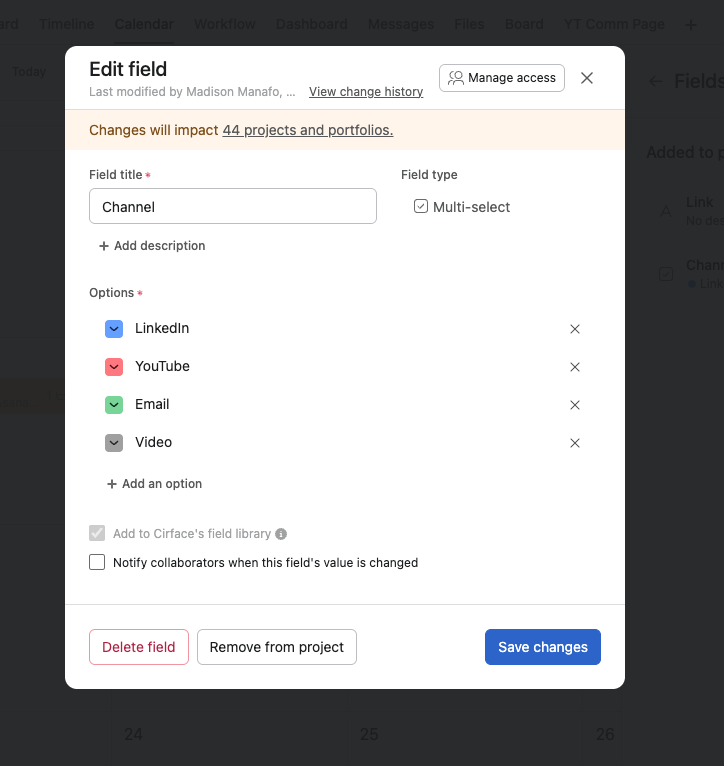
Step 4: Add a "Channel" Custom Field to Tag Content by Platform
If a project handles multiple channels (like "Social Media Posts" covering LinkedIn, Twitter, and Instagram), you need a way to filter by platform. You'll create one custom field called "Channel" with all your platforms as selectable options.
To create your channel field:
Open your project
Click "Customize" in the top right
Select "+ Add Custom Field"
Name it "Channel"
Choose "Single-select" as the field type
Add your platforms as options: LinkedIn, Instagram, YouTube, Email, etc.
Click "Create Field"
Now when you create a task, you can tag it with the specific platform using a dropdown. This makes filtering and reporting much easier such as seeing all Instagram content scheduled for next week, or all LinkedIn posts assigned to you.
Important: This is one field with multiple values, not a separate field for each channel. You're creating a dropdown menu where you pick which channel each piece of content belongs to.
Step 5: Create Content Tasks with Smart Naming
Now comes the fun part: content creation!
You have three ways to create content tasks in Asana, depending on your team size and workflow:
Option 1: Manual task creation (good for small teams or one-off content)
Click "+ Add task" in your project
Fill in details manually each time
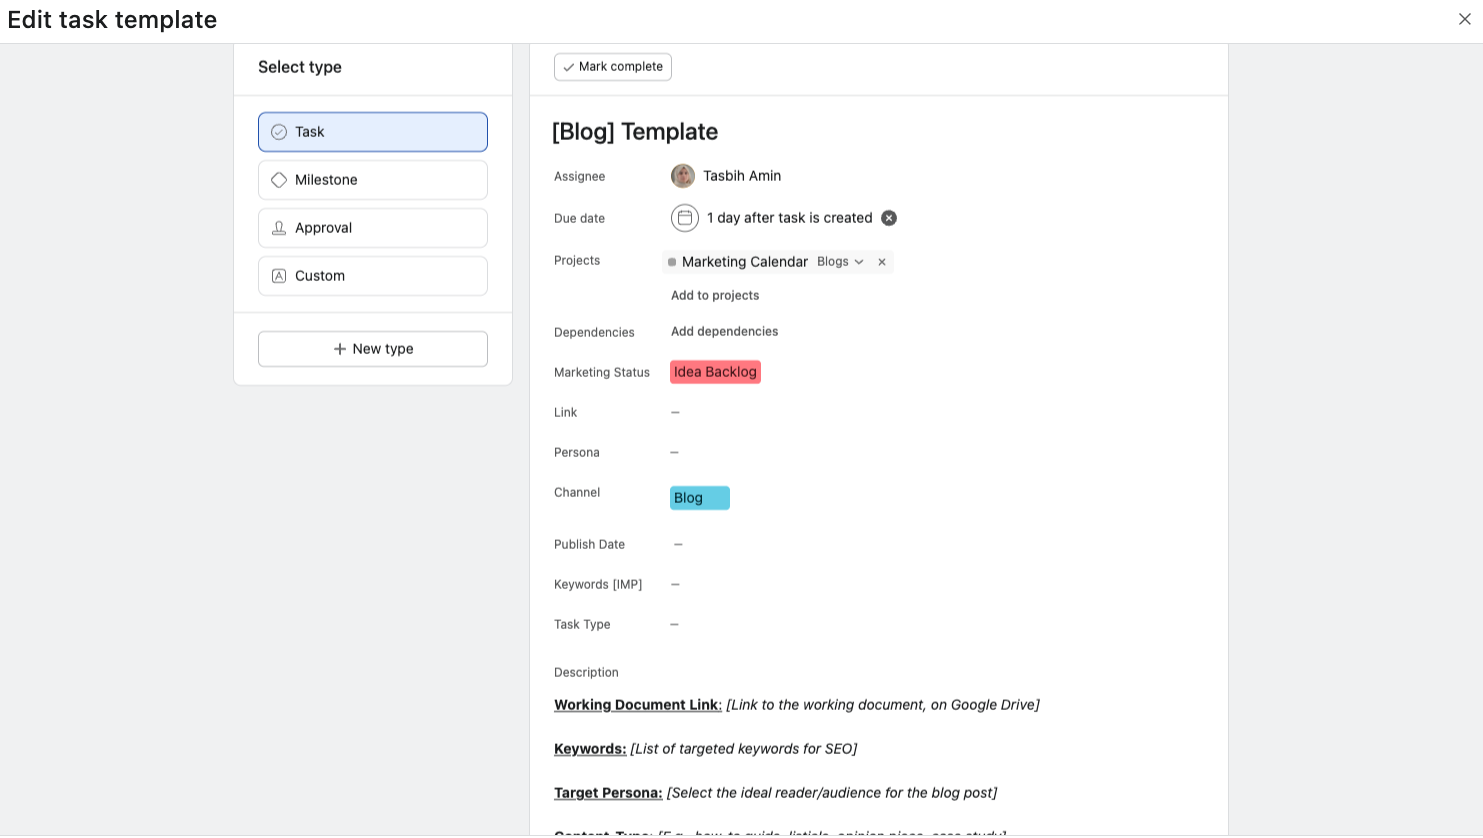
Option 2: Task templates (best for repeatable content like weekly blog posts)
Create a template task with all your standard subtasks, assignees, and fields pre-filled
Each channel project can have its own templates (blog template, LinkedIn template, etc.)
When you need to create content, use the template instead of starting from scratch
Saves 5-10 minutes per task and it ensures nothing gets forgotten
Option 3: Forms (ideal for larger teams or when non-Asana users submit ideas)
Create a Form in your master Marketing Calendar project
Team members or stakeholders fill out the form with content ideas, campaign details, etc.
Form submissions automatically create tasks in the right place
Use automation rules to:
Route tasks to the correct channel project based on form answers
Auto-assign tasks to specific people depending on content type
Create standard subtasks automatically
Set due dates based on "publish date" field in the form
What we do here at Cirface is use a Form for case study content requests. When our sales team submit ideas through the form, tasks automatically land in our master calendar AND get multi-homed to the correct channel project (blog vs social vs video) based on their "Content Type" selection. This eliminates all back and forth of where requests should live.
Naming convention for tasks:
Regardless of how you create them, use this format for consistency:
[Content Type] Channel - Publish Date - Topic
Examples:
[Blog] Website - Feb 15 - Asana Content Calendar[Social] LinkedIn - Feb 10 - Marketing Automation Tips[Email] Newsletter - Feb 12 - Weekly Roundup
What to include in each task:
Description: Content outline, caption, or link to draft
Attachments: Images, videos, or design files
Assignee: Person responsible for publishing
Due date: When it goes live (this makes it appear in the master calendar)
Subtasks (recommended): Break down the work
Example blog post subtasks:
Write draft (assigned to writer)
Source images (assigned to designer)
Review and edit (assigned to editor)
Schedule in WordPress (assigned to writer)
Subtasks let different people own different pieces without confusion about who's doing what.
Step 6: Connect Channel Projects to Your Master Calendar
This is where everything comes together, where you link all your individual content projects to the master calendar.
To connect a project manually:
Open your channel project (e.g., "Blog Content")
Select all tasks (Cmd/Ctrl + A)
Click the clipboard icon at the bottom of your screen
Click "+ Add to project"
Select "Marketing Calendar"
Choose the correct section (e.g., "Blog")
Now every blog task appears in both the Blog Content project AND the master Marketing Calendar. Update it once, it changes everywhere.
Repeat this for each content channel. When you're done, your master calendar will show all content from all channels in one unified timeline.
Or automate this entirely with rules (covered in Step 7 below). If you set up automation, you won't need to manually multi-home tasks and they'll automatically appear in your master calendar the moment they're created. You can also use rules to auto-assign tasks to specific team members based on the channel (e.g., all LinkedIn tasks auto-assign to your social media manager).
Step 7: Automate Task Movement with Rules
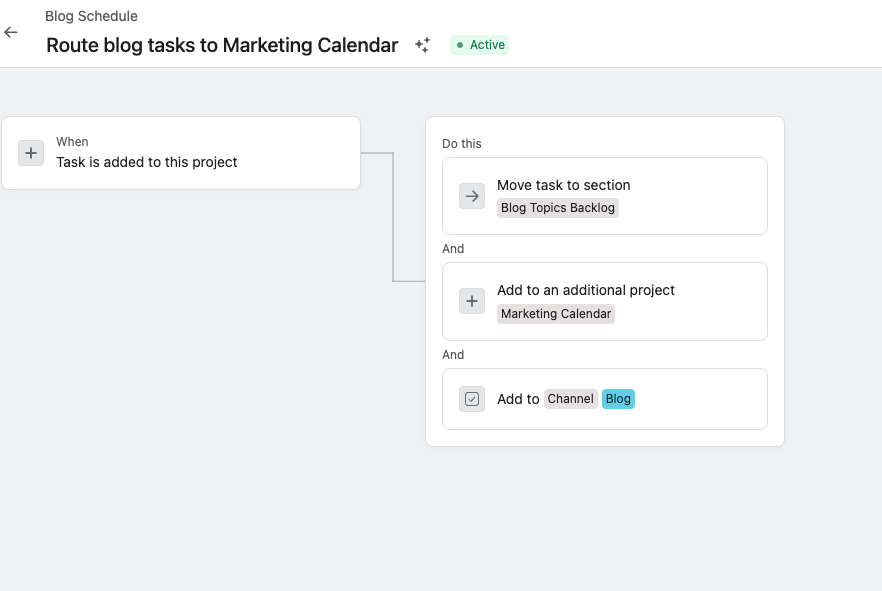
As we say around here, manual work is the enemy of consistency. Set up these automations in one single rule (screenshot below) so tasks flow automatically:
In your channel project, click "Customize" → "Rules"
Click "+ Add rule" → "Create custom rule"
Trigger: When a "Task added to project"
Remove the check if condition, you wont need it.
Action: Then “Move to section Backlog” (or whatever your first column is)
Click the “+” icon in the same action and add select “Move or add to a project”
Choose option “add to additional project” and then choose your project “Marketing Calendar” and the project section (in this example below, it’s blog)
Click the "+" icon again to add the final action
Action: “Change custom field to…”, select your custom field “Channel”
Select: Your channel name (e.g., "Blog" or "LinkedIn")
Finally, name your rule “Add to tasks to Marketing Calendar”
Now when anyone creates a task in your Blog Content project, it automatically:
Lands in the Backlog column
Appears in the Marketing Calendar under "Blog"
Gets tagged with "Blog" as the channel
And just like that, you eliminated manual work!You’ll find this especially helpful when you have multiple team members adding content ideas where everything stays organized automatically.
How Does Asana's Content Calendar Compare to Other Tools?
We tested several content calendar solutions before settling on Asana. Here's how it stacks up:
Marketing Operations Tool Comparison
Compare features for marketing ops teams managing campaigns, creative workflows, and cross-functional projects
| Feature (Marketing Ops Focus) | ✅ Asana (Recommended) | 🌐 Notion | 🌐 Trello | 🌐 CoSchedule | 📊 Google Sheets |
|---|---|---|---|---|---|
| Standardized Intake (Creative/Campaign Requests) | Built-in branching forms that auto-create and route tasks. | Requires 3rd-party integrations (like Tally) or manual entry. | Requires 3rd-party Power-Ups for robust forms. | Built-in request forms (on higher-tier plans). | Google Forms integration (creates rows, not actionable tasks). |
| Automated Approvals & Handoffs | Native "Approval" task types + unlimited multi-step routing automations. | Strong database automations, but lacks native "Approval" states. | Powerful "Butler" automations, but no native approval states. | Good task templates, but workflow routing is more rigid. | Requires manual status updates or 3rd-party tools (Zapier/Make). |
| Asset Proofing & Feedback | Native proofing (leave actionable comments directly on images/PDFs). | Embeds files beautifully, but lacks on-image proofing tools. | Standard file attachments only. | Connects to asset folders, lacks deep native proofing. | Not designed for file storage or visual feedback. |
| Cross-Functional Capacity Planning | Universal "Workload" view to prevent designer/writer burnout across all projects. | No native resource management or capacity planning views. | Requires specialized Power-Ups to track team capacity effectively. | Team performance tracking, but limited macro-capacity planning. | Highly manual to track resource hours and availability. |
| Macro Campaign Visibility (For Leadership) | Portfolios & Goals: Rolls up multiple campaigns into executive dashboards. | Requires complex, manual database rollups to mimic portfolios. | Workspace Dashboards available, but lacks deep cross-board goal tracking. | Excellent single calendar view, but weaker for non-content campaigns. | Requires building complex, manual pivot tables and dashboards. |
Sources & Notes
- Feature comparison based on Cirface team testing across all platforms (January-February 2025)
- Asana features verified via official documentation: asana.com/features
- Notion capabilities: notion.so/product
- Trello Power-Ups and Butler automation: trello.com/power-ups
- CoSchedule marketing features: coschedule.com/marketing-suite
- This comparison focuses on marketing operations workflows including creative requests, approvals, asset proofing, and cross-functional capacity planning
Needless to say, Asana is a winner in our eyes for marketing teams managing multiple content channels because of the combination of calendar views, automation rules, and project interconnectivity. If you need a wiki alongside your calendar, Notion works. If budget is tight and you only have 1-2 channels, Trello's free plan is sufficient.
What Are the Pros, Cons, and Best Use Cases for Asana Marketing Calendars?
Pros
Unified visibility across channels Instead of checking five different tools, everything lives in one master calendar. This is huge when you're running integrated campaigns across blog, social, email, and paid ads.
Automation reduces busywork Rules handle repetitive tasks like moving content through stages, assigning reviewers, and updating status. We estimate this saves our team 5-10 hours per week across all projects.
Flexible views for different needs Marketing managers love the calendar view for deadline planning. Content creators prefer board view to see what's in progress. Everyone's happy because Asana lets them work in their preferred format.
Scales with team growth Started solo, now have a team of five. Same system still works—we just added more assignees and refined our workflows. No migration pain.
Cons
Learning curve for new users Asana has a lot of features, which means it takes time to learn. Budget 2-3 hours for team onboarding and expect questions in the first week. (We created a quick-start template to help, but still—not as intuitive as Google Sheets.)
Limited native social media integrations You can't schedule posts directly to LinkedIn or Instagram from Asana. You'll still need Buffer, Hootsuite, or Later for actual publishing. Asana handles planning and approval only.
Can get cluttered without discipline If people don't follow your naming conventions or tag content properly, the calendar becomes messy fast. You need someone (even if it's just you) to maintain standards.
Free plan limits Timeline view, custom fields, automation rules, and calendar integration are only available on paid plans ($10.99/user/month). For serious content operations, you'll need to budget for this.
🎯 Best Use Cases
Perfect for:
Marketing teams with 3+ active content channels
Agencies managing multiple client calendars
Companies running integrated campaigns (paid + organic + email)
Remote teams needing asynchronous collaboration
Operations managers who need reporting and oversight
Not ideal for:
Solo creators publishing only to 1-2 channels (overkill, just use Trello or Notion)
Teams already invested in another ecosystem (like Monday.com or ClickUp)
Very simple content needs (weekly blog posts only, just use Google Calendar)
Frequently Asked Questions
What's the difference between a content calendar and an editorial calendar in Asana?
They're essentially the same thing, where both refer to planning and scheduling content. "Editorial calendar" is more commonly used for blog and publication content while "content calendar" covers all marketing channels including social media, video, and email. In Asana, you'd set up the exact same structure for both.
Can I create a reusable content calendar template in Asana?
Yes. Once you've built your master marketing calendar and channel projects with all the sections, custom fields, and automation rules, you can save it as a template. Go to your project name and click the down arrow → "Save as template." This is perfect if you're managing multiple clients or want to duplicate your setup for different teams.
How do I share my Asana marketing calendar with clients or external contractors?
Add them as guests to your Marketing Calendar project. They'll see only that project (not your entire workspace) and can view tasks, comment, and upload assets. Go to the "Share" button in your project → Add their email → Select "Guest" as the permission level. Guests are free and don't count toward your paid user limit.
Does Asana integrate with social media scheduling tools?
Not natively. Asana doesn't post directly to LinkedIn, Instagram, or Twitter. However, it integrates with Zapier, which connects to most scheduling tools (Buffer, Hootsuite, Later, Sprout Social). You can set up automation where tasks marked "Ready to Schedule" in Asana trigger draft creation in your scheduling tool. It's a two-tool workflow, but it works.
Can I see which team member is overloaded with content tasks?
Yes, use Asana's Workload view (available on Advanced plans and up). It shows how many tasks each person has assigned across all projects, broken down by estimated time. We use this during weekly planning to redistribute work if someone's calendar is too packed. It's a lifesaver for preventing burnout.
What happens if I delete a task from the master marketing calendar?
It disappears from the master marketing calendar and all projects it’s multi-homed in to.
How do I track content performance and metrics in Asana?
Asana isn't an analytics tool, so you won't get traffic or engagement stats natively. What you CAN do is add custom fields for metrics like "Page Views," "Engagement Rate," or "Conversions," then manually update them after publishing (and create dashboards using these custom fields). Or integrate Asana with Google Analytics via Zapier to auto-populate basic metrics. We track high-level performance in Asana but do deep-dive analysis in dedicated tools like Google Analytics or HubSpot.
Can I automate recurring content in Asana (like weekly newsletters)?
Absolutely. When creating a task, click the due date → "Set to repeat" → Choose your frequency (daily, weekly, monthly). The task will automatically duplicate on your chosen schedule with the same assignee, description, and subtasks. This is perfect for newsletters, weekly social posts, or monthly blog roundups.
Bottom Line: Is Asana Worth It for Your Marketing Calendar?
If you're managing marketing content across multiple channels with a team then yes, Asana's content calendar system is worth the investment. The combination of unified visibility, workflow automation, and flexible views makes content operations significantly smoother than juggling spreadsheets or disconnected tools.
You should use Asana if:
You publish to 3+ platforms regularly (blog + social + email + video)
Multiple people contribute to content creation and approval
You need to see all marketing activities in one master timeline
You want automation to reduce manual task movement and status updates
Stick with simpler tools if:
You're a solo creator publishing to 1-2 channels (Trello or Notion will do fine)
Your content calendar is very straightforward with no approval workflows
Budget is extremely tight and you can't justify $10.99/user/month
At Cirface, this system has become the backbone of our content operations. We plan email campaigns, manage our own blog and social posting, and coordinate with partner teams (sales, delivery) all from one master calendar. The setup takes an afternoon (or a day based on your familiarity with the tool), but the time saved on coordination and status updates pays that back in the first month.
Your Turn
A master marketing calendar is a great way to keep track of your marketing initiatives and ensure that nothing falls through the cracks. With Asana, you can easily streamline your content creation processes, align your team and stay on top of all your marketing activities.
Don’t know where to start? Book a call with us to help you and your marketing team set up your Asana the right way!