
Asana approvals: best practices to keep reviews moving
Asana approvals exist to do one simple thing: let someone say yes, no, or not yet so work can keep moving.
In practice, Asana approvals are where work gets stuck, ownership gets fuzzy, and teams lose time chasing updates.
A budget needs sign-off before work starts. A campaign needs review before it goes live. A creative asset needs feedback before it gets delivered. A leadership team wants visibility into what is waiting, what is approved, and what came back with changes.
After helping teams build approval workflows in Asana across a lot of different use cases, I have found the real questions are practical ones.
How do you structure approvals? How do you automate them? How do you keep them reportable without creating more mess? Let's walk through the setups that work best.
What makes an approval task different from a regular task in Asana?
Asana has a dedicated task type for approvals.
Instead of a regular task being simply complete or incomplete, an approval task gives the assignee a defined outcome such as:
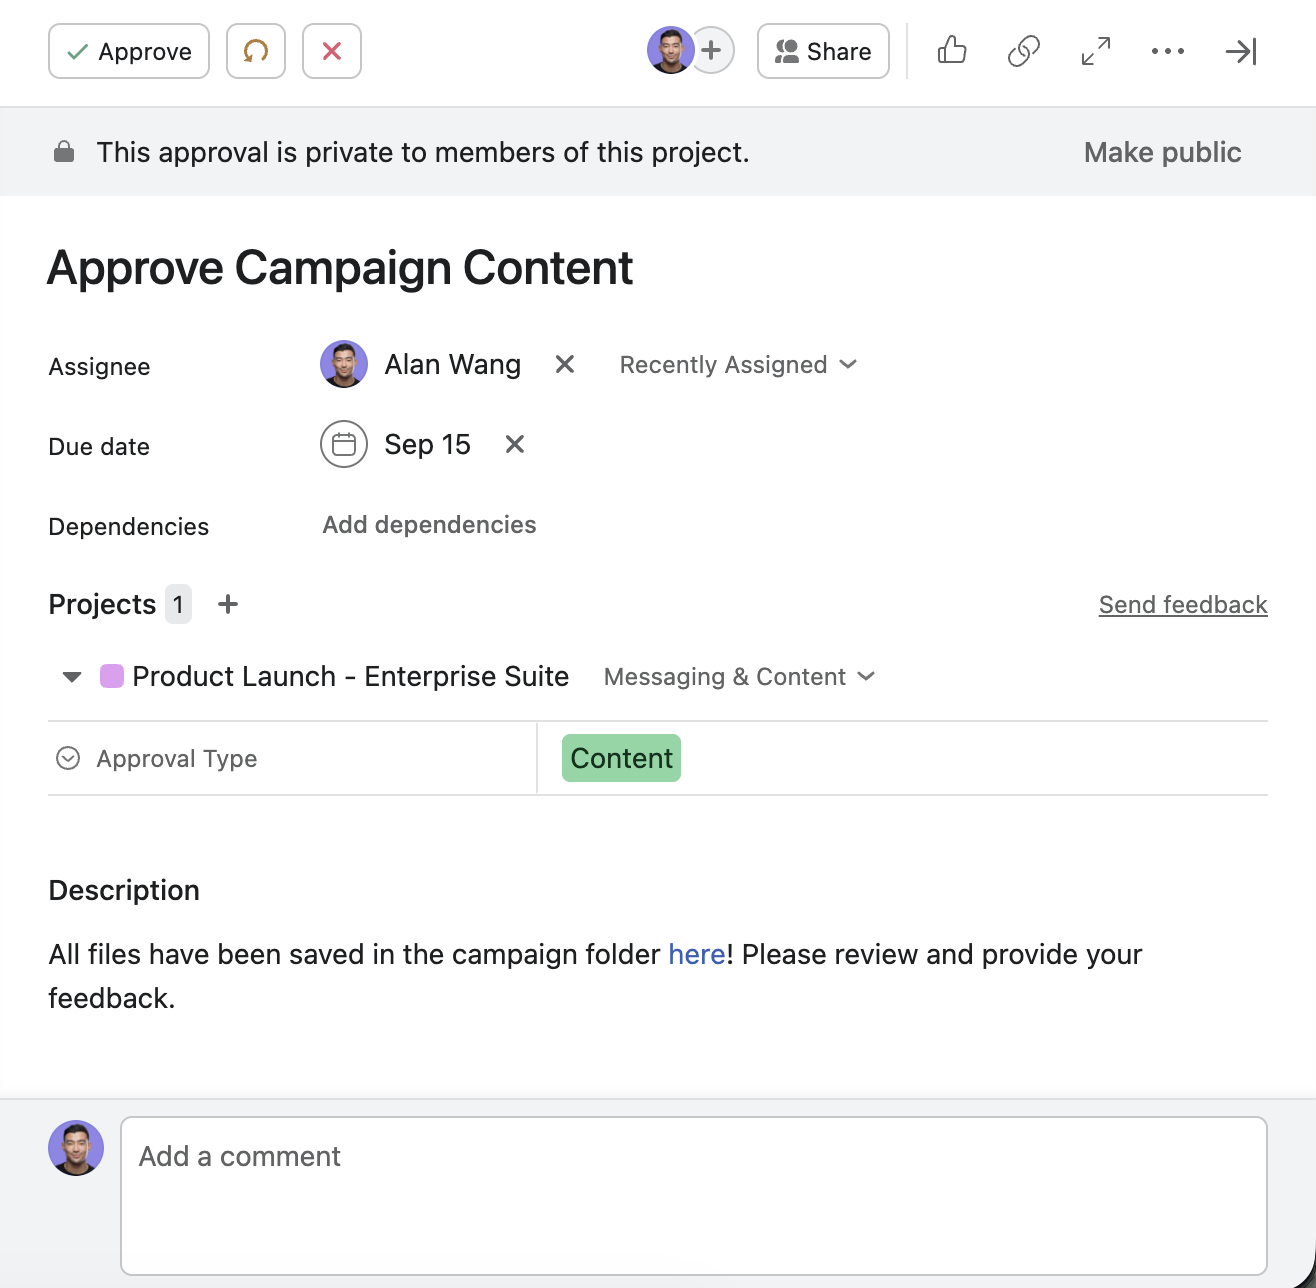
Approved
Changes requested
Rejected
The important operational detail is this: once the approver selects any of those outcomes, Asana considers the approval task complete.
That matters more than most teams realize.
It affects:
rule behavior
project filtering
reporting logic
any workflow that depends on task completion as a trigger
If your team misses that point, it is very easy to build automations that look right at first, but break the minute someone clicks Changes requested.
Choose the right Asana approval model
The best setup depends on the kind of workflow you are managing.
In my experience, most teams fall into one of these two buckets:
Deadline-driven projects with defined phases
Ongoing request workflows where review happens repeatedly
The structure should match the reality of the work.
For structured, deadline-driven projects, use approvals as their own tasks
If your project has clear phases and dependencies, approval steps usually work best as dedicated tasks in the plan.
Think about a launch project with work like this:
Prepare budget
Approve budget
Lock vendor spend
Launch campaign
In that kind of setup, the approval should not be hidden inside the work. It should be visible as its own step, connected by dependencies.
For example, Approve budget can remain blocked until Prepare budget is complete. Once the budget is ready, the approval task becomes actionable.
This structure works well because it:
makes the approval visible on the timeline
gives the approver a clear due date
helps project managers see whether the hold-up is execution or sign-off
makes it easier to automate what happens next

Watch out for dependencies with native approval tasks
There is an important caveat when using dependencies with native approval tasks in this kind of setup.
Because Asana marks an approval task as complete regardless of the outcome, any task that depends on the approval will be unblocked whether the result is Approved, Changes requested, or Rejected.
In the example above, if Lock vendor spend depends on Approve budget, it will become unblocked even if the approver selects Changes requested. That is usually not the behavior teams intend.
A safer pattern is to have the execution task block the approval task, but not have the approval task blocking the next execution step. That way, the approval cannot start before the work is ready, but it does not create misleading unblocks downstream.
For dependency-heavy workflows, consider a custom task type
If your project relies heavily on dependencies, a custom task type can be a stronger choice than a native approval task.
With a custom task type, you define the exact statuses you need and control which ones count as incomplete and which count as complete. For example, you could set Changes requested and Rejected as incomplete statuses and Approved as the only completed status.
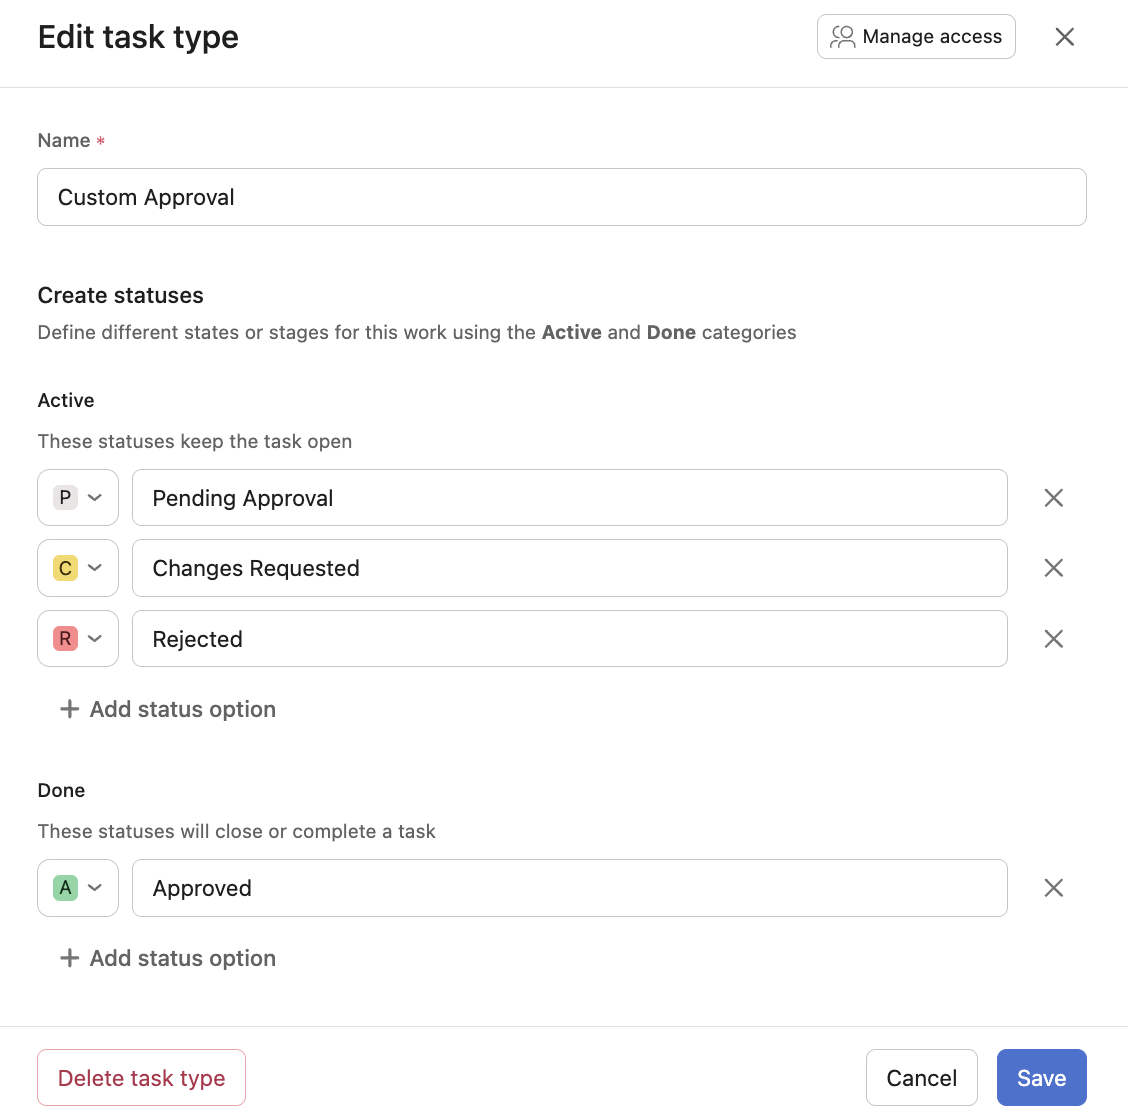
That means dependencies behave more predictably. If Task A blocks Task B, and Task B is a custom-typed approval, Task C will only be unblocked when Task B reaches Approved. A result of Changes requested keeps the task incomplete and the dependency chain intact.
This is especially useful in phased projects where the sequence of work matters and a premature unblock could cause real problems.
Using Asana rules automation to move the workflow forward
Once the approval status changes, you can use rules to push the workflow forward.
If the task is approved, you might:
Create summary of the task history
notify the next assignee
move the task or project item forward
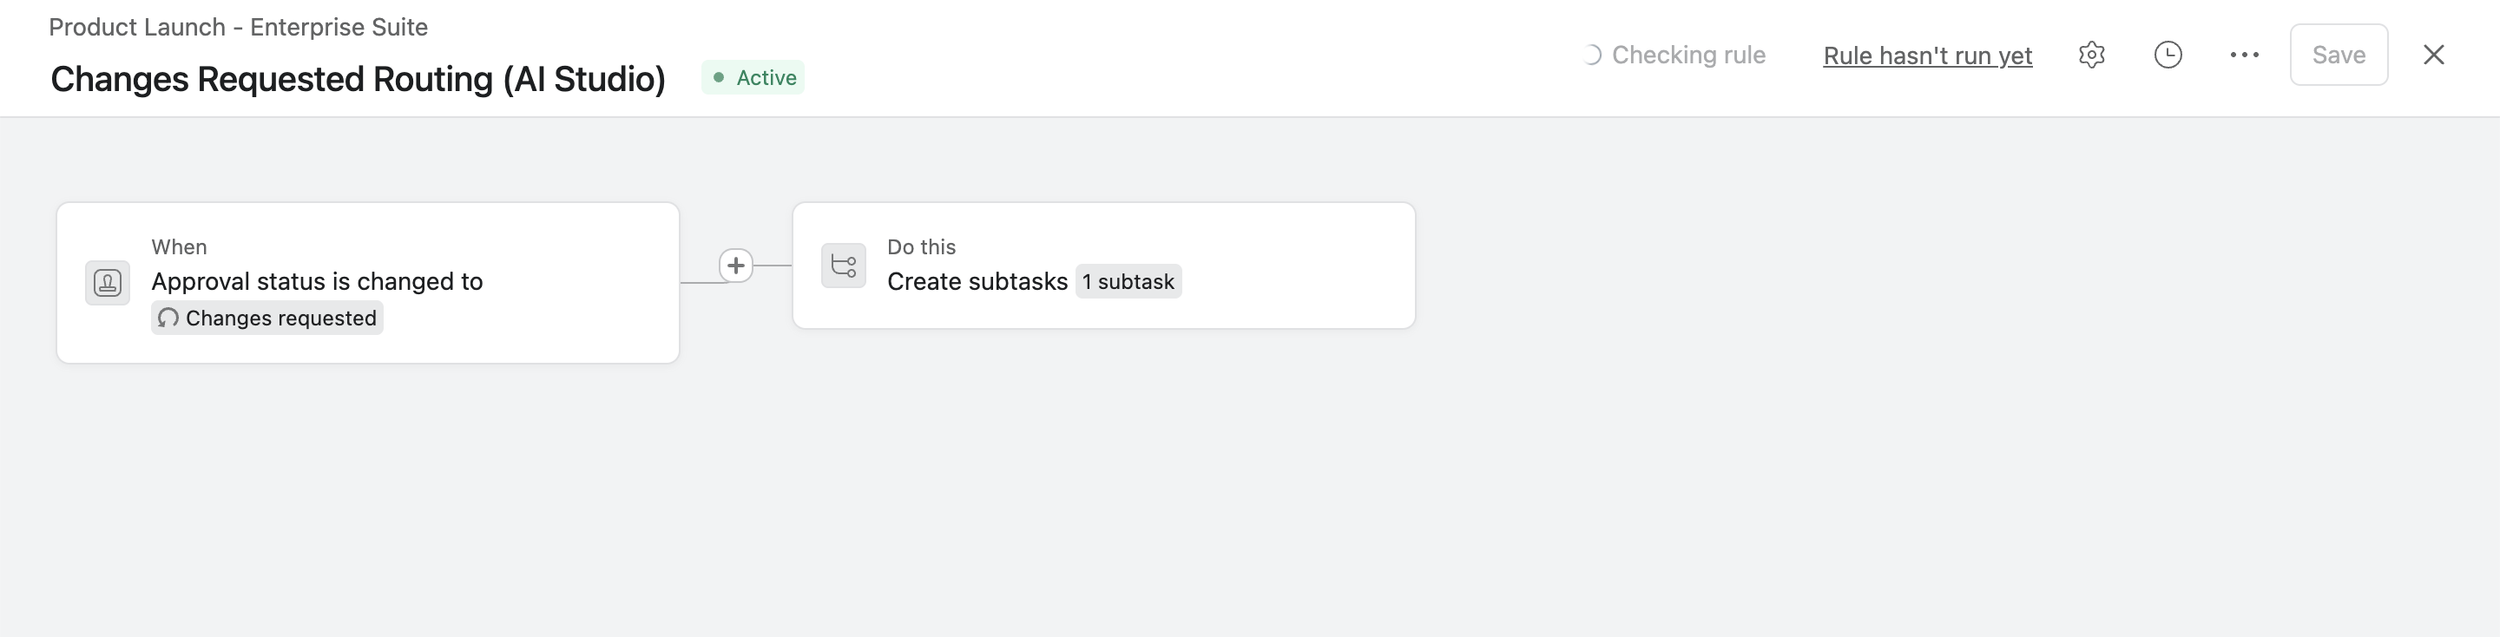
If changes are requested, you might:
post a fixed comment telling the executor to review feedback
create a subtask for the executor to implement changes
How to automate who handles changes requested
This is where teams often hit a practical snag.
Creating the follow-up task is easy. Assigning it to the right person is where the workflow gets more interesting.
There are two common ways to handle that.
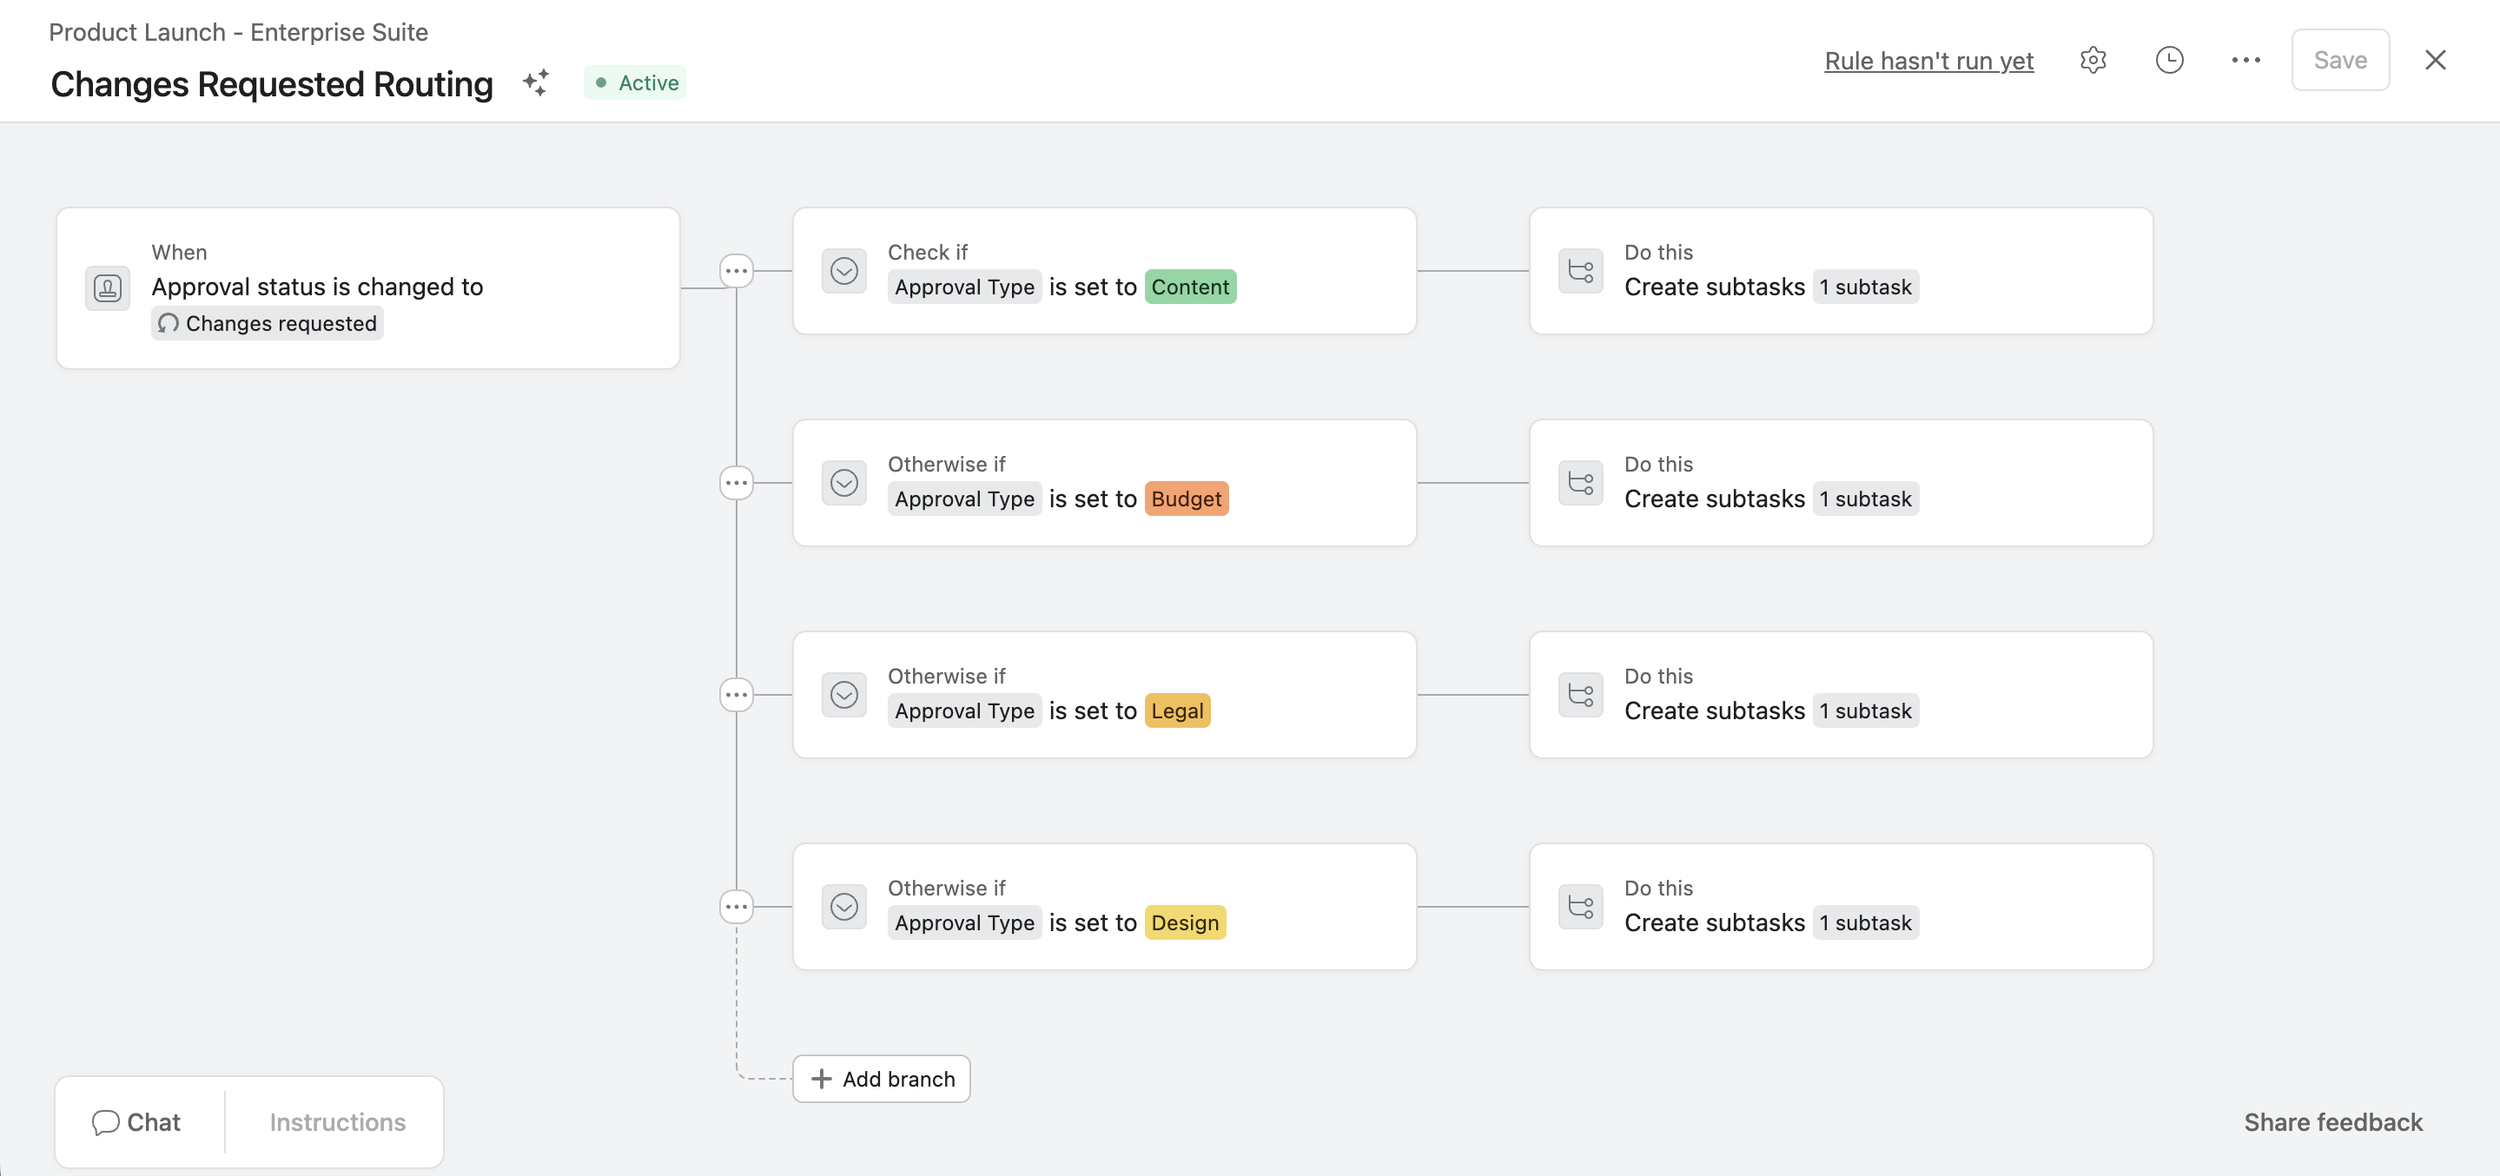
Option 1: Use a custom field when the routing is predictable
If your approval logic follows stable rules, use a custom field.
For example, imagine a shared project that manages different kinds of approvals:
content
budget
legal
design
You could add a single-select field called Approval type and use it to route the follow-up work.
So if:
Approval type = Content, assign the changes task to the marketing specialist
Approval type = Budget, assign it to finance
Approval type = Design, assign it to the designer
This is simple, reliable, and easy to maintain.
Option 2: Use Asana AI Studio when the right assignee depends on context
Sometimes the routing logic is not fixed.
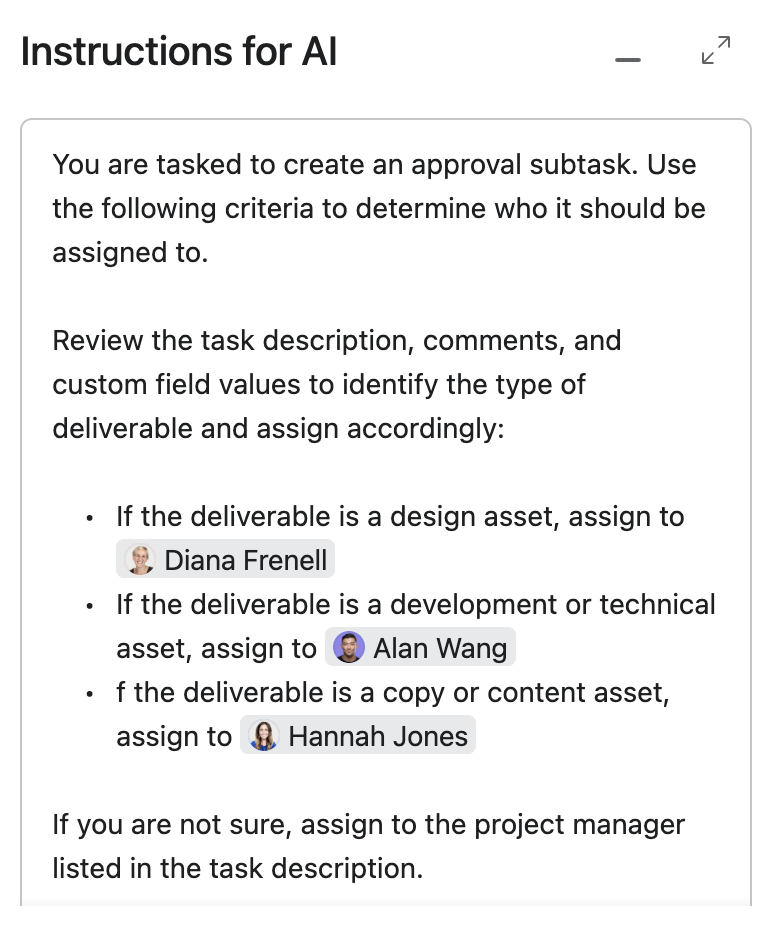
Maybe the right person depends on who completed the previous task, who owns that kind of deliverable, or how the team currently splits work. In that case, AI Studio can be useful inside the workflow.
This is a good fit when you want the rule to interpret task context and make a smarter routing decision instead of relying on one static condition.
For example, AI Studio can read information within the task, such as the description, comments, or custom field values, and use that context to determine who should handle the revision.
That gives you more flexibility, especially in cross-functional workflows where the right assignee is not always the same person.
For ongoing work, decide whether the approval lives on the main task or as a subtask
Now let’s look at a different kind of workflow.
Imagine a creative production process where a designer finishes an asset, a senior manager reviews it, then the final files are delivered to the requester. This review may happen over and over again across many incoming requests.
In these workflows, teams usually choose one of two patterns.
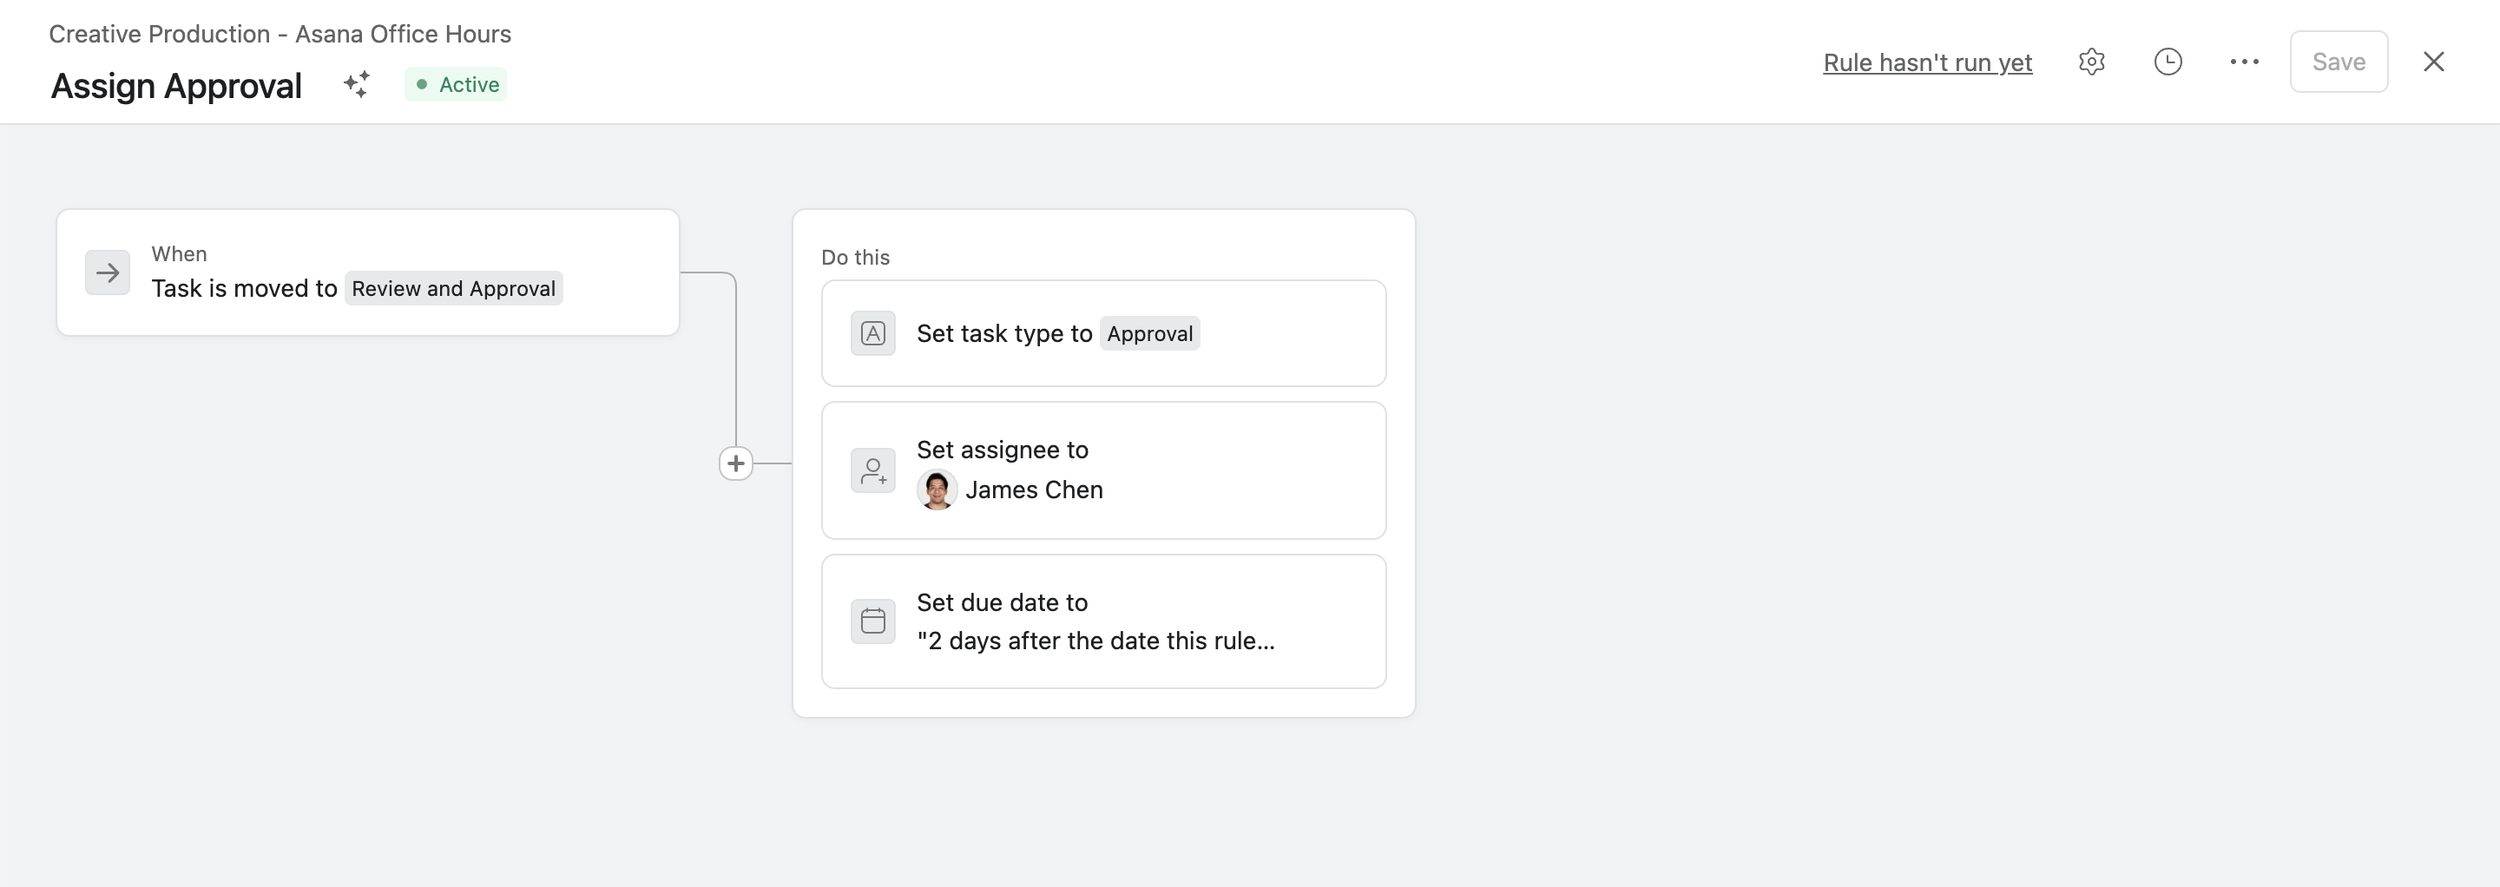
Option A: Convert the main task into an approval task
This is one of the most straightforward setups.
When the task moves into In review, or when a status field changes, a rule converts the task into an approval and assigns it to the approver.
This works well because:
it is simple for the team to follow
the item stays in one place
approval status changes can trigger next actions quickly
A common flow looks like this:
Designer finishes the work
Task moves to In review
Task becomes an approval and gets assigned to the reviewer
Reviewer selects Approved or Changes requested
A rule moves the task to the next step
If changes are requested, the task can be converted back into a regular task, reassigned to the person doing the work, given a due date for revisions, and moved back into In progress or Changes needed.
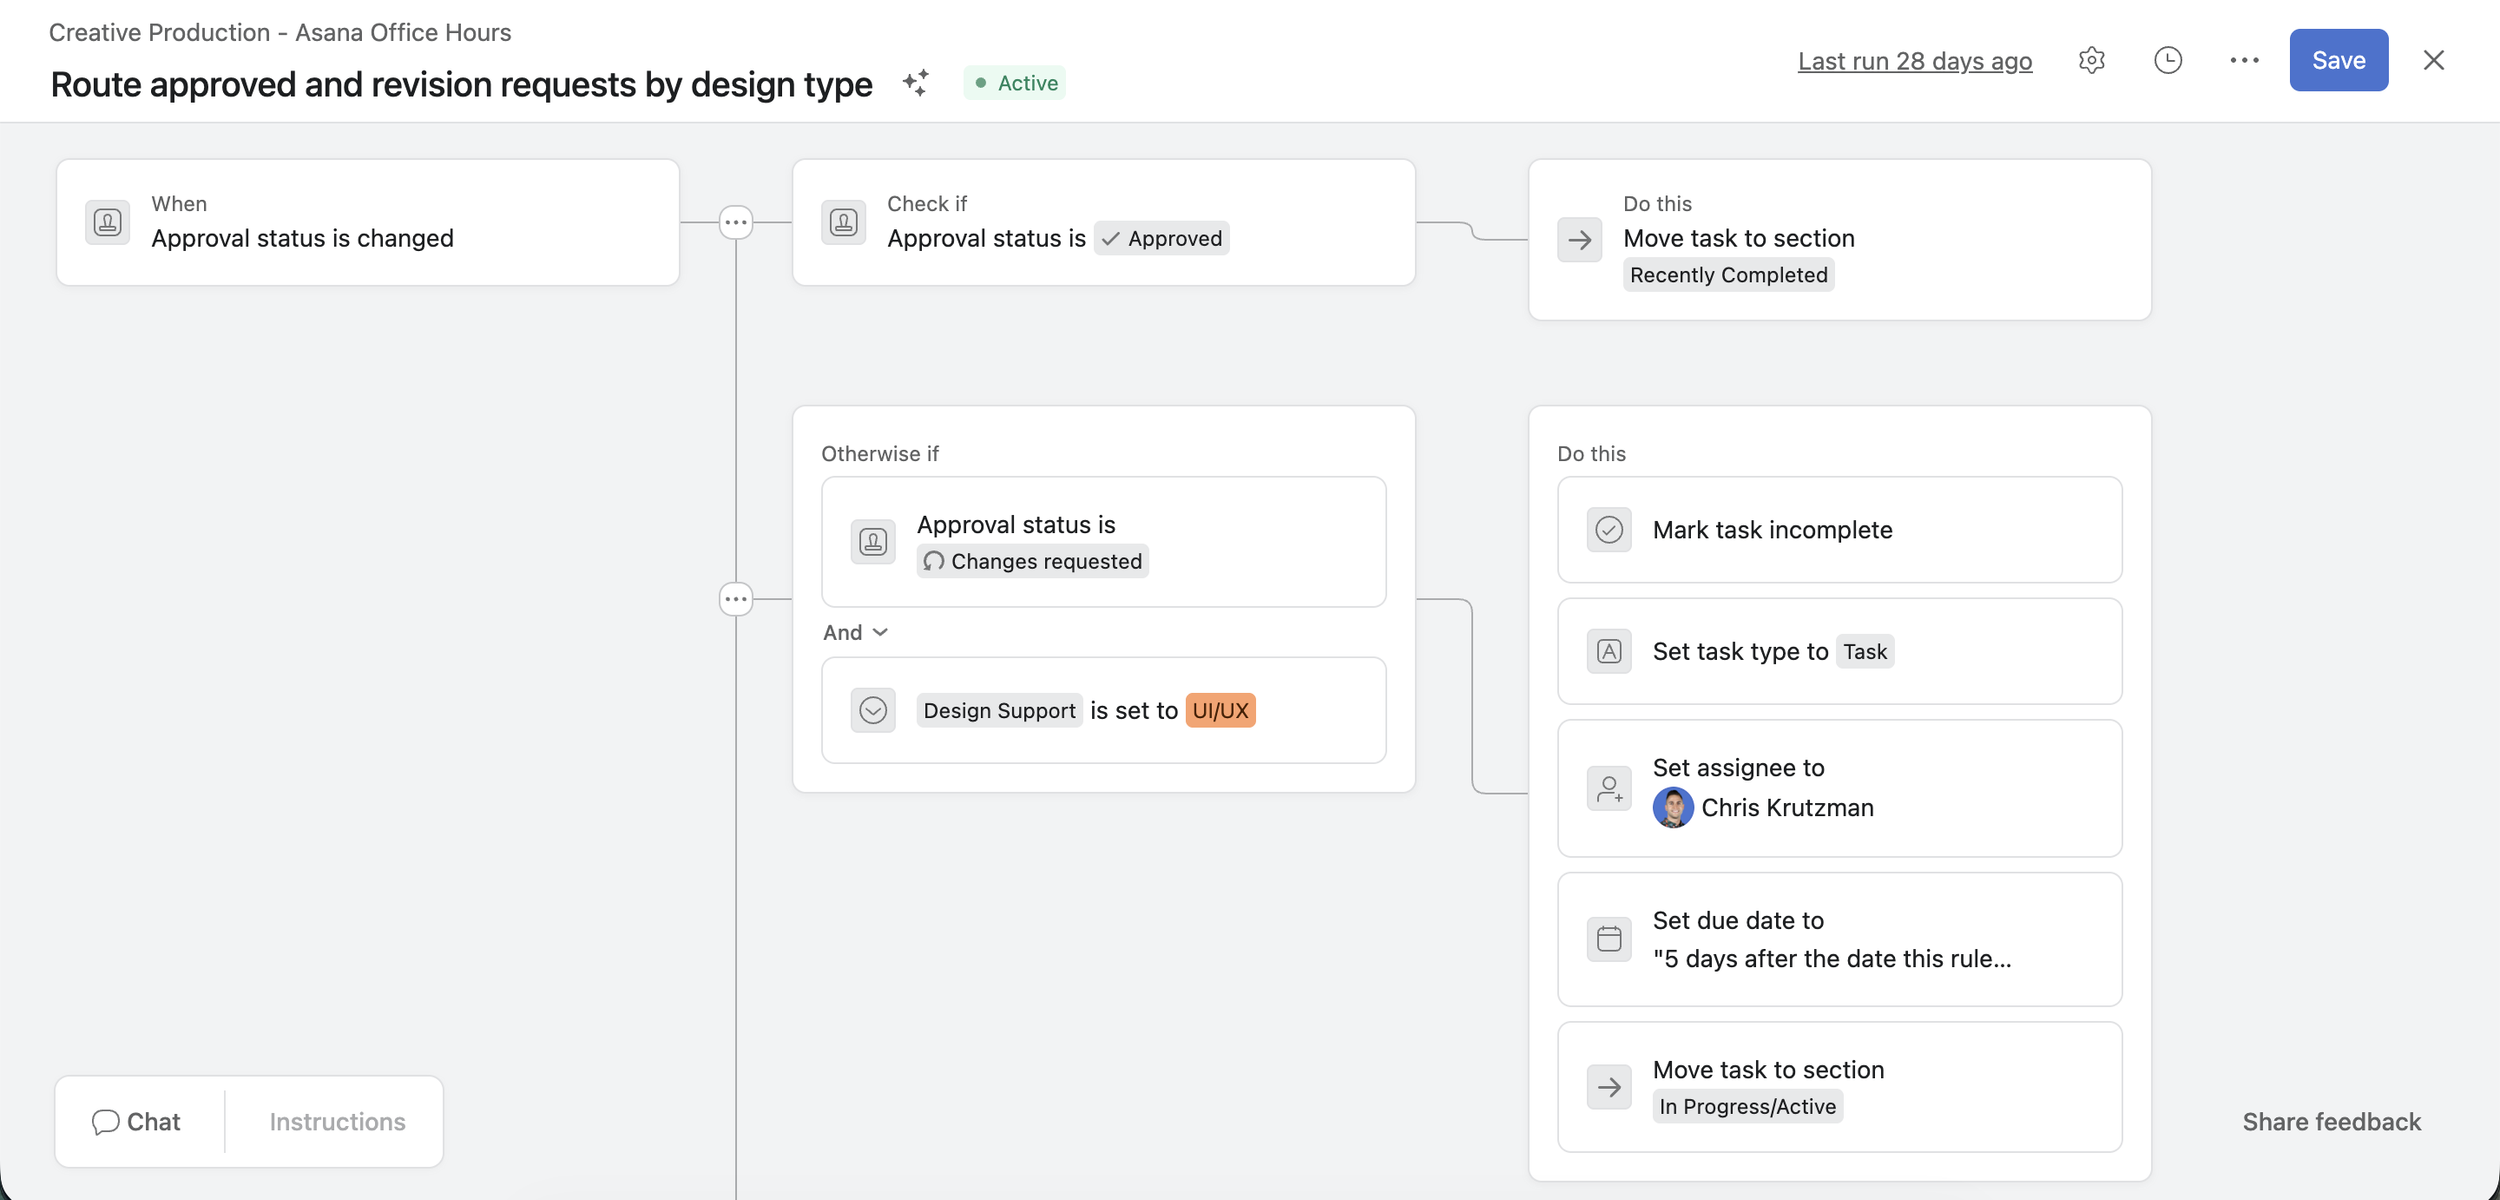
Once the revision is ready, the task goes back to In review and becomes an approval again.
The limitation of this setup
The biggest drawback is reporting.
If you want to know how many approval rounds happened on a given request, that is harder to see at a glance. The task history will show it, but it is not naturally packaged into an easy report unless you add more workflow structure.
So this setup is great for operational simplicity, but weaker when you need detailed round-by-round approval reporting.
Option B: Create approval subtasks
The second pattern is to create approval subtasks under the main work item.
This is especially useful when teams want a visible record of each review cycle.
For example:
parent task = Produce landing page banner
subtask 1 = Approval round 1
subtask 2 = Approval round 2
subtask 3 = Final approval
This makes the review history easier to spot. It can also be helpful when several rounds of approvals are normal and you want that pattern to be explicit.
The catch with approval subtasks
There is an important workflow caveat here.
If you use a rule triggered by approval status changed, that action applies to the approval subtask itself. It does not automatically manage the parent task the way many teams expect.
There is another common trap.
A lot of teams use rules like:
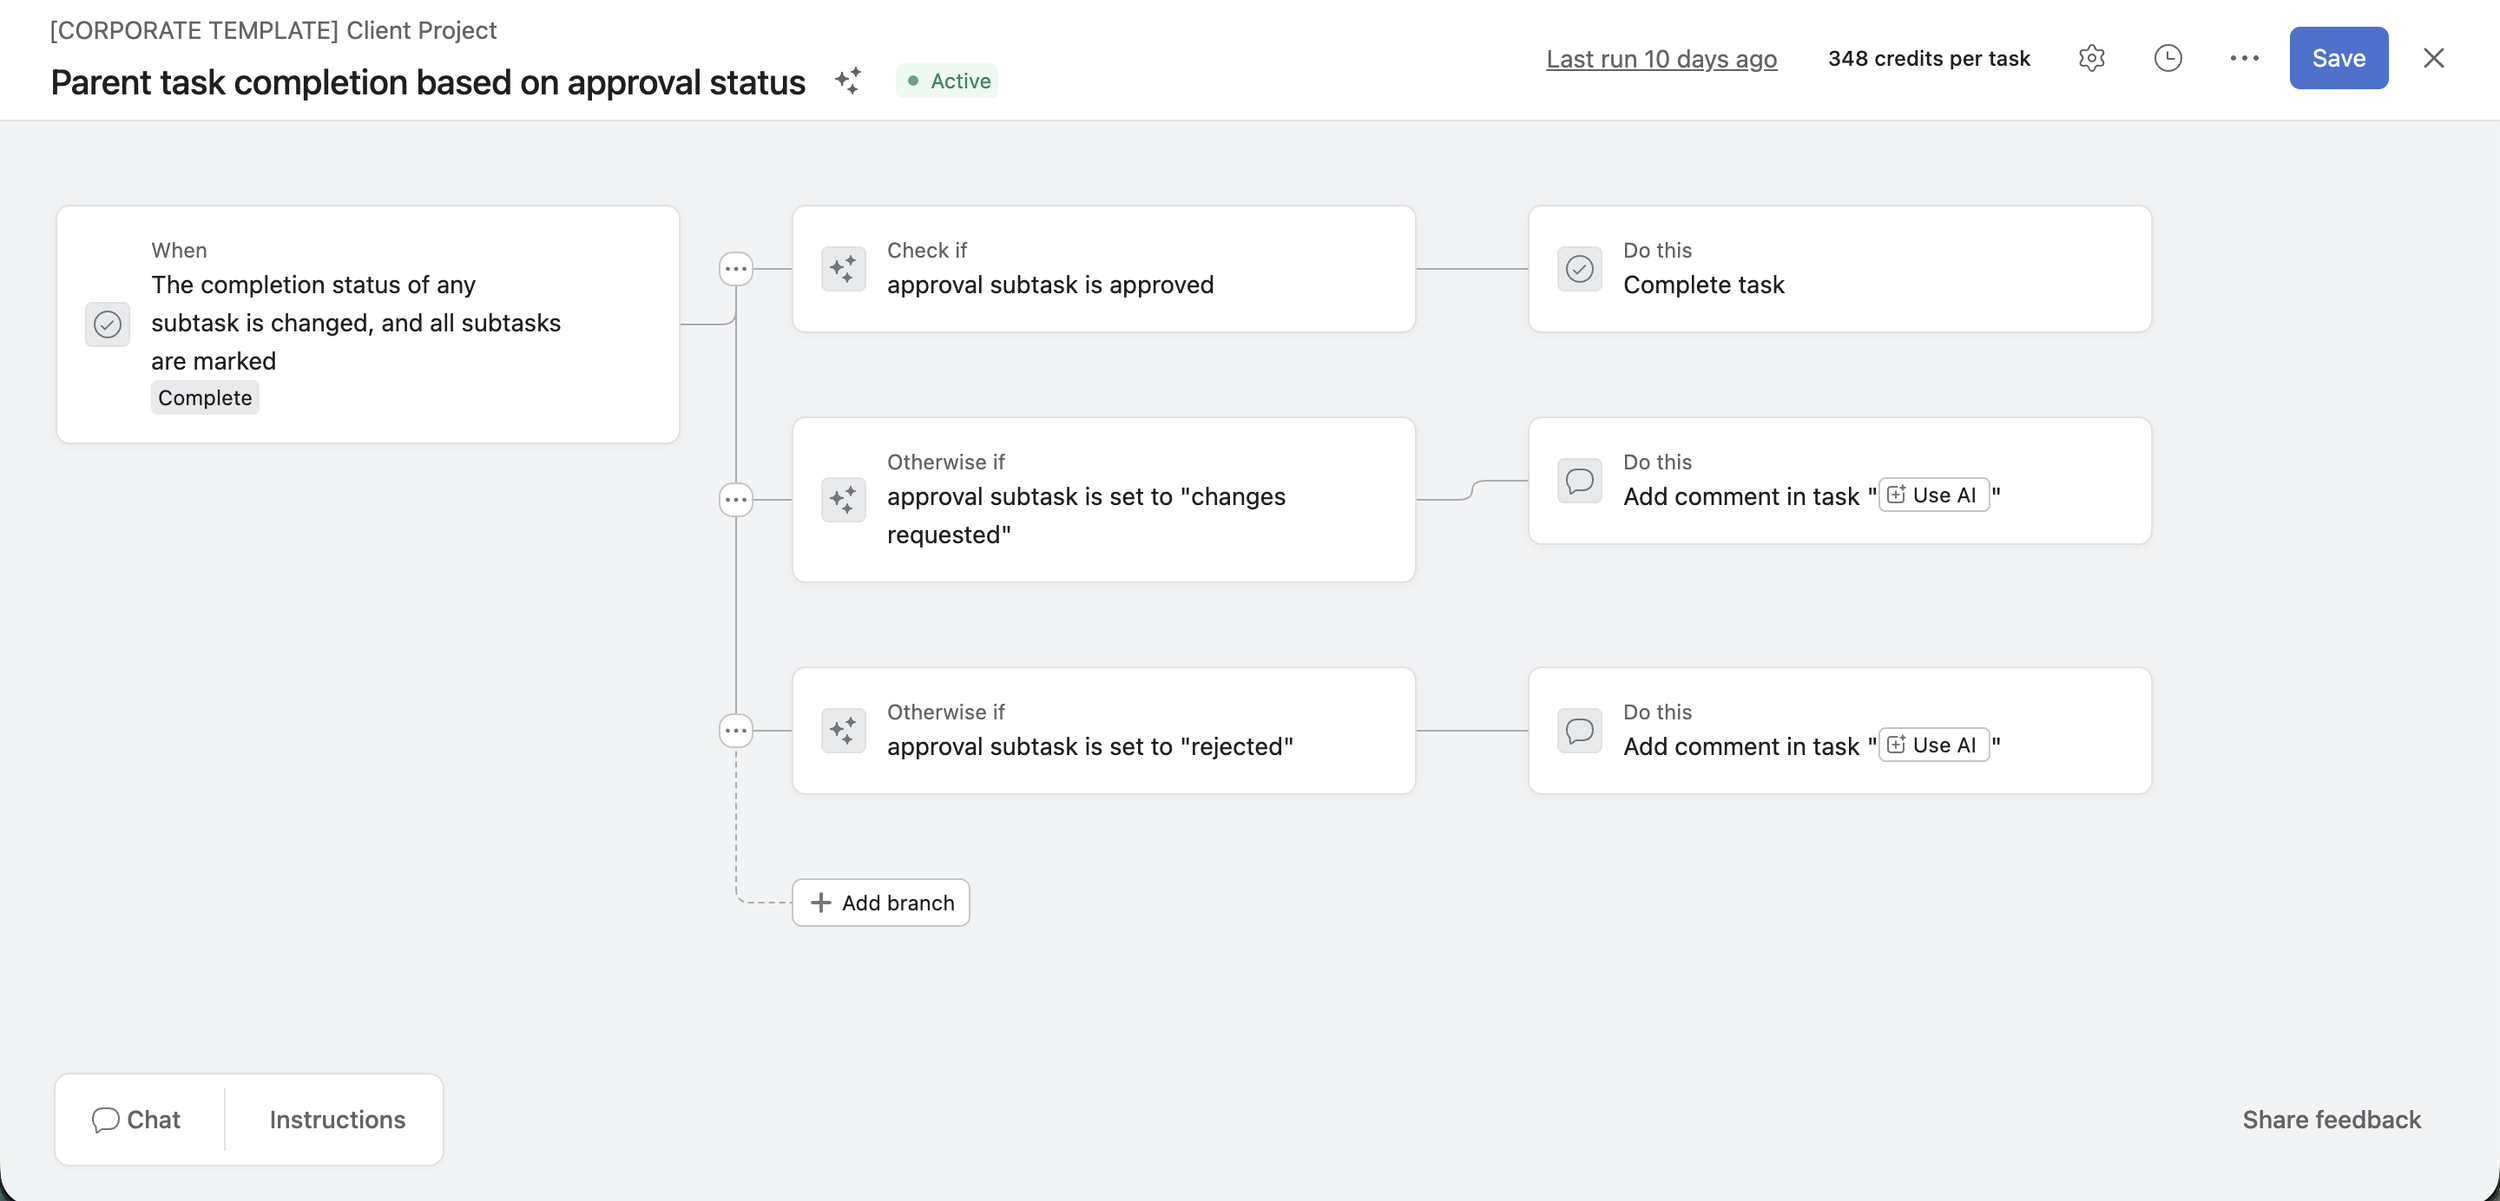
When all subtasks are completed → complete parent task
That can work in some workflows, but with approval subtasks you have to be careful because Changes requested and Rejected also count as completed approval tasks.
So if your workflow says, “all subtasks completed means the parent is done,” you can accidentally complete the parent even when the approval outcome was not actually approved.
That is why this setup works best when you add an extra layer of logic to make sure the parent task only advances when the approval result is genuinely Approved.
For example, you might use AI Studio to inspect the approval subtask result and only update the parent task when the outcome is Approved.
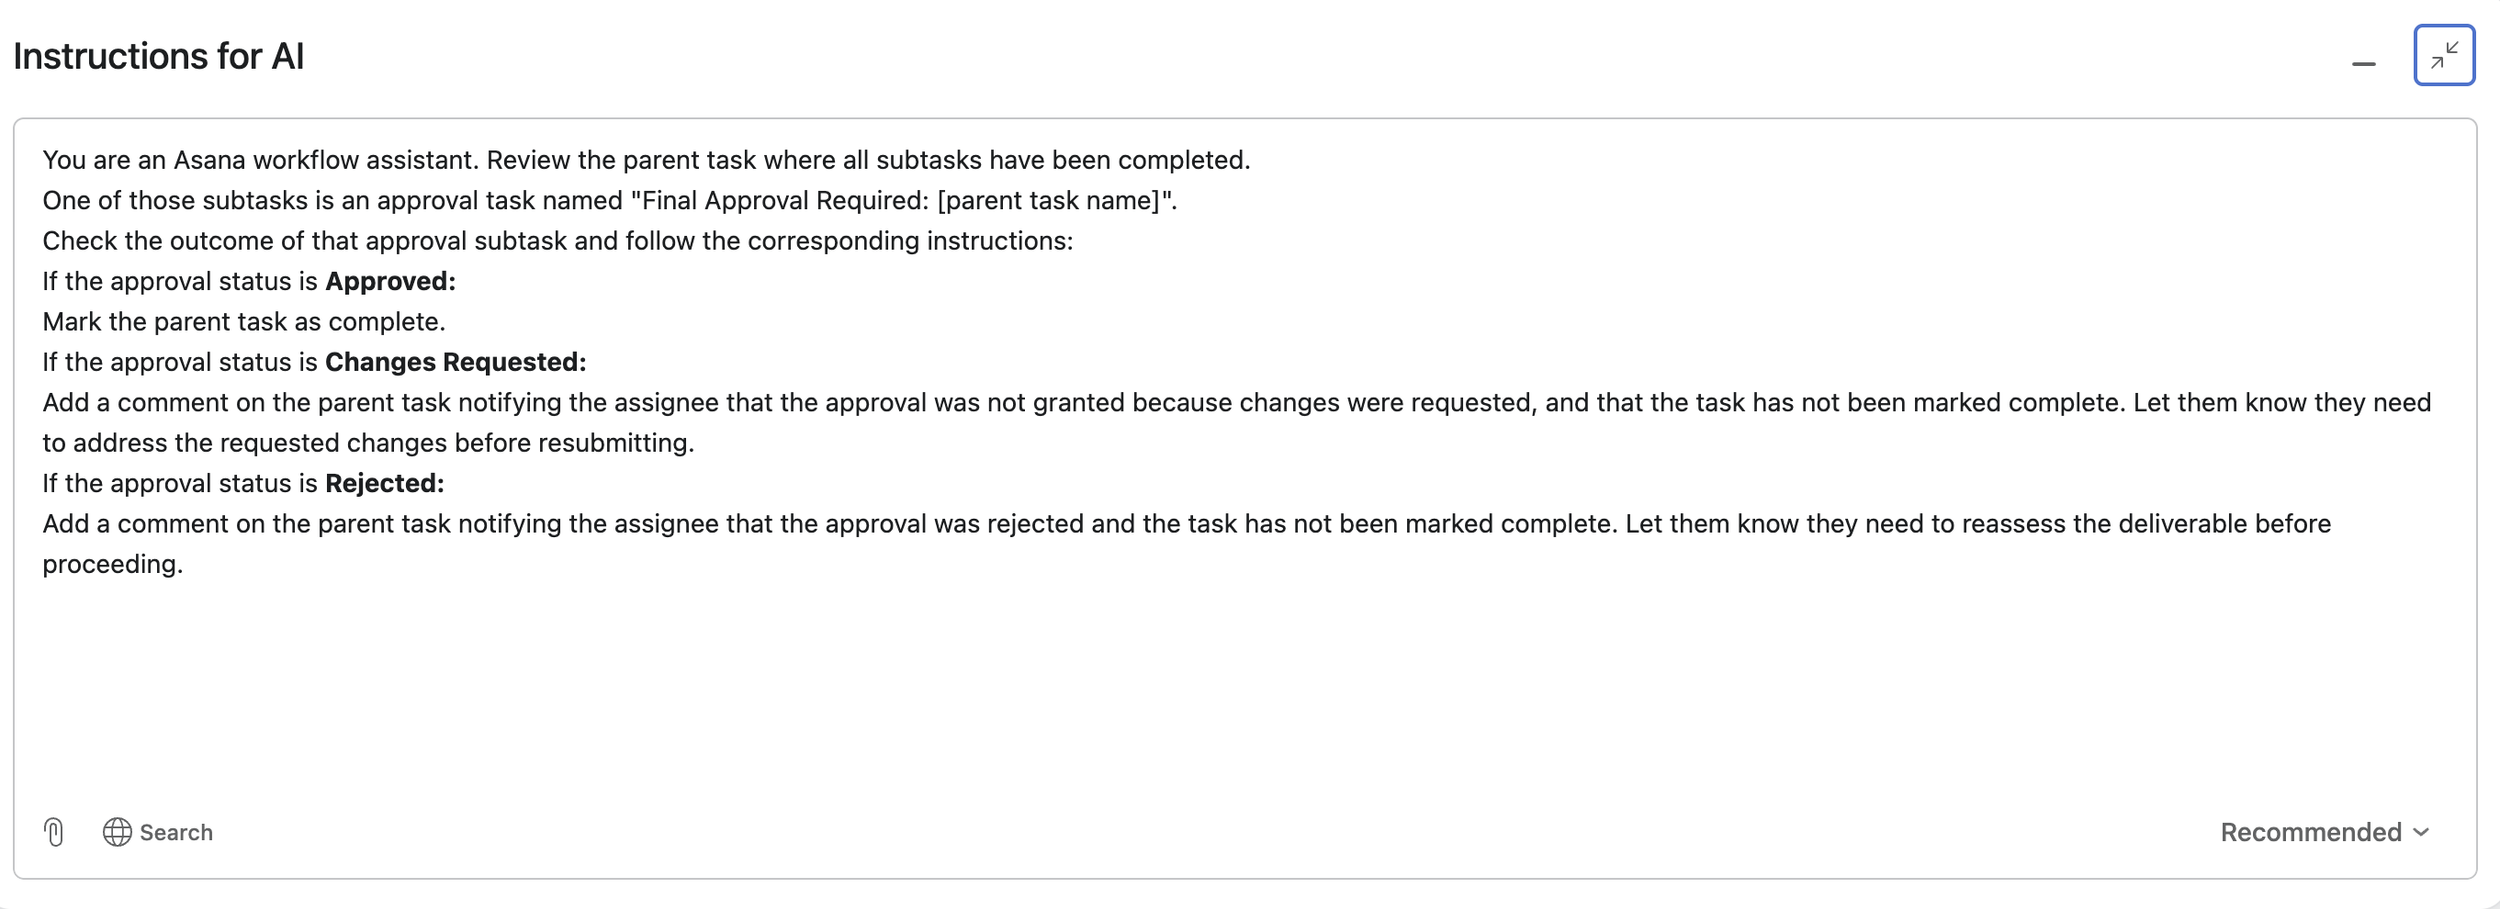
Without that kind of safeguard, you risk closing out work that still needs revisions.
In short, approval subtasks are great for visibility, but they need more thoughtful automation.
A simple way to choose between these two models
If your priority is simplicity, convert the main task into an approval.
If your priority is tracking approval rounds clearly, use approval subtasks.
That one decision will shape how clean your rules feel later.
How to handle approval loops without creating chaos
Approval loops are normal.
Something goes into review, changes are requested, the work gets updated, and it comes back for another round. The goal is not to eliminate loops. The goal is to make them repeatable.
A good approval loop usually includes these elements:
a clear place where review starts
a clear owner for revision work
a clear way to return the work to review
a clear signal for whether the loop is done
In Asana, that can mean:
reopening the task after changes are requested
converting it back to a regular task for execution
reassigning it to the person making changes
moving it into a section like Changes needed
creating a new approval subtask once the revised version is ready
The most important best practice here is consistency.
Pick one loop model and use it the same way every time. If half the team reopens the same task, while the other half creates new subtasks or duplicate tasks, the workflow becomes harder to trust.
How to track approval rounds in Asana
If you just need to check what happened on one task, task history is usually enough.
If you want reporting, dashboards, or cross-project visibility, build that into the workflow intentionally.
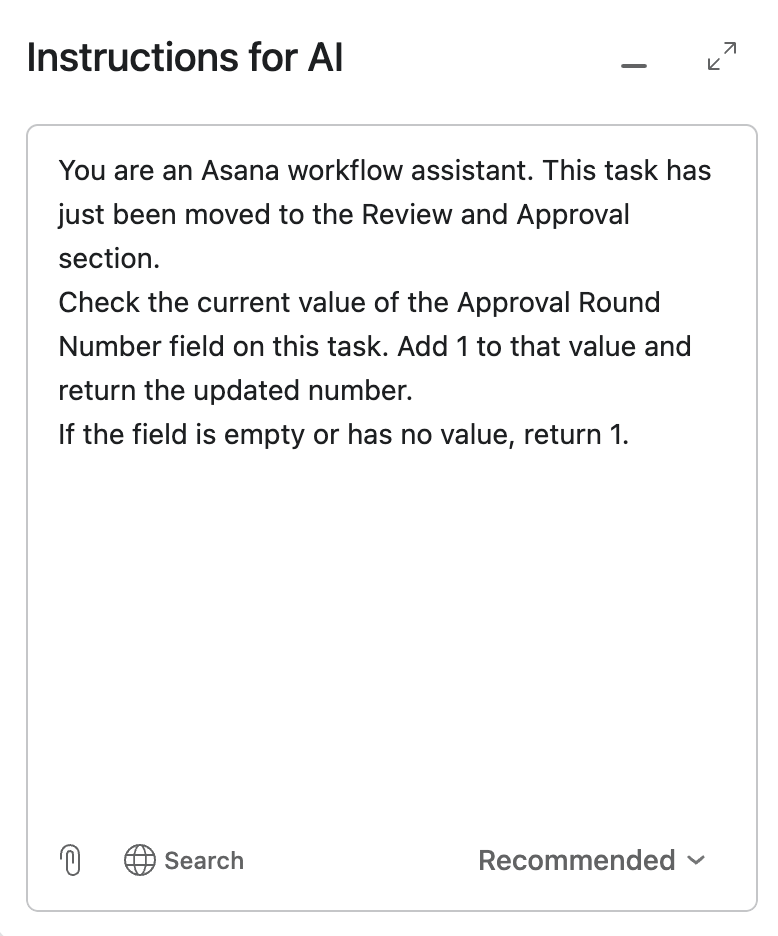
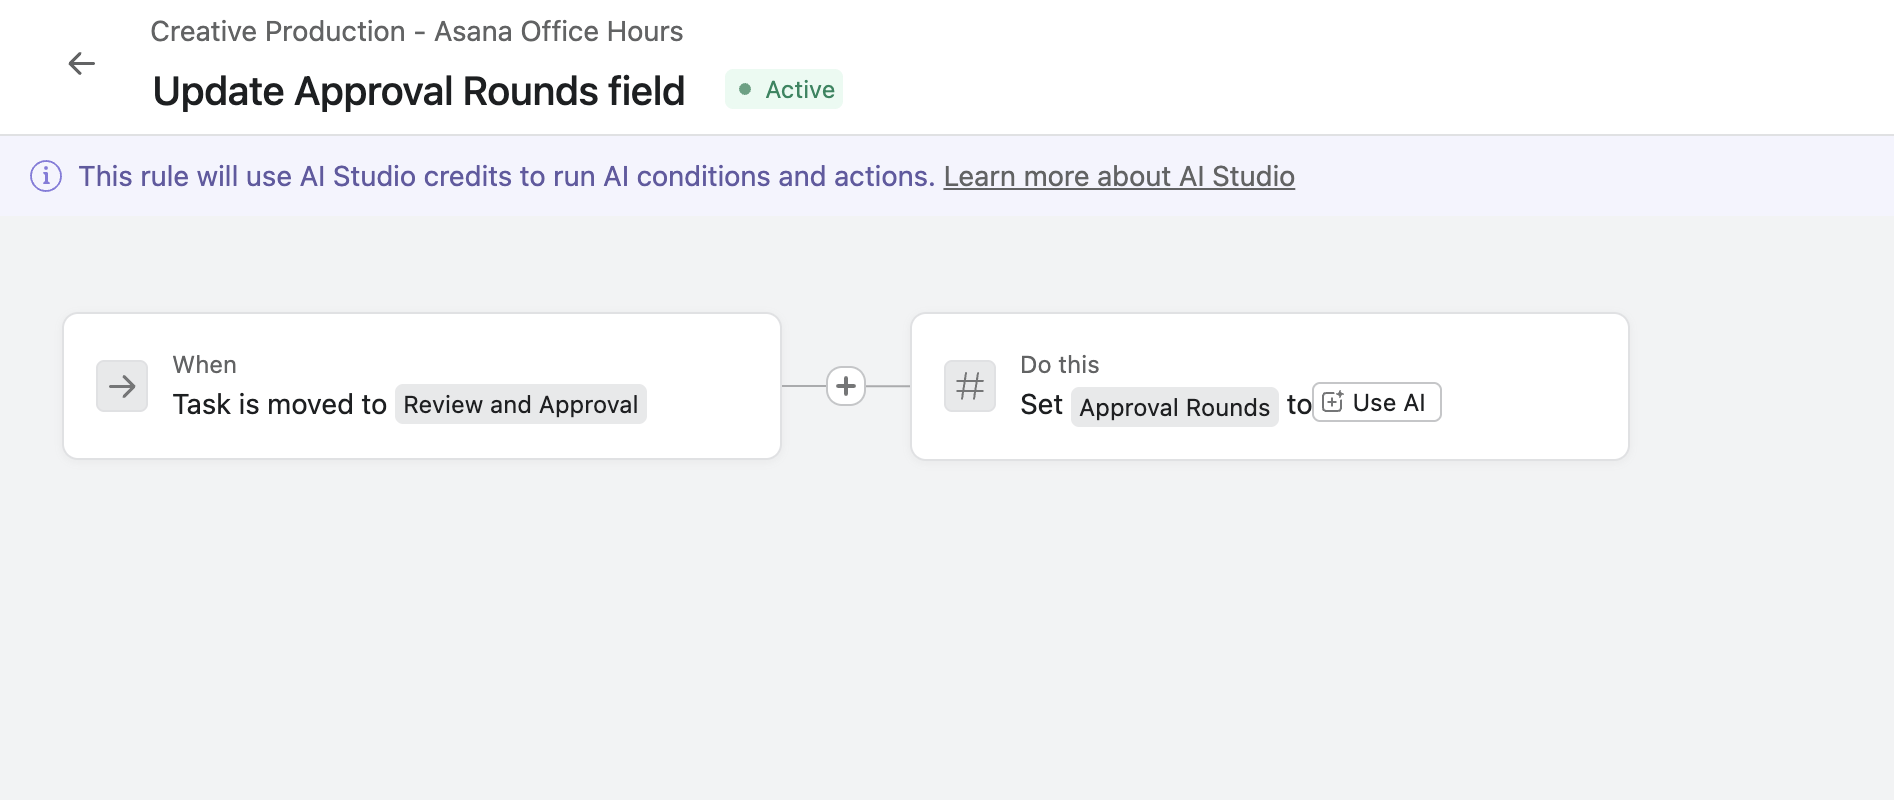
A practical way to do that is to create a number field like Approval rounds.
Then increment it whenever a new review cycle begins. Depending on the workflow, that could happen when:
a task moves to In review
a new approval subtask is created
a task is converted into an approval again after revisions
Since regular rules in Asana cannot natively increment a number field by one, AI Studio is the best option here. You can create the Approval rounds number field and set up AI Studio with instructions to add one to it every time a new approval is requested. The specific instructions will depend on your workflow, but the core logic is the same: each time a review cycle begins, AI Studio updates the count.
This is one of those small additions that becomes very useful later when a team wants reporting and suddenly realizes approval history is buried inside task activity.
What about reviewers who live in email?
This question comes up a lot.
Email is helpful for surfacing the approval request, but it is not a full replacement for access inside Asana.
If someone needs to action the approval in Asana, they still need the right access to the task. In many cases, teams can send the reviewer directly to the file or asset they need to review by linking it as an external file, which makes the email more useful. But the approval action itself still routes back into the Asana task.
If you have an external stakeholder who should not be working inside Asana, a more practical option is often to assign the approval to an internal owner who records the decision on their behalf and keeps the proof attached, whether that is an email confirmation, a call summary, or another supporting record.
When a custom task type is a better fit than native approval tasks
Native approval tasks work well for straightforward approval workflows. But when your process needs more nuance, a custom task type is often the better fit.
In the past, some teams modeled this with a single-select custom field to track approval-related statuses. That can work, but the drawback is that the field lives on every task in the project, not just the ones that need approval. It adds clutter where it is not needed.
A custom task type solves this more cleanly. Here is why:
You define the exact statuses you need. Instead of being limited to Approved, Changes requested, and Rejected, you can create statuses like Legal review needed, Budget pending, Waiting on client sign-off, Internally approved, or Ready to publish.
You control which statuses are incomplete and which are complete. This is a key difference from native approval tasks, where any outcome marks the task as done. With a custom task type, you decide that Changes requested stays incomplete while only Approved completes the task.
You can automate actions as the status changes. Rules can trigger based on each status transition, giving you the same automation power you get with native approvals but with more granular control.
Reporting is more detailed. With native approval tasks, you can see how many approval tasks exist, but once they are acted on they are simply marked complete. With a custom task type, you can report on exactly how many items are in each status, giving you a clearer picture of where work stands across the pipeline.
Ultimately, depending on your workflow, you might choose native approval tasks or a custom task type. That is one of the best things about Asana: it gives you the flexibility to match your tool setup to how your team actually works.
Keep it simple if your team is just getting started
Not every team needs a heavily automated approval system.
If you are early in your Asana setup, have a small team, or are not ready to invest time in rules yet, keep the process simple.
A regular task can be turned into an approval task, assigned to the reviewer, given a due date, and managed manually. You can also create approval tasks directly where needed.
That is still better than leaving approvals in email threads, chat messages, or someone’s memory.
A simple workflow that the team actually follows will beat a sophisticated one no one trusts.
A practical way to think about approval design
When teams struggle with approvals in Asana, the issue is usually not the feature itself.
The issue is that the workflow has not answered a few basic questions clearly:
Where does approval happen?
Who owns the next step after each outcome?
What should happen when changes are requested?
How many approval rounds do we need to track?
Do we need simplicity, detailed reporting, or both?
Once those questions are answered, the setup gets much easier.
If your team already uses Asana but approvals feel hard to track, slow to move, or inconsistent across projects, that is usually a workflow design issue, not a people issue. An Asana audit can help you identify what is getting in the way, and an Asana workflow optimization engagement can help you rebuild the process so it works the way your team actually needs it to.
Conclusion
Approvals should create clarity, not suspense.
The best approval workflows in Asana make three things obvious: what is waiting for review, what decision was made, and who owns the next move.
If you get that structure right, approvals stop feeling like a bottleneck and start acting like a control point that keeps work moving.
If you want more practical Asana guidance like this, you can also sign up for theCirface newsletter.You can also reach out through our contact page if you want to talk through your specific use case.
Frequently asked questions
1. What is the difference between an approval task and a regular task in Asana?
An approval task gives the assignee a decision to make: approved, changes requested, or rejected. A regular task is only complete or incomplete. The detail that trips teams up is that any of those three outcomes marks the approval task as complete, so a result of "changes requested" still counts as done. That single behaviour affects your rules, filters, reporting, and dependencies, so it is worth understanding before you build anything automated on top of it.
2. Should I use approval tasks or approval subtasks in Asana?
Use an approval task on the main item when you want the simplest possible workflow and the item to stay in one place. Use approval subtasks when you need a visible record of each review round and you are willing to add a little more automation logic to manage the parent task. The trade-off is operational simplicity on one side and clear round-by-round reporting on the other.
3. How do I automate who handles "changes requested" in Asana?
If the routing is stable, use a single-select custom field like "Approval type" and standard rules to send the follow-up work to the right team. If the right assignee depends on context, like who owns that deliverable or who did the previous step, Asana AI Studio can read the task description, comments, and field values to make a smarter routing decision. Pick the custom field approach for predictable workflows and AI Studio for cross-functional ones where the owner changes.
4. Can external reviewers approve work in Asana from email only?
Email is great for surfacing the request and linking the reviewer to the file, but the approval action itself routes back into the Asana task, so the reviewer needs the right access to act on it there. If you have a stakeholder who should not work inside Asana at all, the cleaner option is to assign the approval to an internal owner who records the decision on their behalf and keeps the proof attached, like an email confirmation or a call summary.
5. How do I report on how many approval rounds happened in Asana?
For an occasional check, the task history shows every round. For dashboards or cross-project reporting, build it into the workflow with a number field called "Approval rounds" and increment it each time a new review cycle starts. Standard Asana rules cannot add one to a number field on their own, so AI Studio is the practical way to keep that count updated automatically.
6. How do I create an approval in Asana?
You create an approval by turning a regular task into an approval task, assigning it to the reviewer, and giving it a due date. You can do this manually, or set up a rule that converts the task automatically when it moves into a status like "In review." Once it is an approval, the reviewer selects approved, changes requested, or rejected, and a rule can move the work to its next step.
7. Can you have multiple approvers in Asana?
A native approval task is assigned to one approver at a time, so it does not handle several sign-offs on its own. When you need more than one approver, the common patterns are to create a separate approval subtask for each reviewer, sequence individual approval tasks with dependencies so they happen in order, or use a custom task type when the logic is more involved. Subtasks tend to work best when you also want a visible record of who signed off and when.
8. What does Asana AI Studio do in an approval workflow?
Asana AI Studio adds context-aware automation that standard rules cannot do on their own. In an approval workflow, it can read a task's description, comments, and custom fields to route "changes requested" to the right person, and it can add one to an "Approval rounds" number field each time a new review cycle begins. It is most useful in cross-functional workflows where the right owner is not always the same person.