
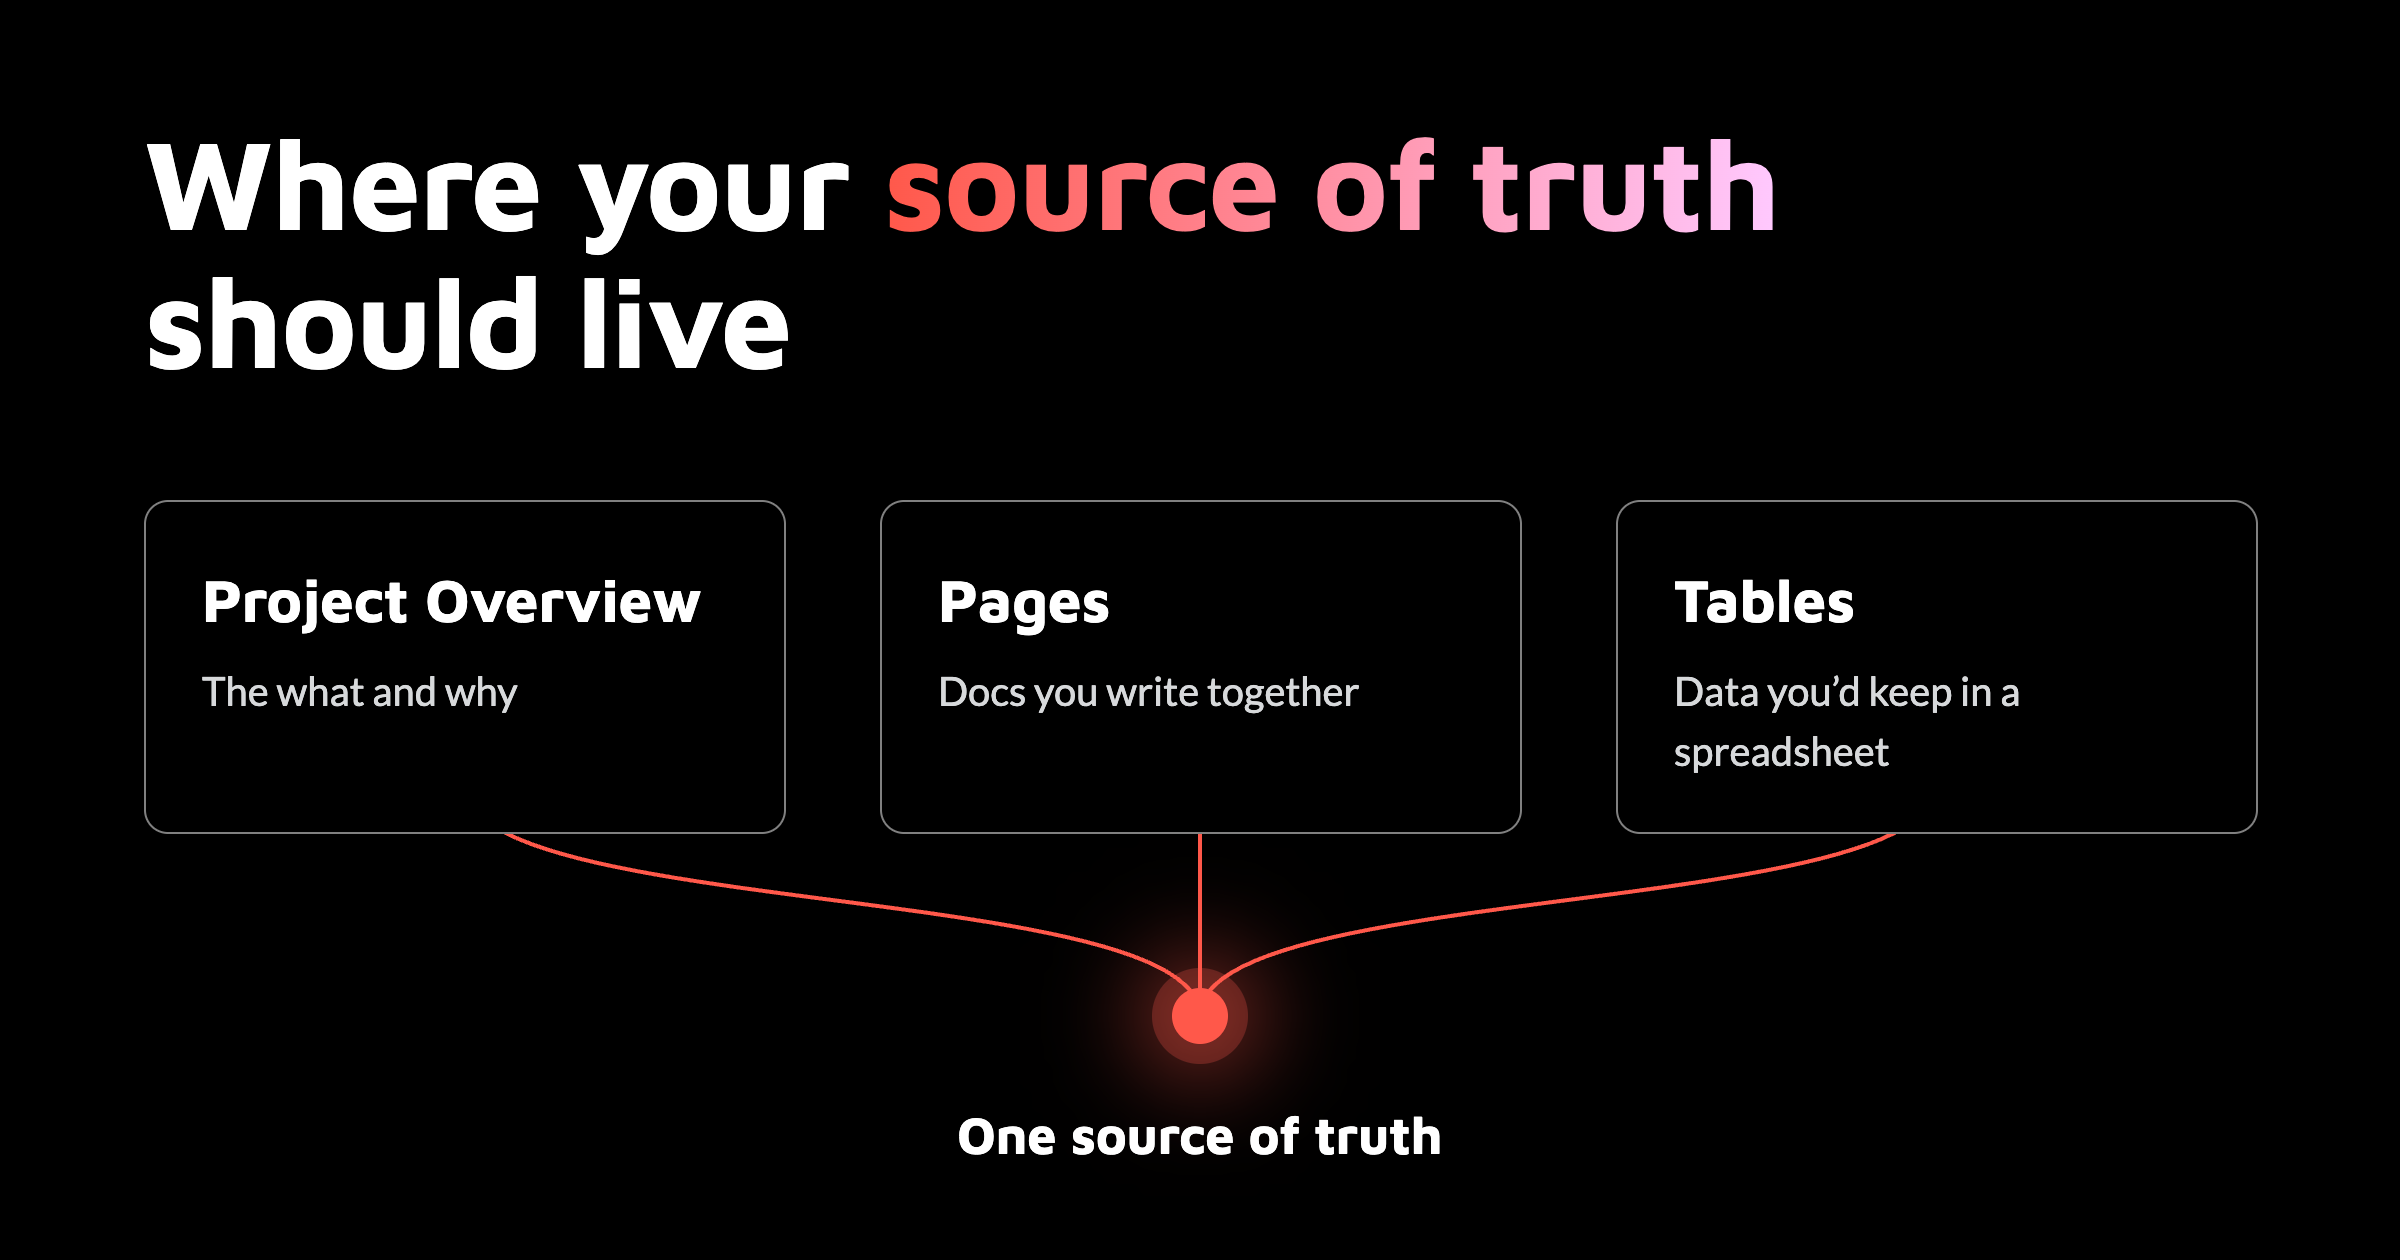
Short answer: Asana Tables hold structured reference data, like vendors, channels or product lines, as records linked to the projects that use them. The project Overview holds the what and why of one project, and Pages hold the documents your team writes together, like briefs, SOPs and guidelines. Tables are available on the Advanced, Enterprise and Enterprise+ plans. When all three stay current, your team, Asana Dash, AI Teammates and AI Studio work from the same information.
When I open a project's Overview tab with a client, it's usually empty. There's no description, no roles, no key resources and no status update. Anyone new to the project has to dig through the task list, hope someone attached the right file, and then ask for access to it.
The information is there, just not in Asana: a brief in a shared drive, three versions of the brand guidelines, a vendor list in a spreadsheet only one person updates.
For marketing teams, that looks like brand guidelines copied into every task, the old logo still in half of them, and the agency list in a spreadsheet nobody can find. For product teams, it's specs in five places, release notes written from an outdated version, and product lines and their owners in a separate file.
AI makes this harder to ignore. Asana Dash, AI Teammates and AI Studio can read external files and connect to other apps and agents, so they'll find your brief wherever it lives. The catch is keeping it current. A file in a shared drive only stays accurate if someone remembers to go back and update it, and AI will work from it either way. Information that lives in Asana gets updated as part of the work.
This guide covers when to use each one, how to set it up, and the setups I recommend to clients.
Asana Tables, Pages or project Overview: which one should you use?
All three keep your information in Asana. What changes is the type of information.
| Project Overview | Pages | Tables | |
|---|---|---|---|
| Best for | The what and why of one project | Documents your team writes and edits together | Structured reference data, kept as records |
| Where it lives | Inside each project | Knowledge mode, or as a tab in a project | Knowledge mode, linked to projects |
| Examples | Project description, roles, project brief, key resources | Campaign briefs, creative guidelines, SOPs, meeting notes | Vendors and agencies, channel specs, product lines |
| Plans | Personal and all paid plans | Personal and all paid plans | Advanced, Enterprise and Enterprise+ |
My rule of thumb: if it explains one project, it goes in the Overview. If people write it and read it, it's a Page. If you'd normally keep it in a spreadsheet, it's a Table.
Why your source of truth in Asana matters for AI
AI Teammates are built on Asana's Work Graph, the data model that connects tasks, projects, people and goals across your organization. When a Teammate reads a task or project, it also gets the context and memories tied to it. Asana describes Tables records as part of the same Work Graph, so your team, Dash and AI Teammates work with more context.
AI Teammates and Dash can also connect to apps like Google Drive, Gmail, Slack, HubSpot, Figma and Canva, and they use the access of the person who triggers them. They’ll find a file wherever it lives, and they’ll use it even when it’s out of date.
AI also follows your permissions. An AI Teammate can only use a project's information if both it and the person asking have access to that project. Linking the approved Page or Table to the project, and adding the Teammate as a member, is how you make sure it works from the right version.
How to use the Asana project Overview
The project Overview is the tab where a project explains itself: its description, project roles, connected goals and portfolios, key resources, milestones and status updates.
Picture two holiday campaigns. One has an empty Overview: no description, no key resources, no status update. The other has all of it filled in, so someone new can get up to speed without opening a task.
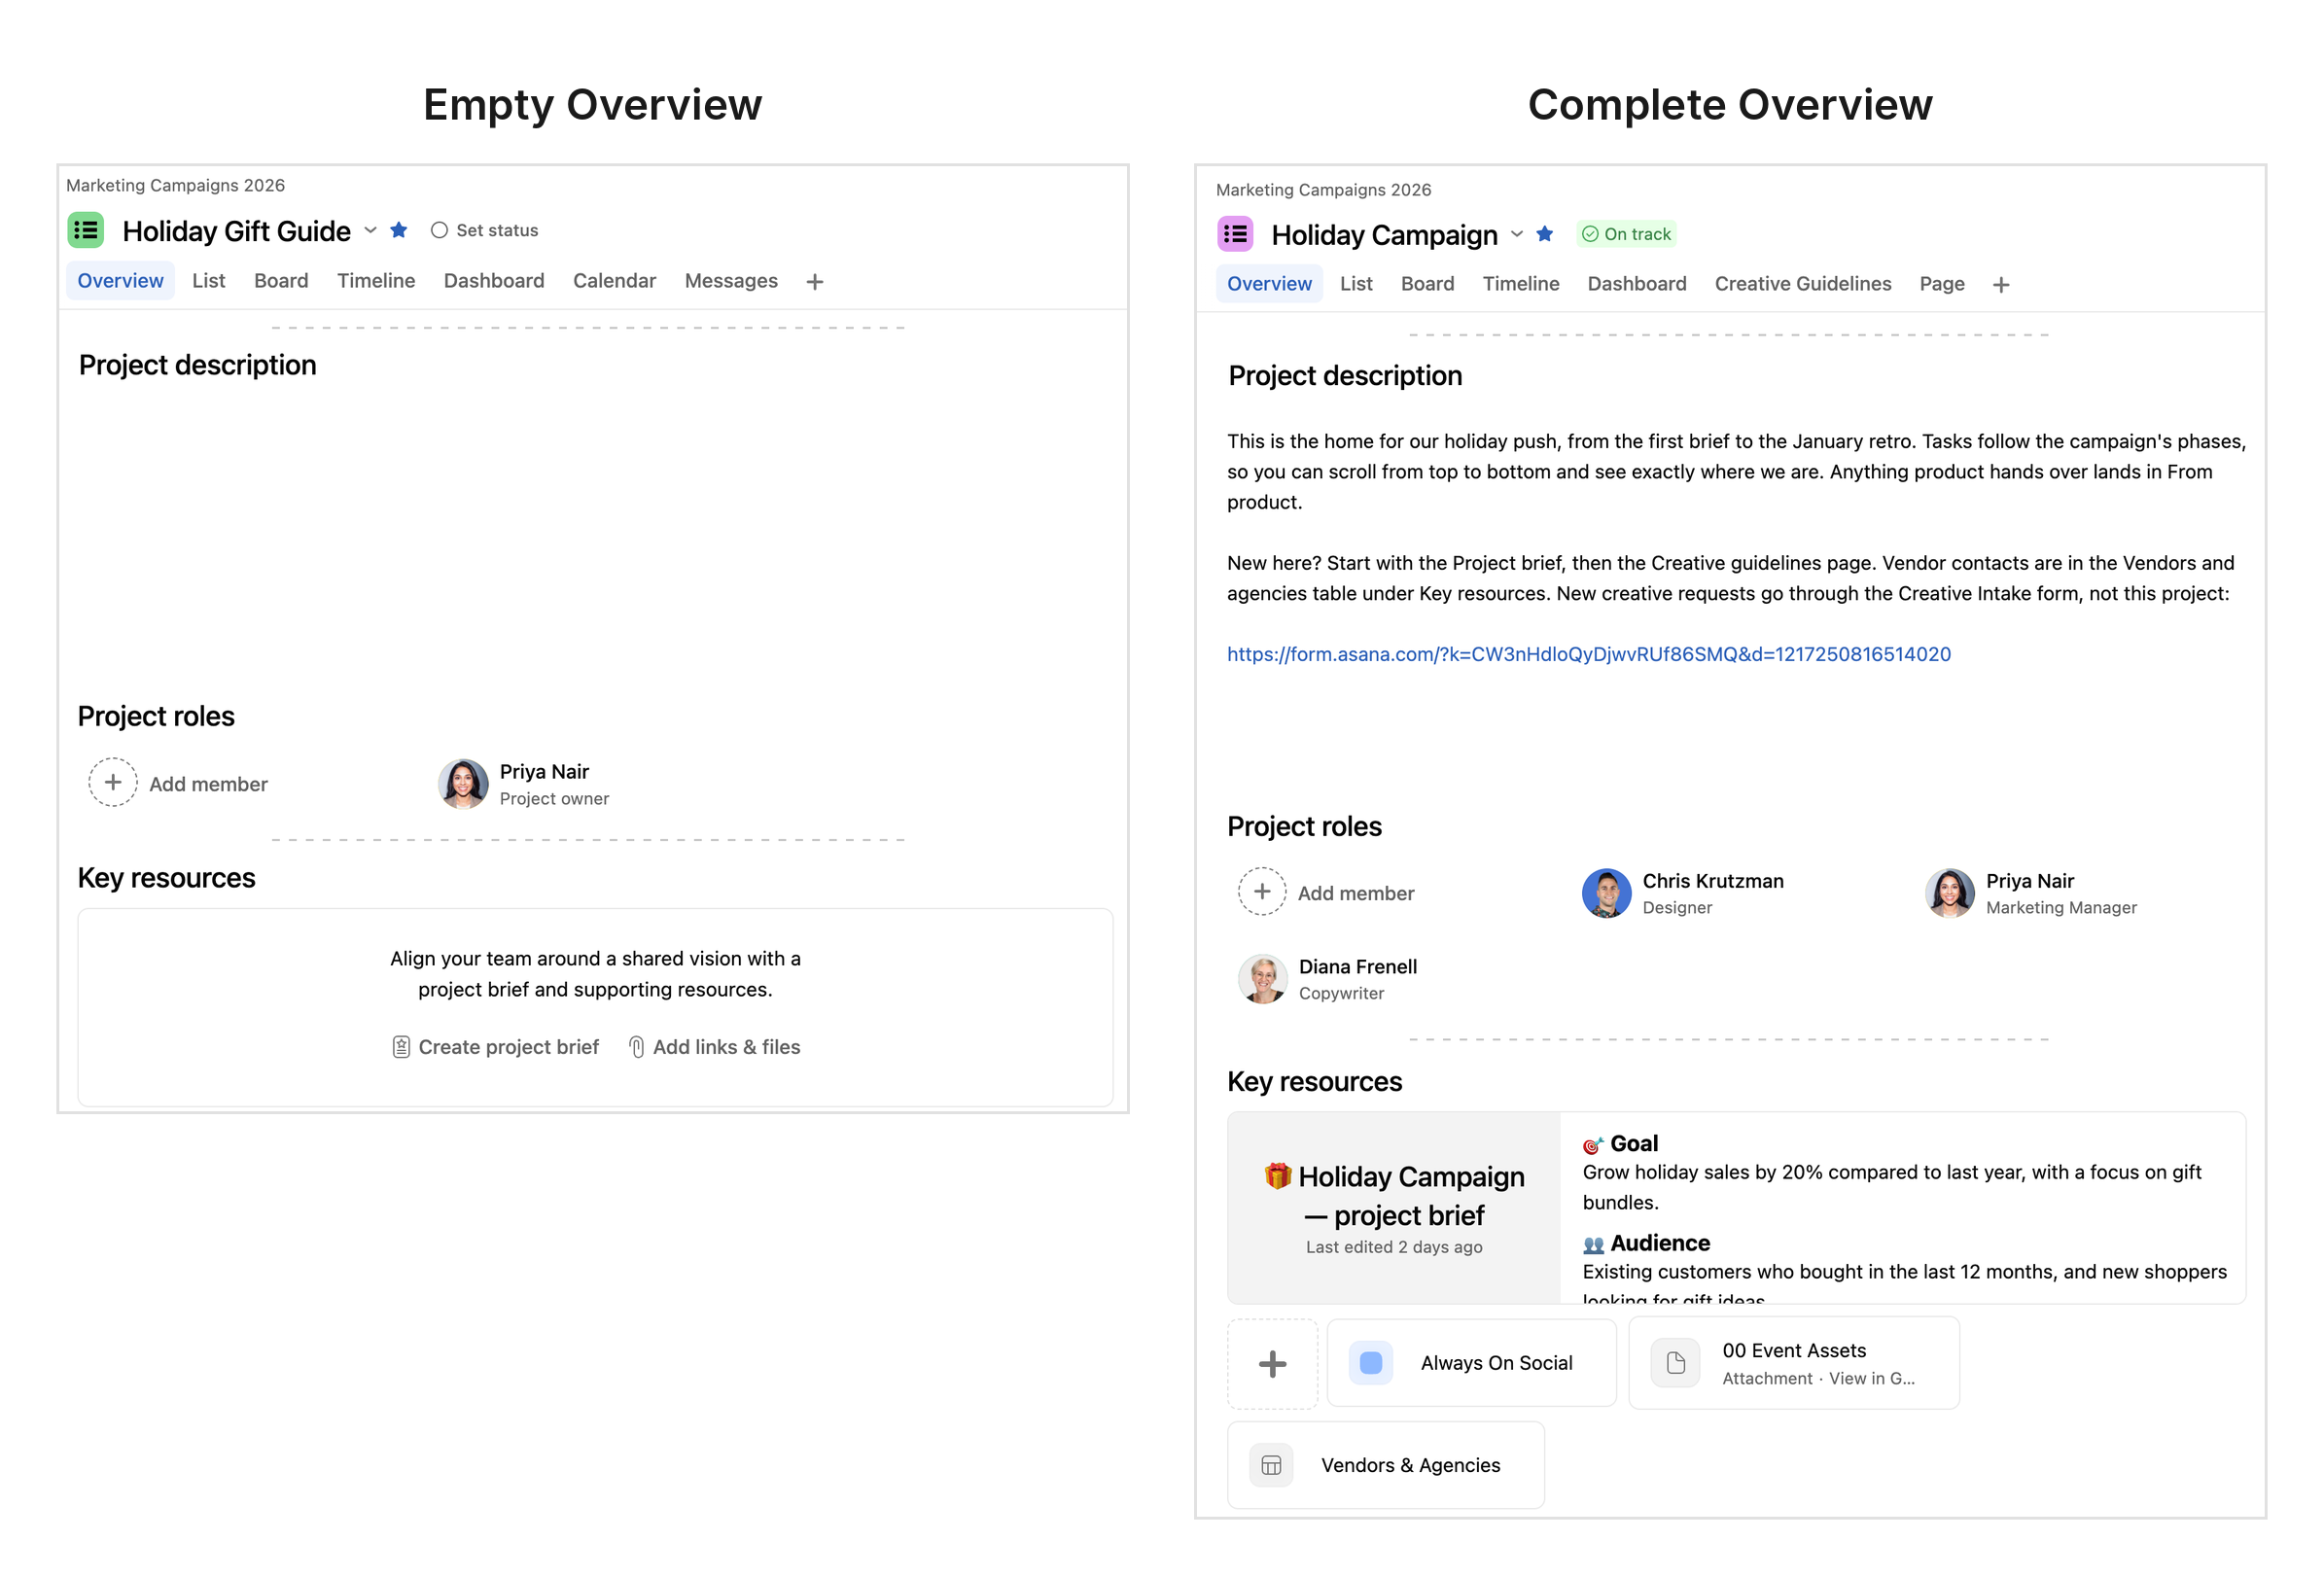
How to set up a project Overview
Write a short project description. Say what the project is for, how people should request work and where the team talks. For example, if your team takes requests through an Asana form, add the form link here so people know where to submit them.
Assign project roles. Set the project owner and add roles like designer, marketing manager or copywriter. You can name roles however you like.
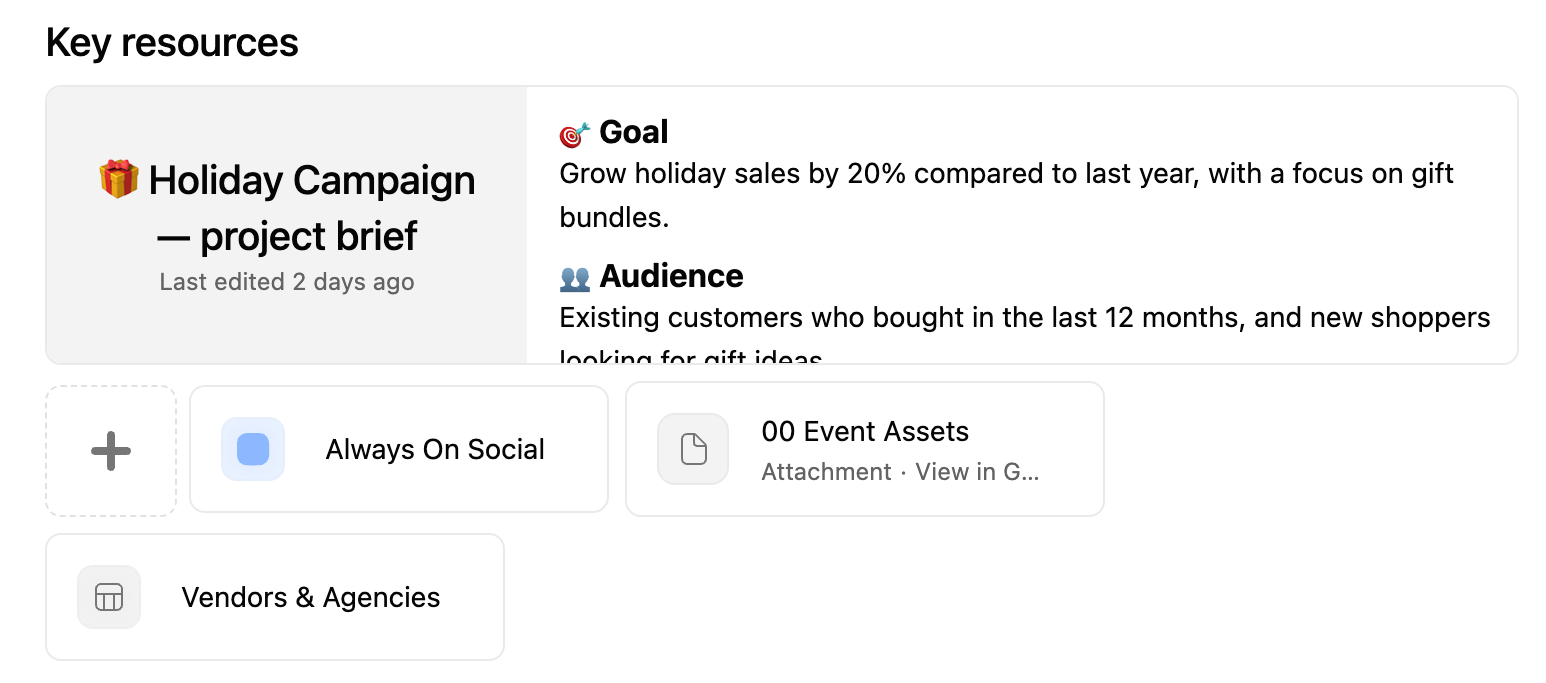
Create the project brief. In Key resources, click Create project brief and explain the what and why. You can add tables, images and media from tools like Figma, Miro or Loom, and pull in the project's milestones and connected goals.
Add key resources. Attach files from your computer, Google Drive, OneDrive or SharePoint, Box or Dropbox, add a link, or connect any Asana object, like a Page, a Table or another project.
Post status updates. The Overview shows the project's progress and latest status, so it's the first thing people see.
Project Overview best practices
A few habits keep the Overview useful. Build the description, roles and brief structure into your project templates, so every new project starts with them. Point key resources to the one approved file or Page instead of attaching copies, and keep the list short: the five or so things people actually ask for. When the brief includes a decision, select the text and turn it into a task, so it doesn't stay as a note.
How to use Asana Pages (formerly Notes)
Pages are collaborative documents inside Asana, where your team can draft, comment and turn decisions into tasks. Pages used to be called Notes, and any existing notes are now Pages.
You can create a page inside a project, as a tab, or from Knowledge mode in the sidebar. From there, you can attach it to a project, task, portfolio or team, or leave it standalone. Standalone pages are private until you share or attach them.
What makes Pages work as a source of truth is that the conversation happens on the page itself. You can highlight text, leave an inline comment and @mention a teammate, and every change is saved in the version history, so you can restore an earlier version anytime.
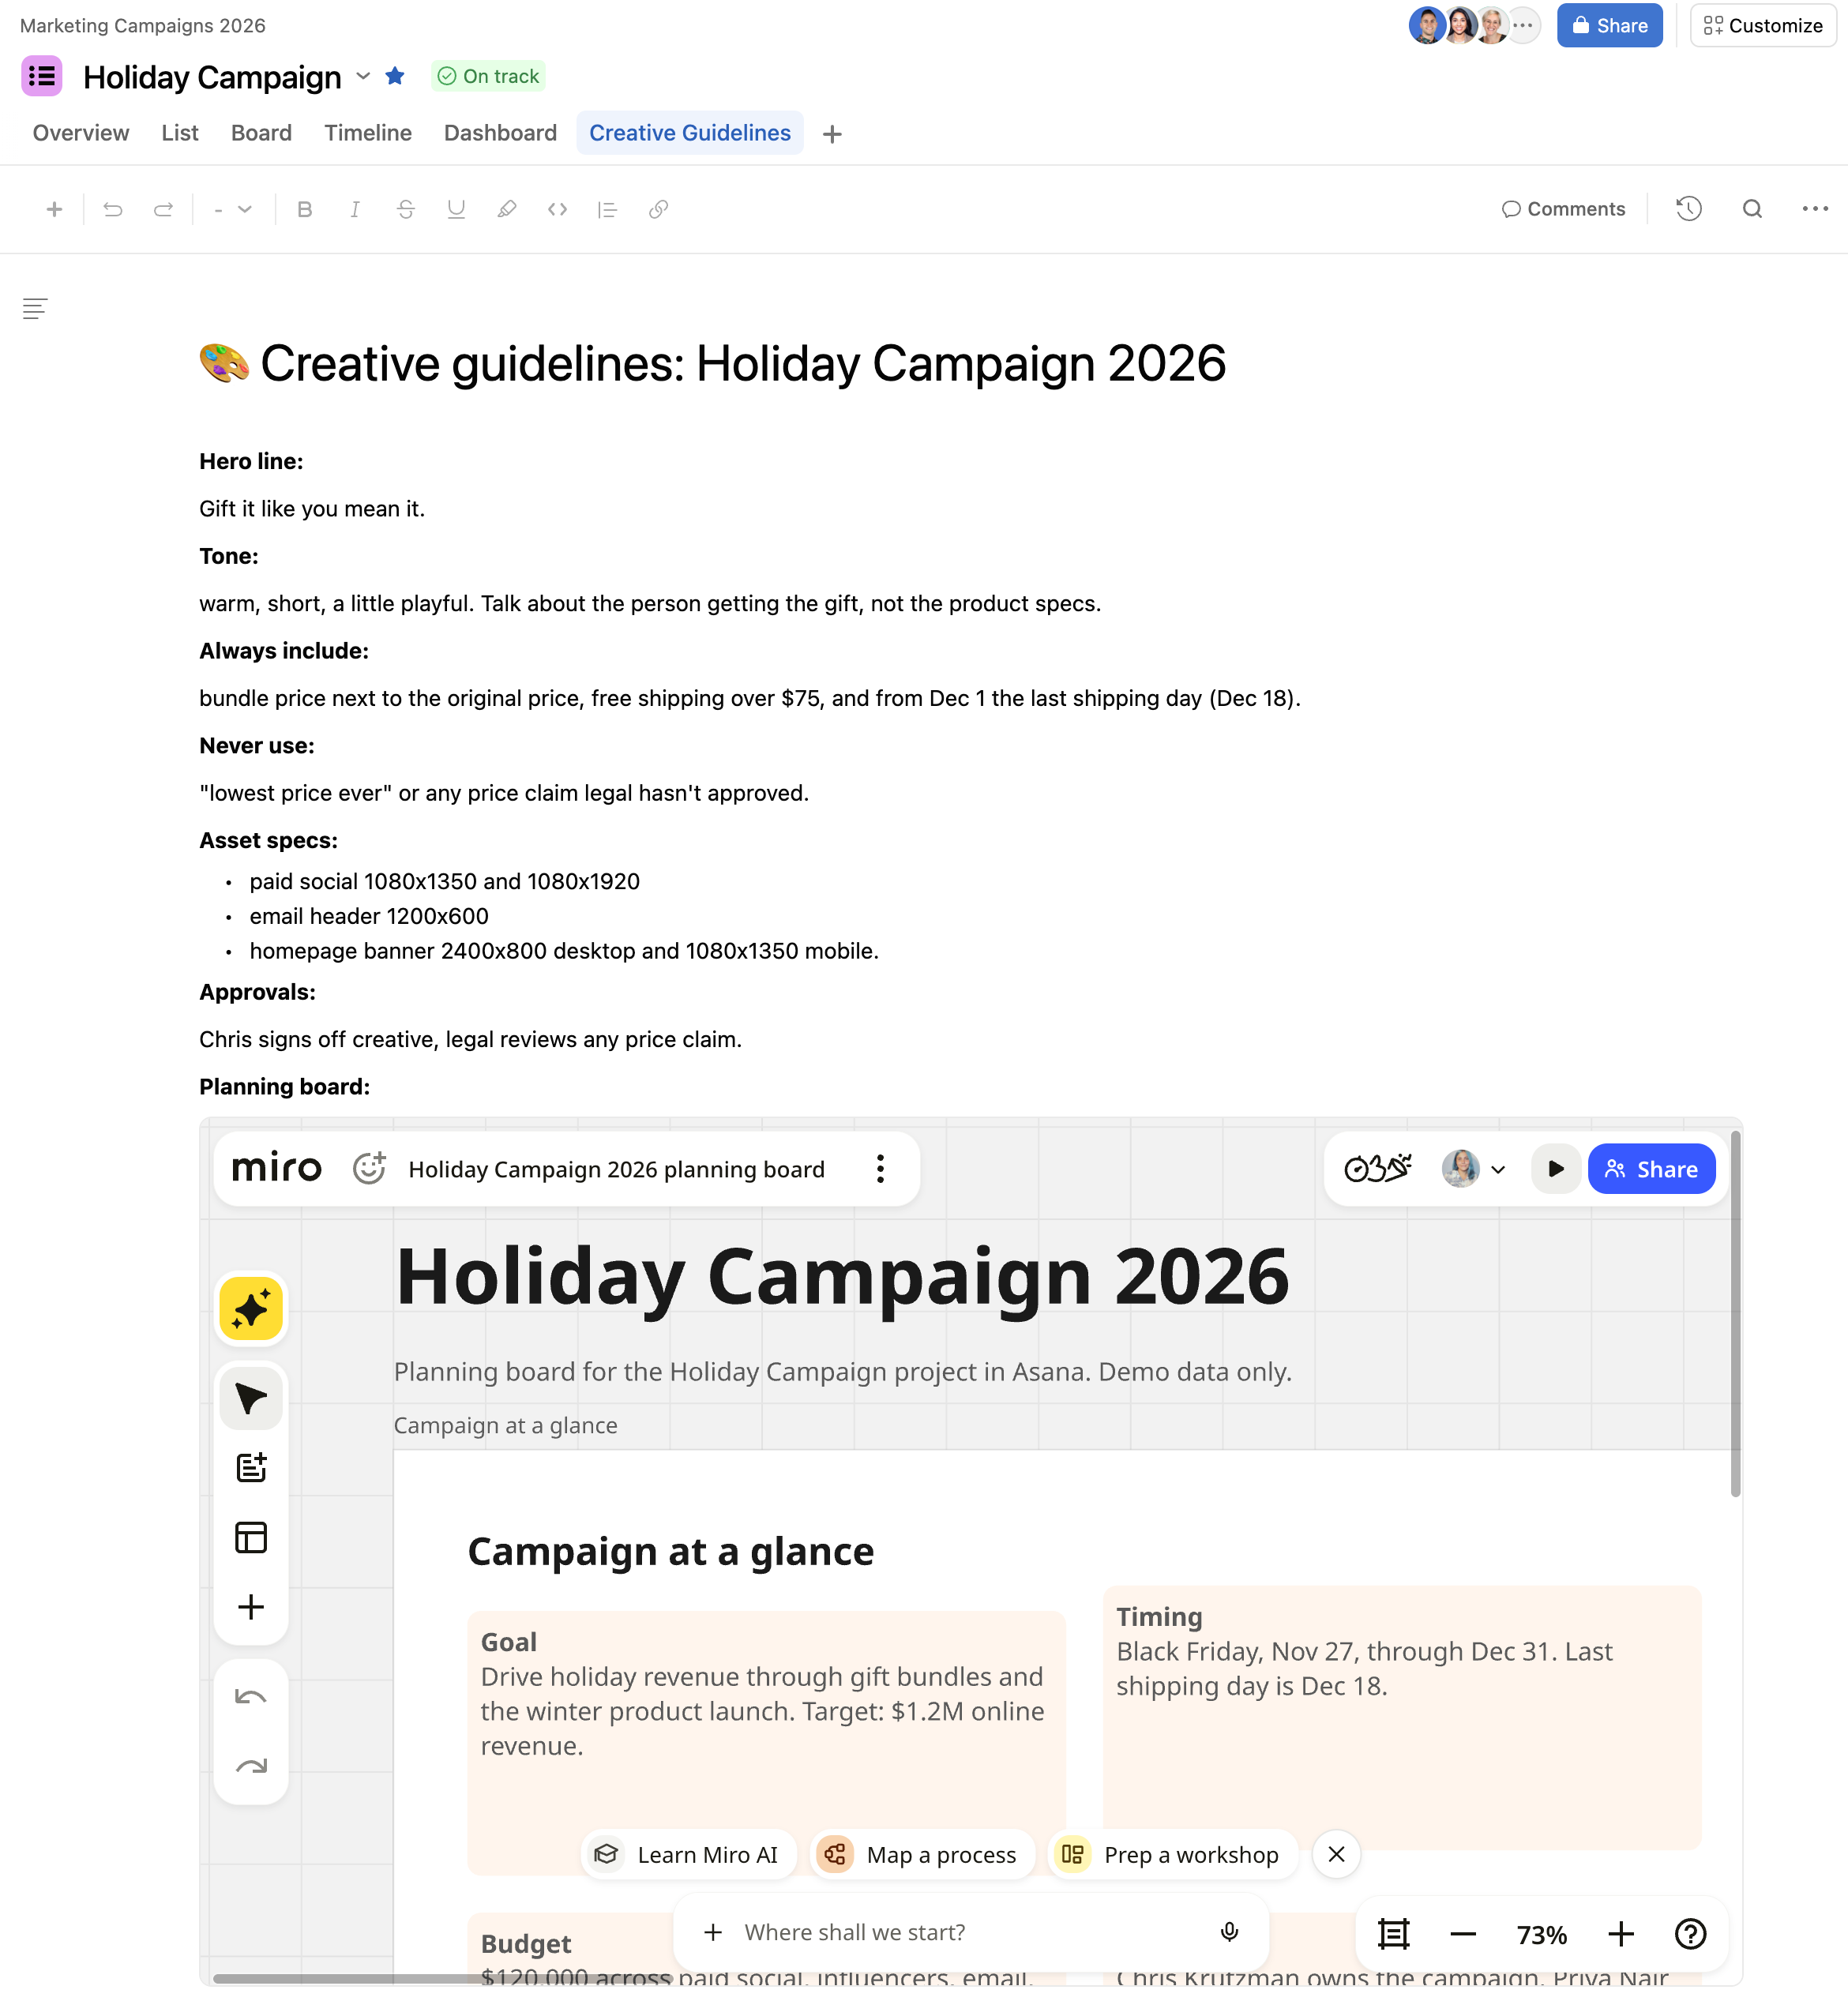
Pages also connect to the work. Highlight a line and turn it into a task with a link back to the page, embed tools like a Miro planning board so the team can edit it without leaving Asana, or use the AI sidebar to draft sections, summarize the page and pull out action items.
Ideas for Pages at the project level
Campaign or launch brief: goals, audience, key messages and deadlines for this project only.
Creative guidelines for this campaign: colours, formats and do's and don'ts specific to this launch.
Meeting notes and decision log: what was decided, by whom, and the tasks that came out of it.
Retro: what worked and what to change, written while it's still fresh.
Ideas for Pages in Knowledge mode
These apply across projects, so keep them at the team level and link them from each project's Overview:
SOPs: how to submit a request, how approvals work, how to hand work to another team.
Brand guidelines: the one approved version, instead of a copy in every task.
Team onboarding guide: which projects to join, which forms to use, who owns what.
Two limits to know: pages can only be shared with members of your Asana workspace, not people outside it, though you can export a page as Markdown. Inline comments also work on desktop and web only, not mobile.
How to use Asana Tables
Asana Tables store structured information as records, the same way you'd use a spreadsheet, but connected to the work in Asana. Tables are available on the Advanced, Enterprise and Enterprise+ plans, and they live in Knowledge mode, not in your project list.
The big difference from a spreadsheet or a database tool like Airtable: you link records to the projects and tasks that use them. A reference field makes the link, and lookup fields show that record's details. Change a detail once in the table, and it stays current everywhere it's referenced. Feature details checked November 2026.
How to create an Asana table
Click Knowledge in the sidebar and open the Tables tab.
Click Create table. Start blank, import a CSV or convert an existing Asana project. When you convert a project, each task becomes a record.
Add your fields. Every table starts with created on, created by and last modified, and you can add fields from your organization's library or create new ones.
Add a reference field to connect each record to the projects it belongs to.
Link the table from each project's Overview, in key resources, so the team can find it.
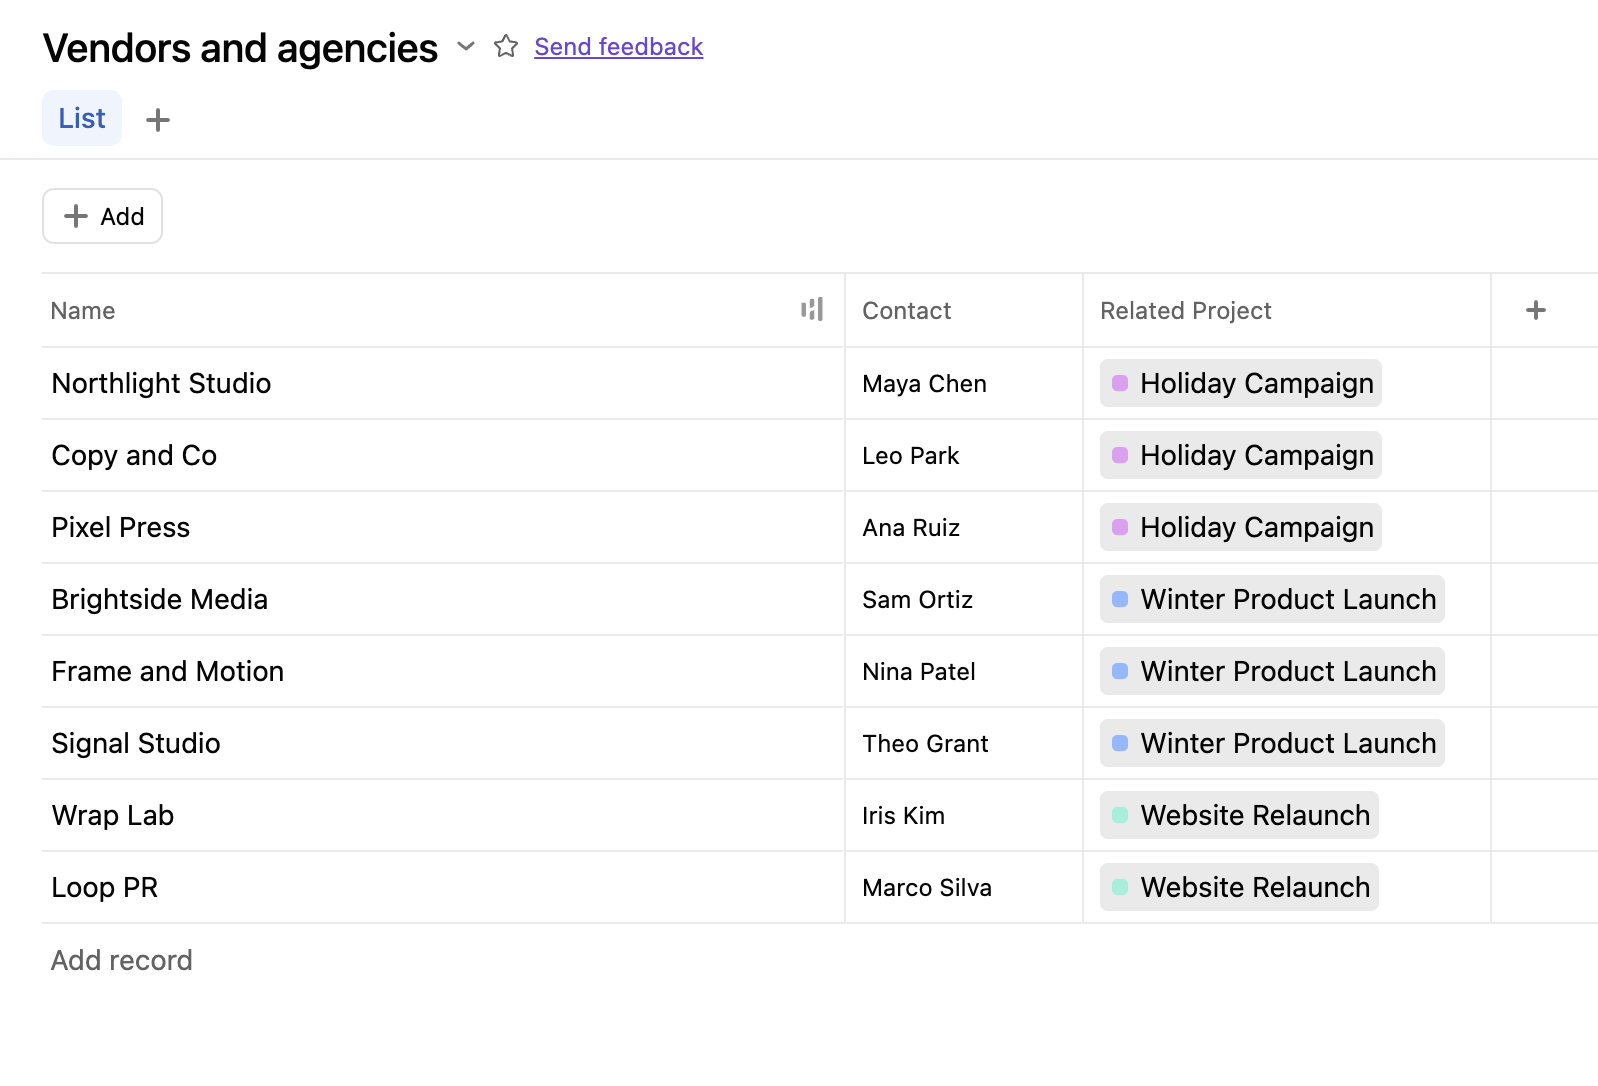
Which tables to create first
Start with the spreadsheets your team opens every week. For marketing and product teams, these are usually the first ones I'd move:
| Table | Fields to add | Link it to |
|---|---|---|
| Vendors and agencies | Contact, service, contract end date | The campaign projects each vendor works on |
| Channel specs | Channel, format, dimensions, character limits | Social and creative production projects |
| Product lines | Owner, status, next launch date | Launch projects for each product |
| Freelancers | Skills, availability, contact | Your creative intake project |
| Event venues | Location, capacity, contact | Event projects |
| Approved AI tools | Owner, approved use, data rules | Your AI governance or IT projects |
How to use forms with Tables
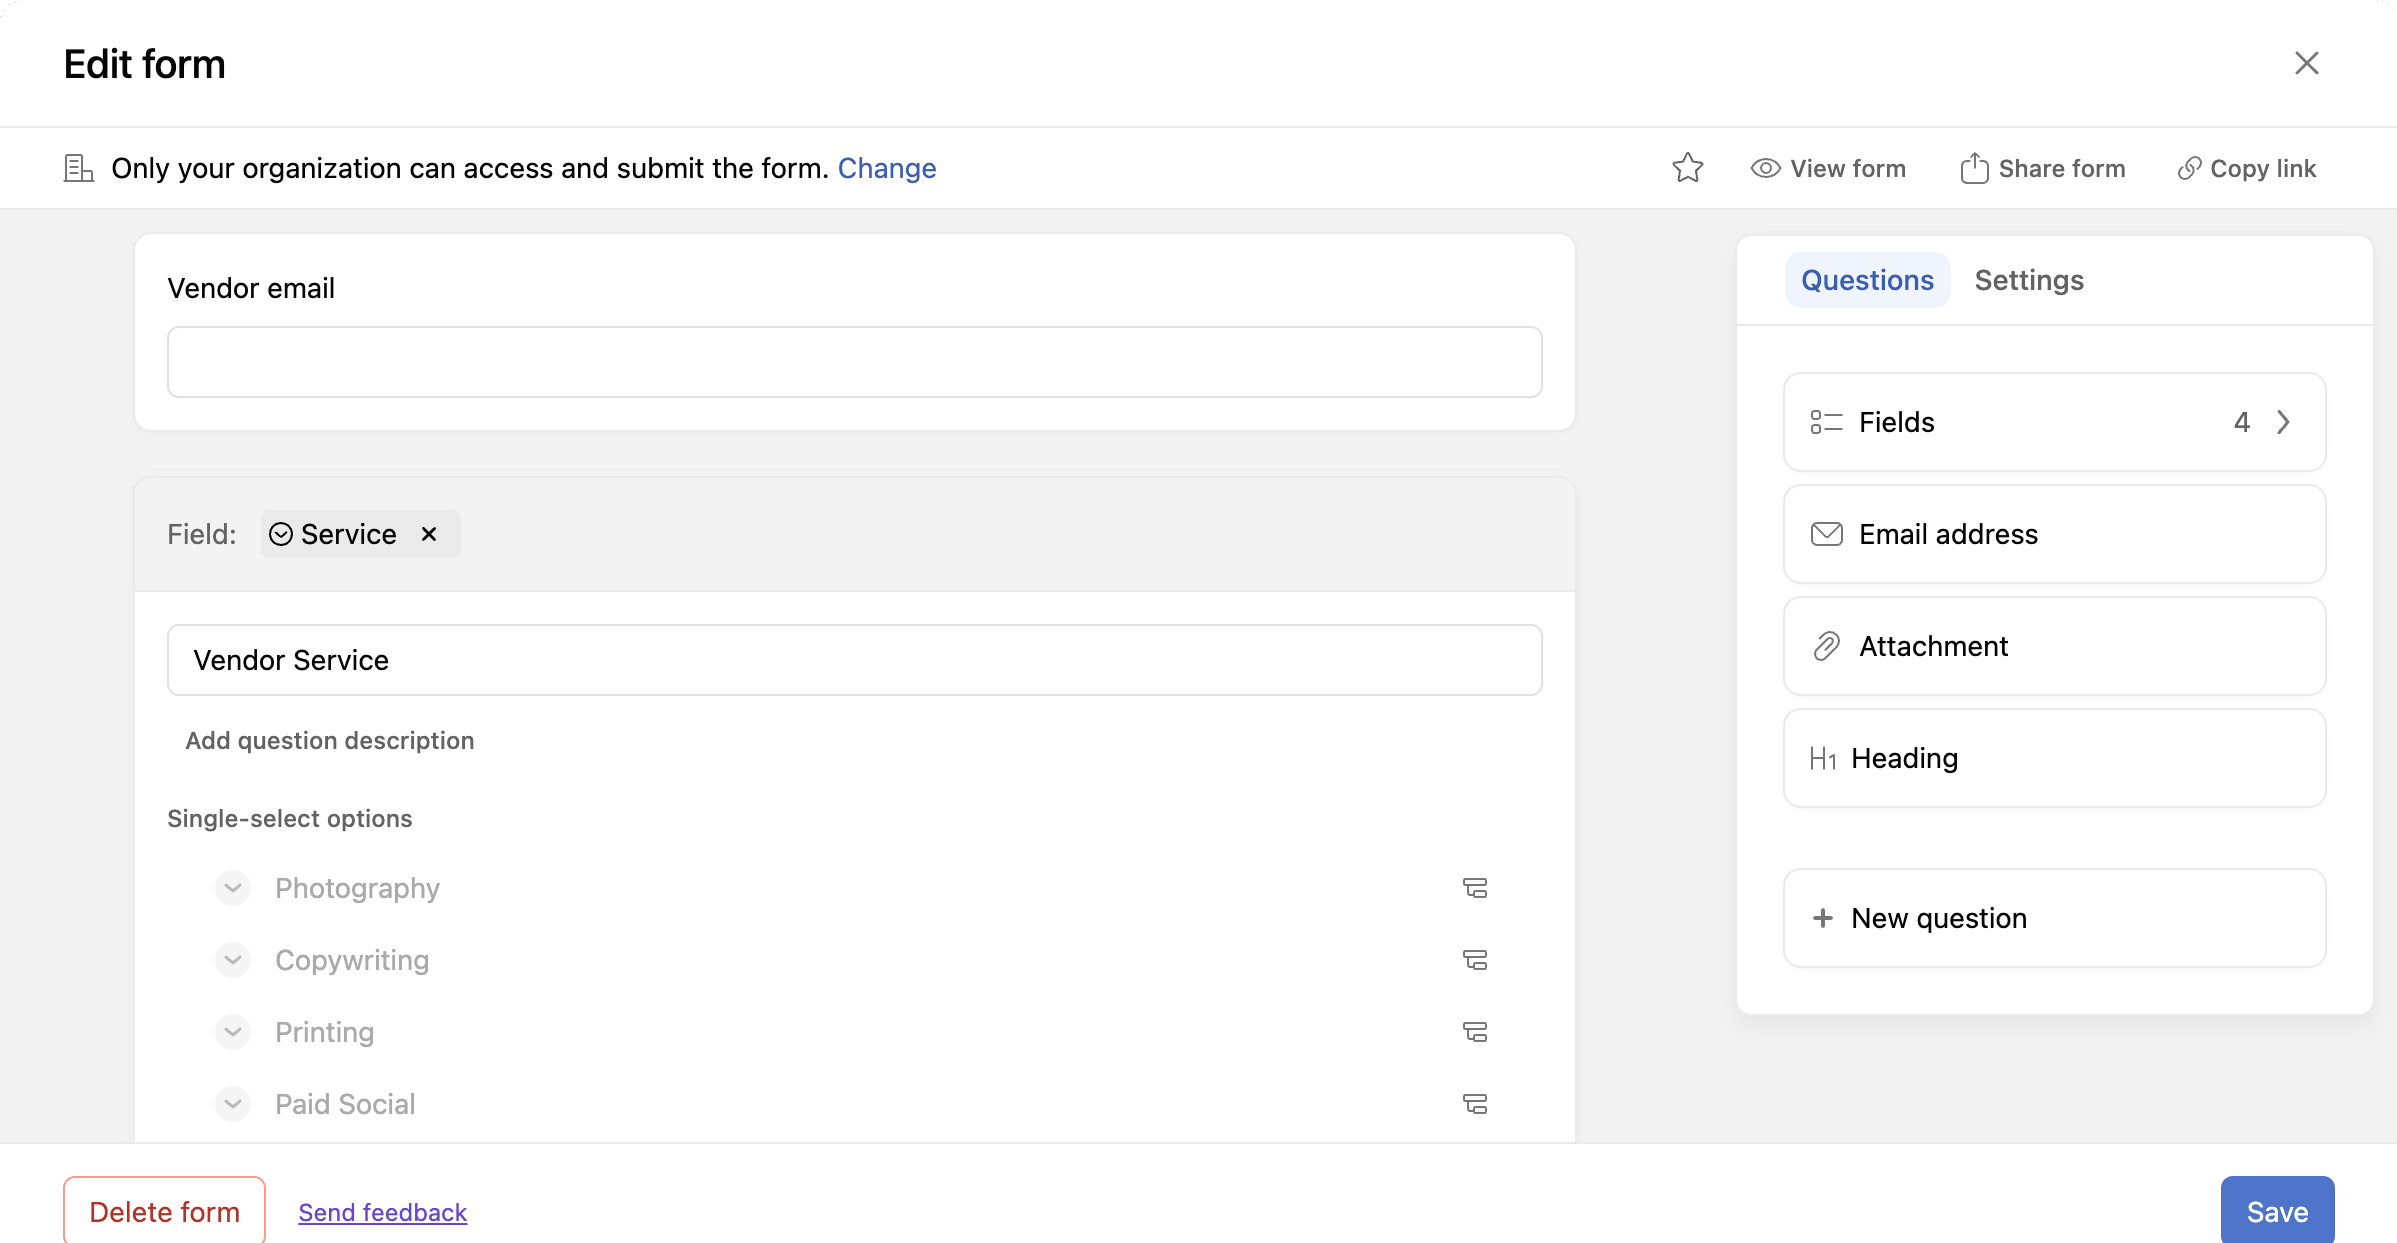
Tables have their own forms, under Customize > Forms. Instead of creating a task, a submission creates a new record in the table. The builder works like project forms, with one difference: every question must be mapped to a field. In a project form, unmapped answers land in the task description. In a table form, you can't publish until every question has a field.
Good uses: a vendor onboarding form your agencies fill in themselves, or a request form for adding a new channel to your channel specs.
How to use automations with Tables
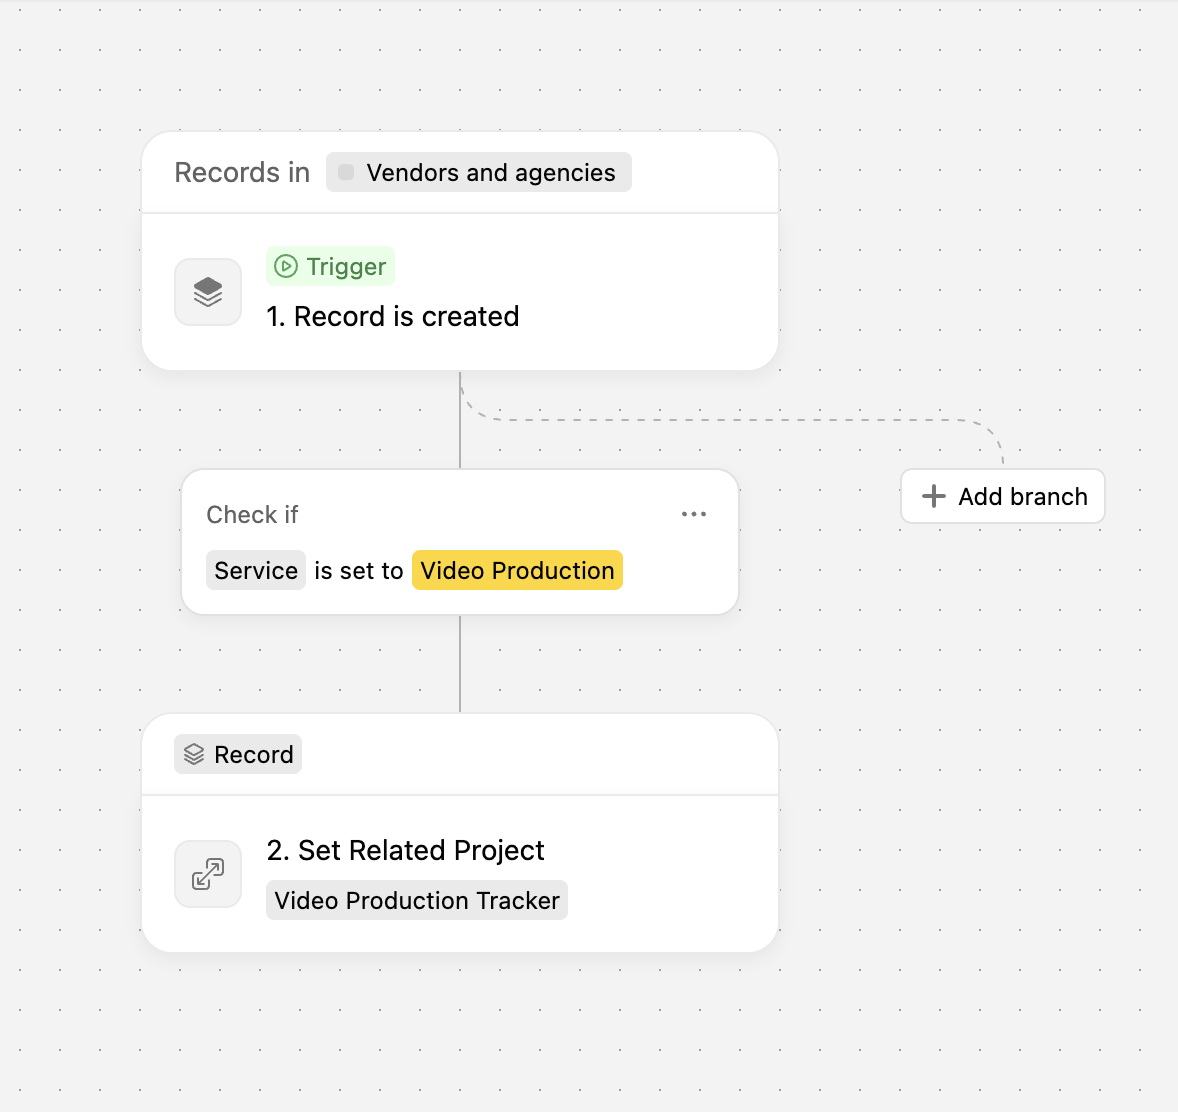
Tables also have automations, under Customize > Automations, with the same builder as project automations. For now, a table automation can start when a record is created or when one of its fields changes, and the action is updating a field. You can also use AI Studio to fill in or update fields for you.
A simple one to start with: when a new record is created and the service is video production, link the record to the video production tracker project. Every new video vendor is linked to the right project automatically, so the record always shows which project it belongs to.
Two more ideas that work with what's available today:
Keep categories consistent with AI Studio. When a record is created, let AI Studio read the record and set the Service field, so every vendor is categorized the same way no matter who adds it.
Keep links current when something changes. When the Service field changes, update the Related project field to match, so a vendor that moves from photography to video production is linked to the right project.
Tables are still new, so the triggers and actions are limited for now. Start with one automation and add more as Asana adds options.
How to use the project Knowledge tab
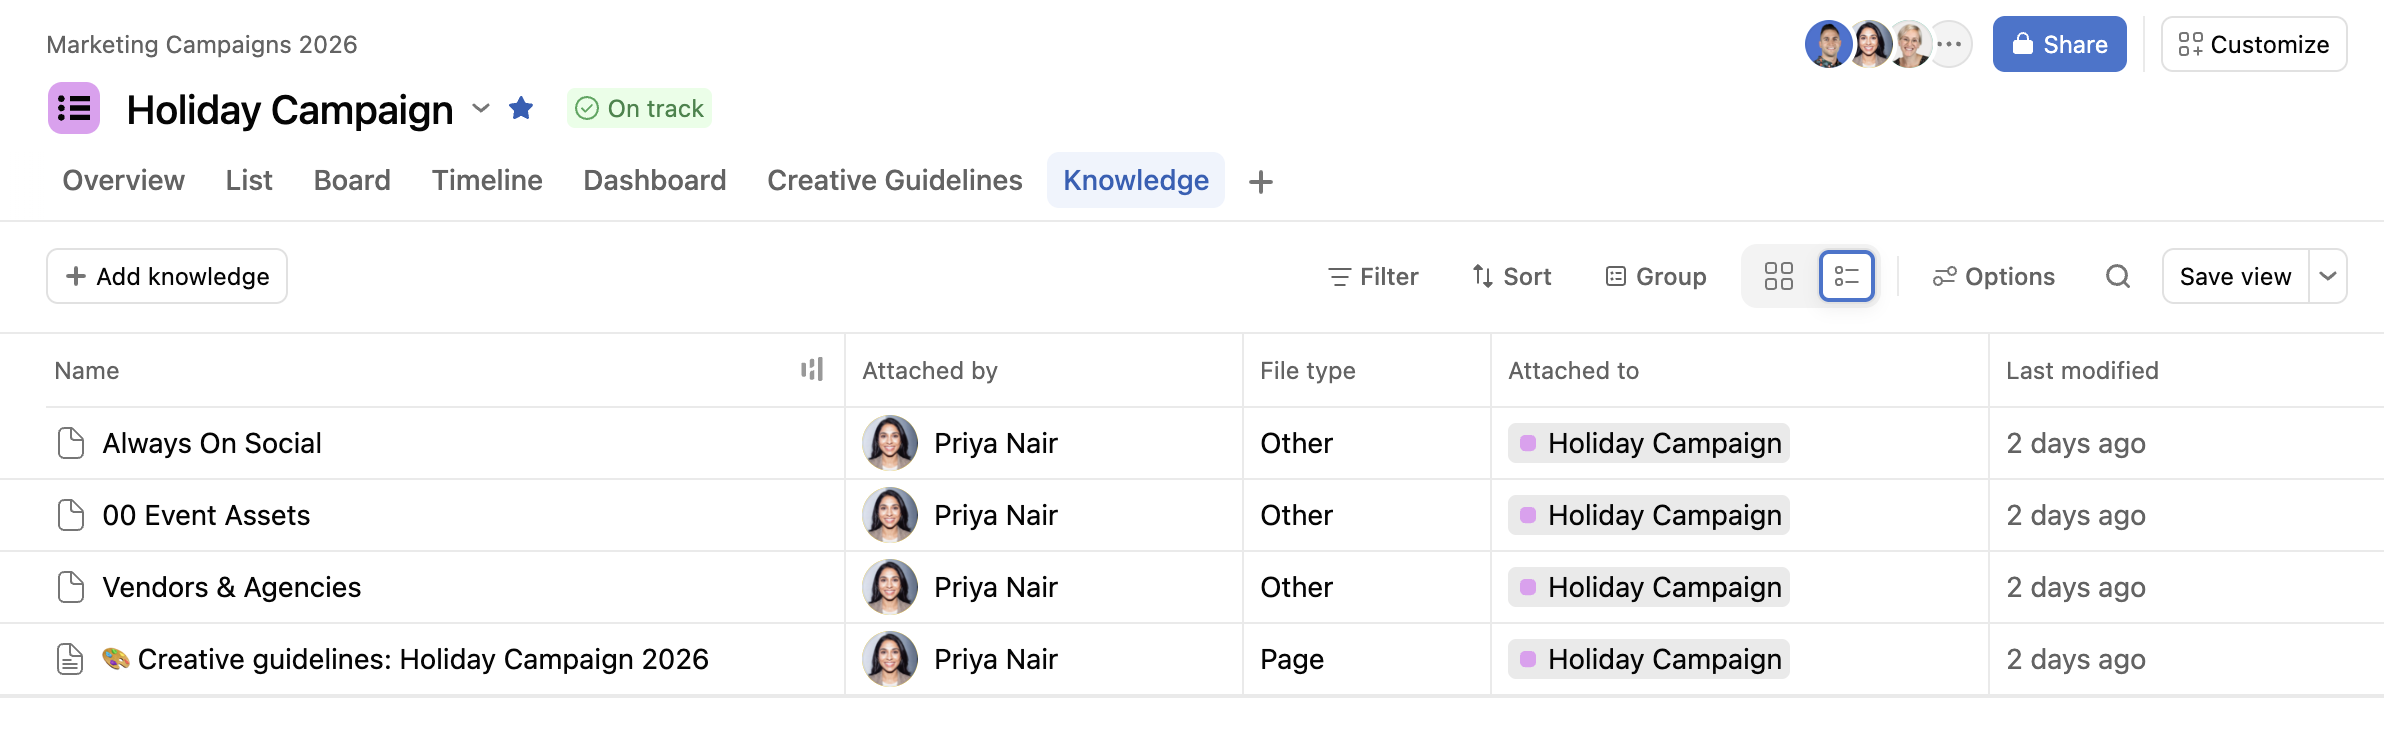
Each project can also have a Knowledge tab: one place to see every file, Page, Table and record connected to that project, so nobody has to remember which tab or task something lives in. If your project doesn’t have it yet, you can add it by clicking the + next to your project tabs and choosing Knowledge.
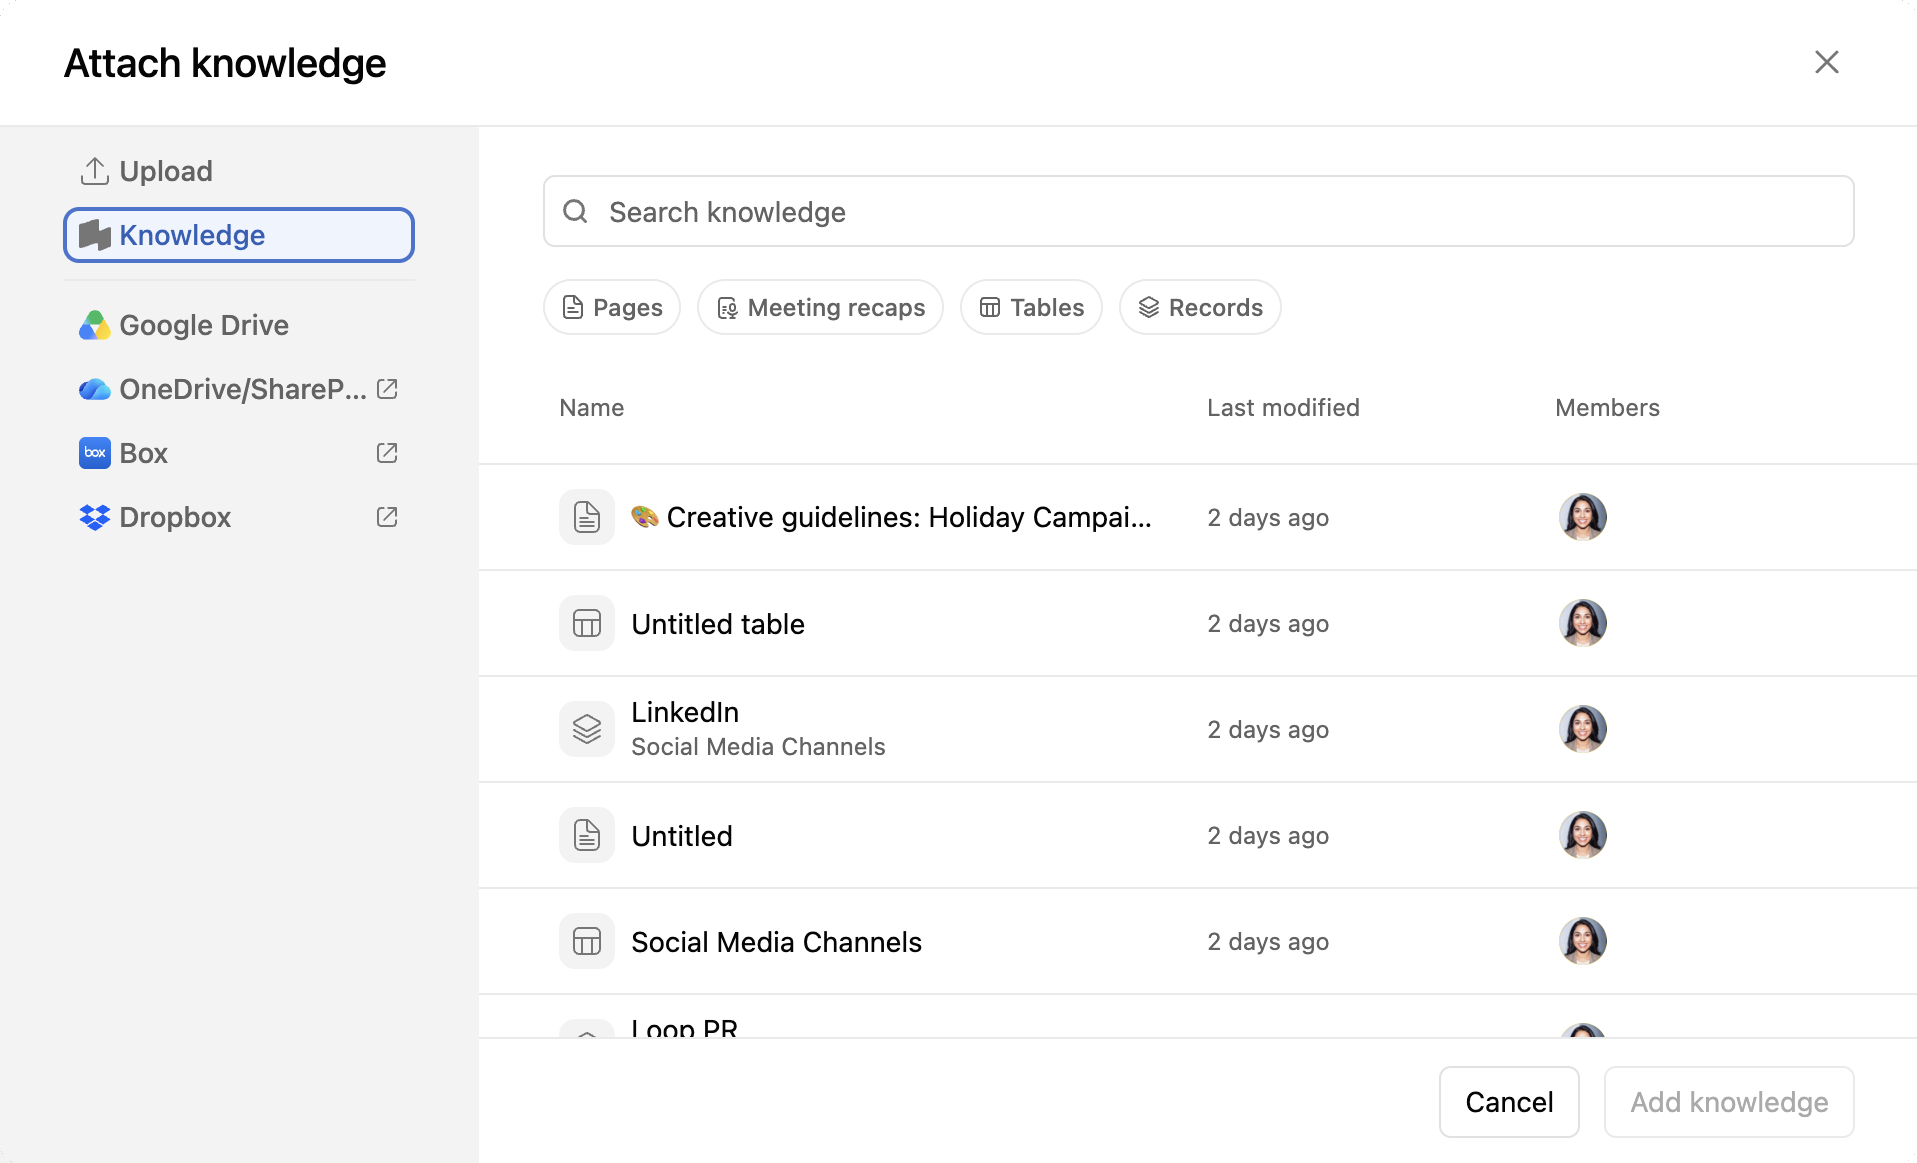
Click Add knowledge to upload a file, connect one from Google Drive, OneDrive or SharePoint, Box or Dropbox, or link something already in Asana: a Page, a meeting recap, a Table or a single record. Everything in the Overview’s key resources shows up here automatically, except the project brief, which stays in the Overview.
You can switch between a gallery view, which previews each Page, and a list view that shows who attached each item, its file type, what it’s attached to and when it was last changed. Filters let you show only Pages, Images, Meetings, Tables or Records, and you can sort by file type, name or last modified, or group by file type or file source.
How AI uses your Pages, Tables and project Overview
Here's what that looks like day to day.
AI Teammates can review new requests against your own documentation. For example, a creative request can be checked against the brand guidelines Page before it reaches a designer. Our guide to Asana automations and AI Teammates explains how they fit with your workflows.
Asana Dash can answer questions with the right context, like which agency handles video for the holiday campaign, because the answer sits in a linked Table record. See 5 things to try in Asana Dash.
AI Studio automations can use the same information to triage and route work. Our AI Studio guide covers how it works.
Using Claude with the Asana MCP
If your team uses Claude, you can connect it to Asana through the MCP. At the time of writing, Claude can create, update and search Table records, so it can keep reference data current, and it can update project descriptions. It can't edit Pages or the project brief yet, so keep those in Asana itself.
Your source of truth checklist
Fill in the Overview of every active project: description, roles, project brief and key resources.
Add that structure to your project templates, so new projects start complete.
Move shared documents, like brand guidelines and SOPs, into Pages and link them from each project.
Turn your most used spreadsheets into Tables, starting with vendors, channels or product lines.
Link records to projects with a reference field, and link each table from the project Overview.
Add a form to each table so new records come in complete.
Point AI Teammates, Dash and AI Studio at the approved Pages and Tables.
If you're cleaning up the rest of your workspace too, start with our guide on how to audit your Asana workspace.
When your team needs help with this
Setting up a Page or a Table takes minutes. The harder part is deciding what goes where, and getting every team to use the same ones instead of building their own.
That's part of what our Asana Health Check covers. Our team reviews one stakeholder group and two of your critical projects, and gives you 3 to 5 high impact opportunities, including where your information should live so people and AI work from the same source. You get a report and a Loom video walkthrough of the findings, plus an optional live call to go through them together.
Want to know if your team needs one? Book a call and we'll talk it through.
FAQ
Where should your source of truth live in Asana?
In three places, depending on the information. Each project's Overview explains that project, Pages hold shared documents like SOPs and brand guidelines, and Asana Tables hold reference data like vendors or product lines. Pages and Tables live in Knowledge mode, so the whole team can find them and link them from any project.
What's the difference between Asana Pages and the project Overview?
The project Overview explains one project: its description, roles, project brief, key resources and status. Pages are documents your team writes and edits together, like guidelines, SOPs or meeting notes. A page can be attached to a project, but it can also live in Knowledge mode and be shared across many projects.
What are Asana Tables?
Asana Tables store structured information as records, like a spreadsheet inside Asana. You link records to the projects and tasks that use them with a reference field, and lookup fields show the record's details. When you update a record once, the change shows everywhere it's referenced.
What’s the difference between an Asana table and a project?
A project tracks work that moves and finishes, so its tasks have due dates and get marked complete. A table holds reference information that outlasts any single task, like a vendor list or a product catalogue. Records don’t get marked complete, so they stay available to every project that references them. If you’ve been using a project as a makeshift list, open its drop-down menu and select Create table from project.
Which Asana plans include Tables?
Tables are available on the Advanced, Enterprise and Enterprise+ plans. Pages and the project Overview are available on Personal and all paid plans.
Are Asana Pages the same as Notes?
Yes. Pages was previously called Notes, and all existing notes are now Pages. Notes that lived as tabs in your projects stay where they were.
Can forms add records to an Asana Table?
Yes. Tables have their own forms, and each submission creates a new record. Unlike project forms, every question must be mapped to a field before you can publish the form.
How do Pages and Tables help AI in Asana?
Asana Dash, AI Teammates and AI Studio can read files and apps outside Asana too. The difference is upkeep. When your guidelines live in a Page and your reference data lives in a Table, they get updated where the work happens, so AI always works from the current version instead of a file someone forgot to update.