
Short answer: Asana has two resourcing features. Capacity planning is the plan: you allocate people to whole projects, before any tasks exist, to check that your team can staff them. Workload is the reality: it shows the tasks each person actually has, day by day, against their capacity. Workload works inside projects and portfolios on the Advanced plan and above, and across your whole organization on Enterprise and Enterprise+. Capacity planning is available on Enterprise and Enterprise+.
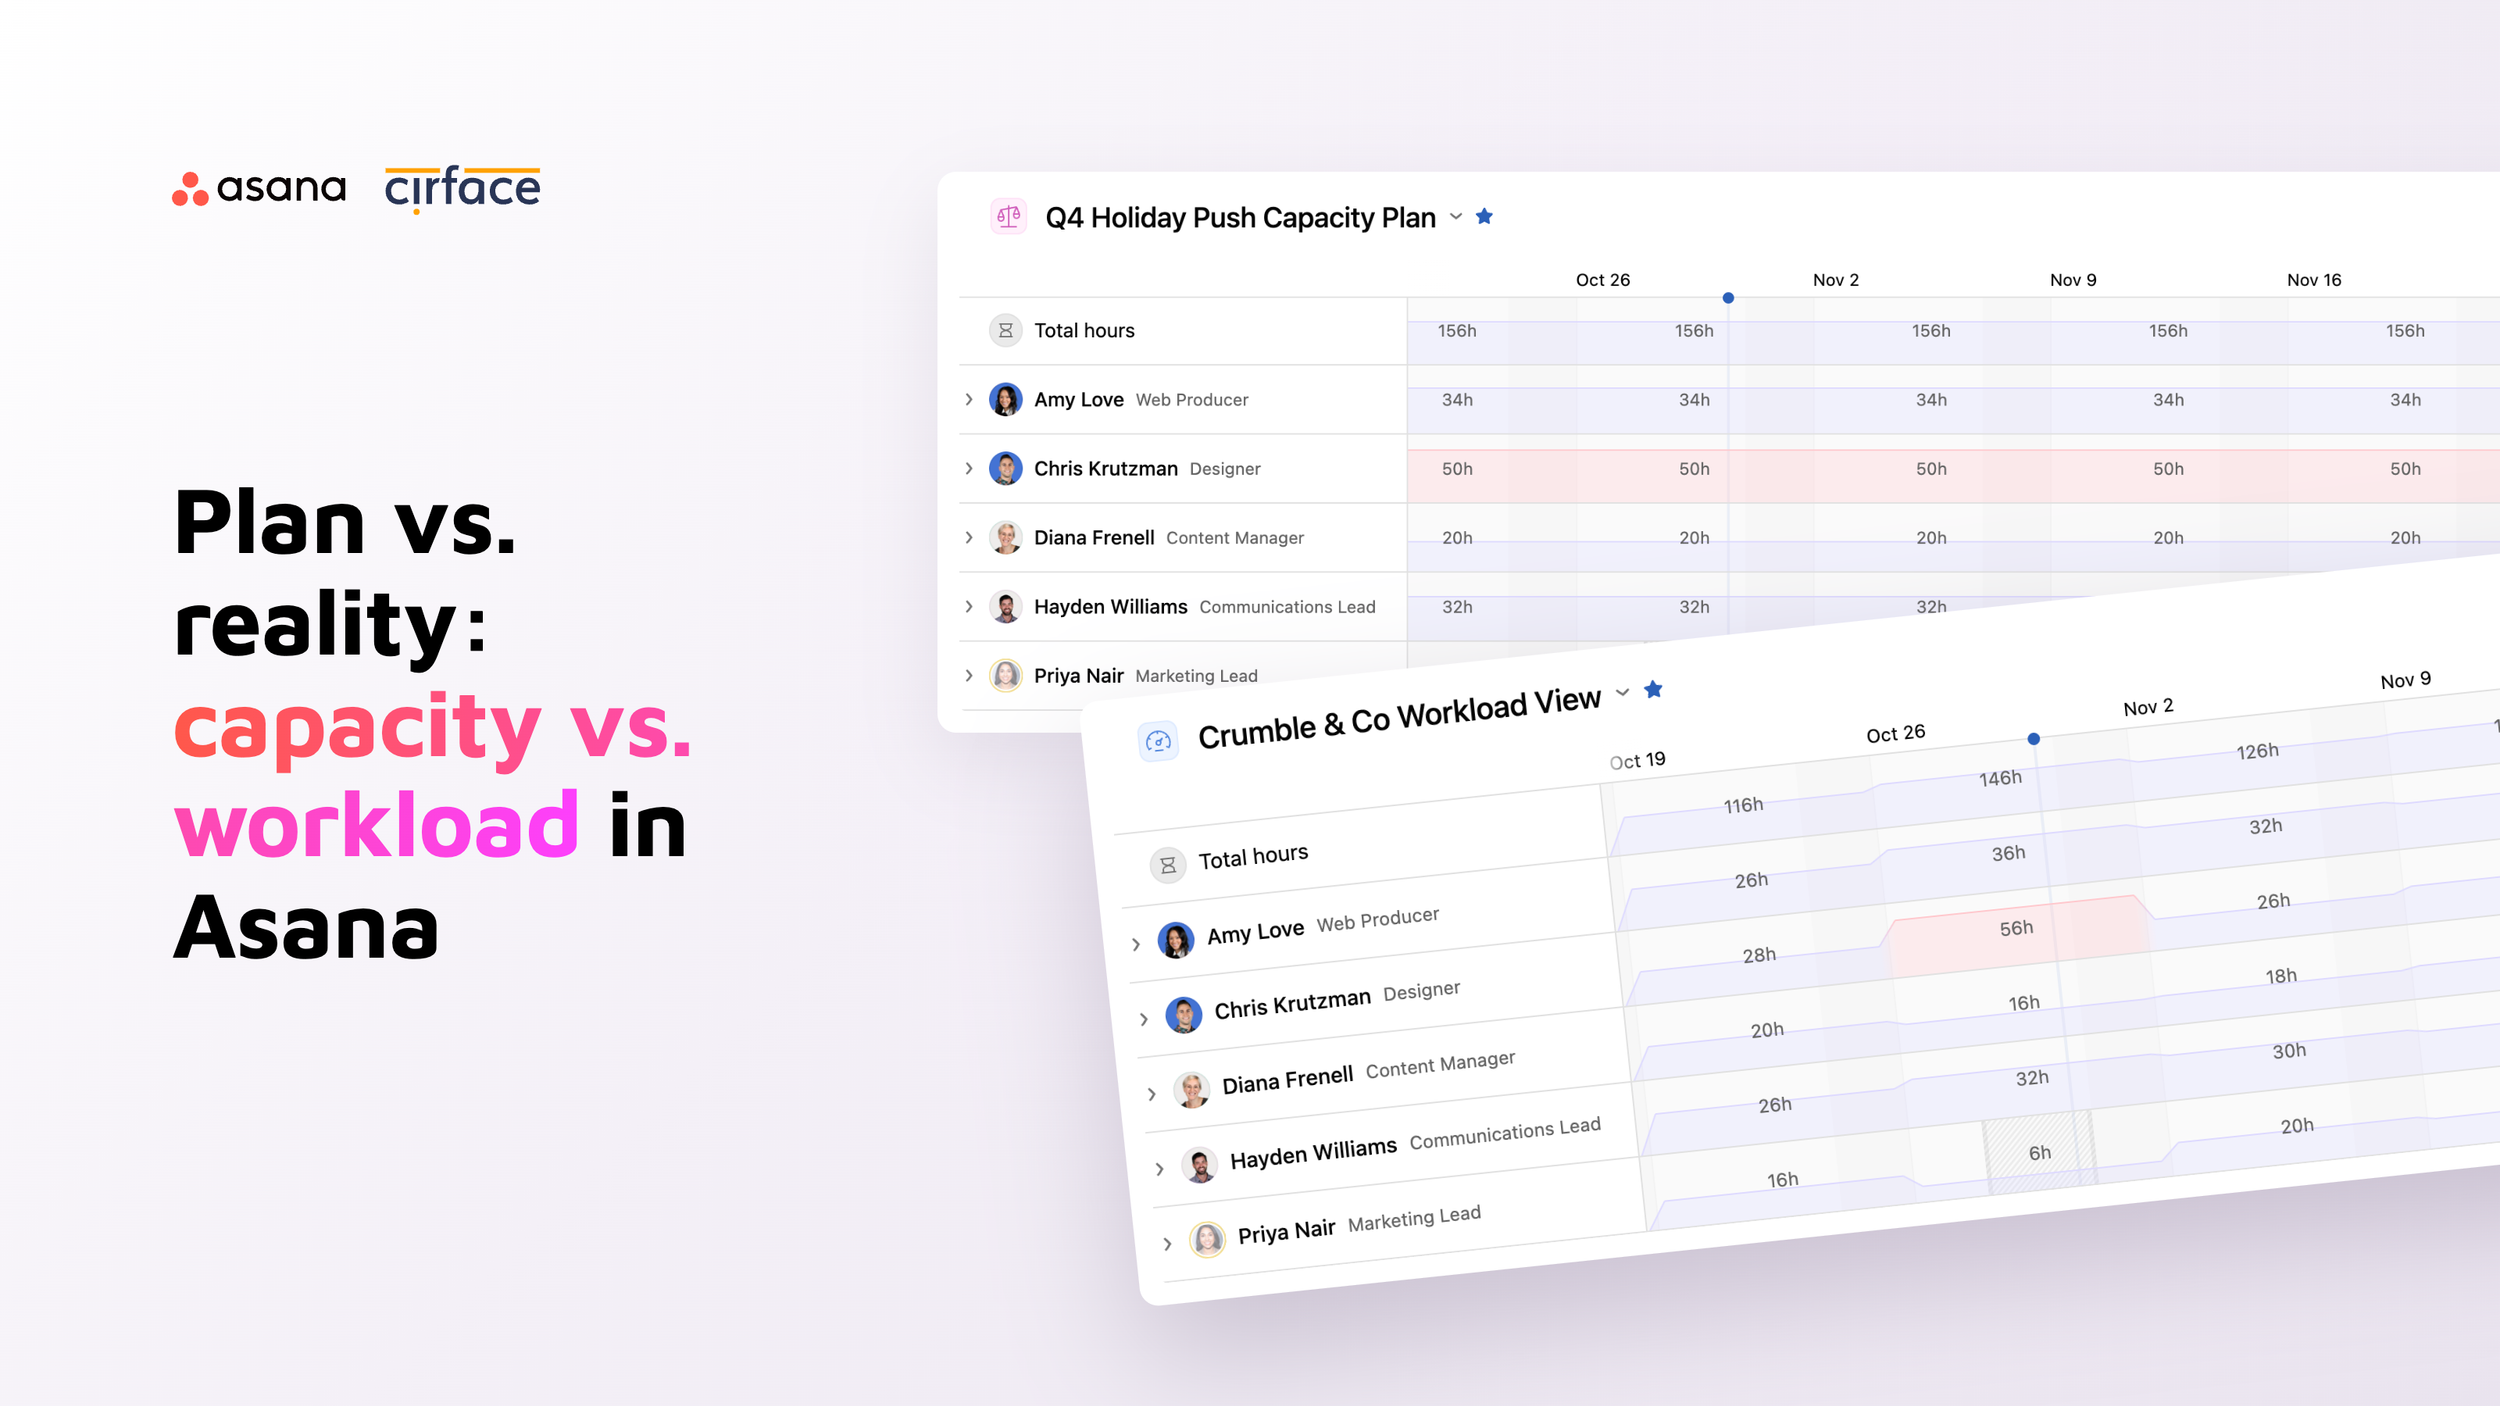
Asana makes it easy to plan work. You create the project, add the tasks, set the dates and assign people. What it won't tell you on its own is if those people can actually fit all of it into their week. That answer lives in separate views, and a lot of teams never open them.
Workload and capacity planning are made for exactly that, and they're two of the most underused features I see. Once your tasks have estimates and your team has a capacity, you can spot who's overloaded before deadlines start slipping, and you know early if you need to hire someone or bring in a freelancer.
In this guide I'll walk through what each feature does, where it lives, which plans include it and how they work together. I'll also cover the Compare button, how to fill in effort automatically so your team doesn't have to, and the AI Teammate that can review all of it for you.
What is Asana workload?
Asana workload is a view that shows every task assigned to each person, spread across the days between its start and due date, against the capacity you set for them.
It answers a very practical question: this week, with the tasks we have today, is anyone overloaded? When someone goes over their weekly capacity, their bar turns red, and you can fix it right there. Drag a task to another person's row to reassign it, or drag it along the timeline to give it more time.
The three levels of workload in Asana
Workload exists at three levels, and the level decides how much of your work it can see.
Project workload. Add it as a tab on any project from the plus button in the project header. It only sees that project.
Portfolio workload. Open a portfolio and go to the Workload tab. It sees every project in that portfolio, so a team portfolio becomes a quick view of your whole team's work.
Universal workload. Go to Strategy in the sidebar, open Resourcing and create it there. It pulls tasks from across your entire Asana organization, for the people you choose.
Project and portfolio workload are included on Advanced, Enterprise and Enterprise+. Universal workload is only on Enterprise and Enterprise+.
If you're on Advanced, portfolio workload can still get you very close. A workaround I use with clients is a master portfolio with your team portfolios nested inside it, then the workload tab on the master one. It takes more upkeep than universal workload, but it works.

Switch from task count to real effort
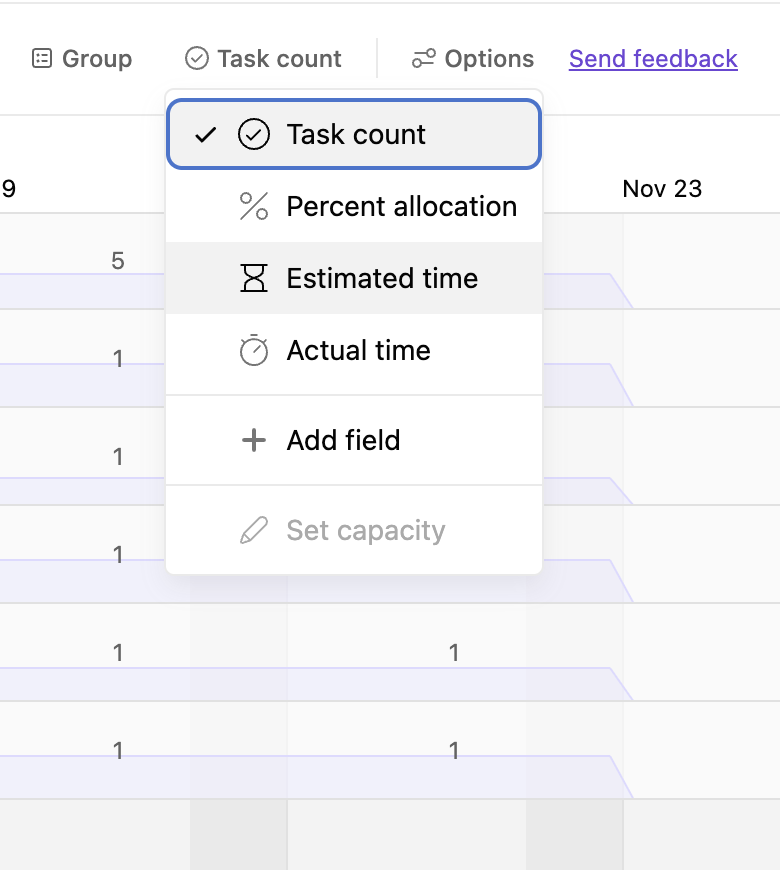
By default, workload counts tasks. That's the first thing I change, because a count tells you very little. Twenty quick tasks can be less work than one task that takes 100 hours, but by count they look like twenty times more.
Switch the effort to estimated time, percent allocation or a number field such as story points, then set each person's capacity.
Workload won't fill in those values on its own. Go to your projects, add the field, fill in a value on each task, and then come back to workload to see it reflected. Once your tasks carry real effort, the red bars start meaning something, and the automation section below shows how to skip most of that manual entry.
Two details are worth knowing. Effort is split evenly across the weekdays between a task's start and due date. Also, a task only appears in workload when it's assigned, has a due date and belongs to a project.
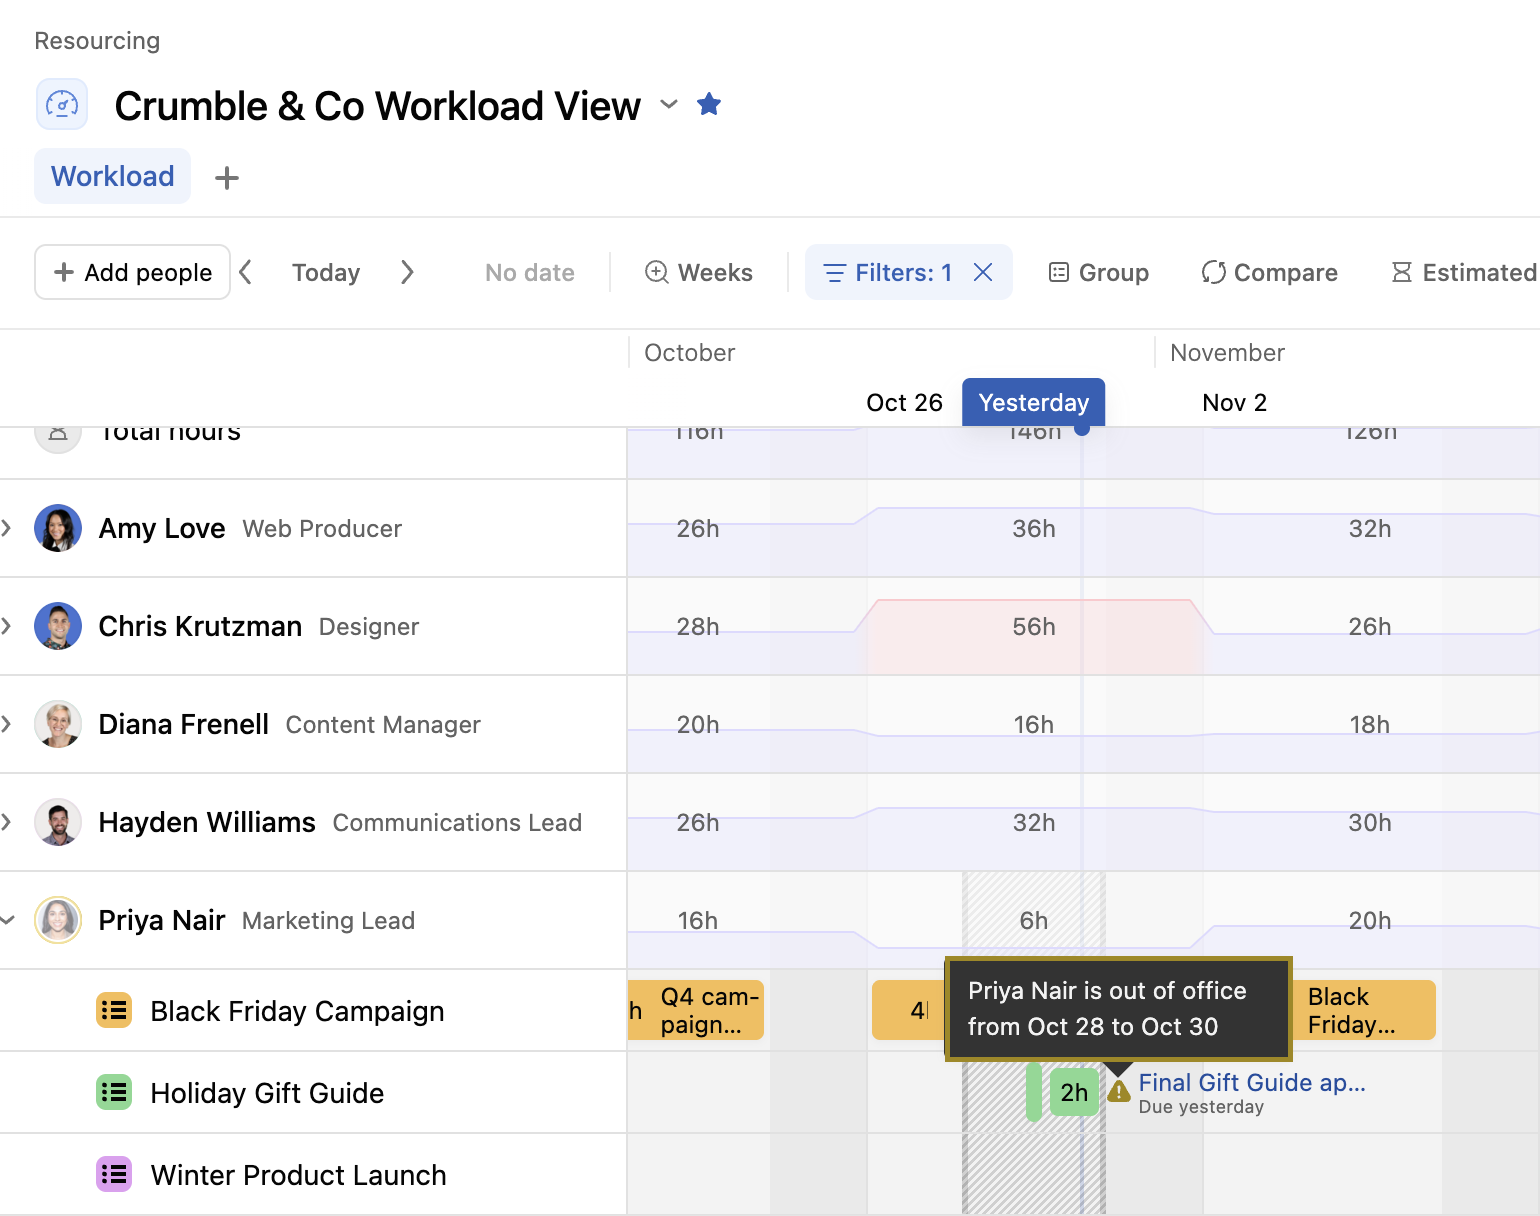
Out of office shows up too
Workload and capacity plans both flag a teammate's time off. If a task is due while someone is away, Asana shows a small warning, so you can finish it earlier, push it back or hand it to someone else.
What is Asana capacity planning?
Asana capacity planning lets you allocate people to entire projects over a period of time, without thinking about individual tasks yet.
This is the planning layer. At the start of a quarter you know which projects are coming and roughly who should work on them. A capacity plan tells you if the team you have can cover that work, or if you need to move dates, borrow someone or bring in a freelancer for one initiative.
Like workload, capacity plans exist at two levels. Inside a portfolio, the plan covers that portfolio's projects. From Resourcing, a universal capacity plan can pull in projects and portfolios from across your organization. Both are available on Enterprise and Enterprise+.
How to create a capacity plan in Asana
Open your portfolio and add a capacity plan there, or for a universal plan go to Strategy in the sidebar, then Resourcing, open Capacity plans and click Create.
On the Projects tab, add projects one by one or add a whole portfolio. A portfolio stays in sync, so new projects in it show up in the plan automatically.
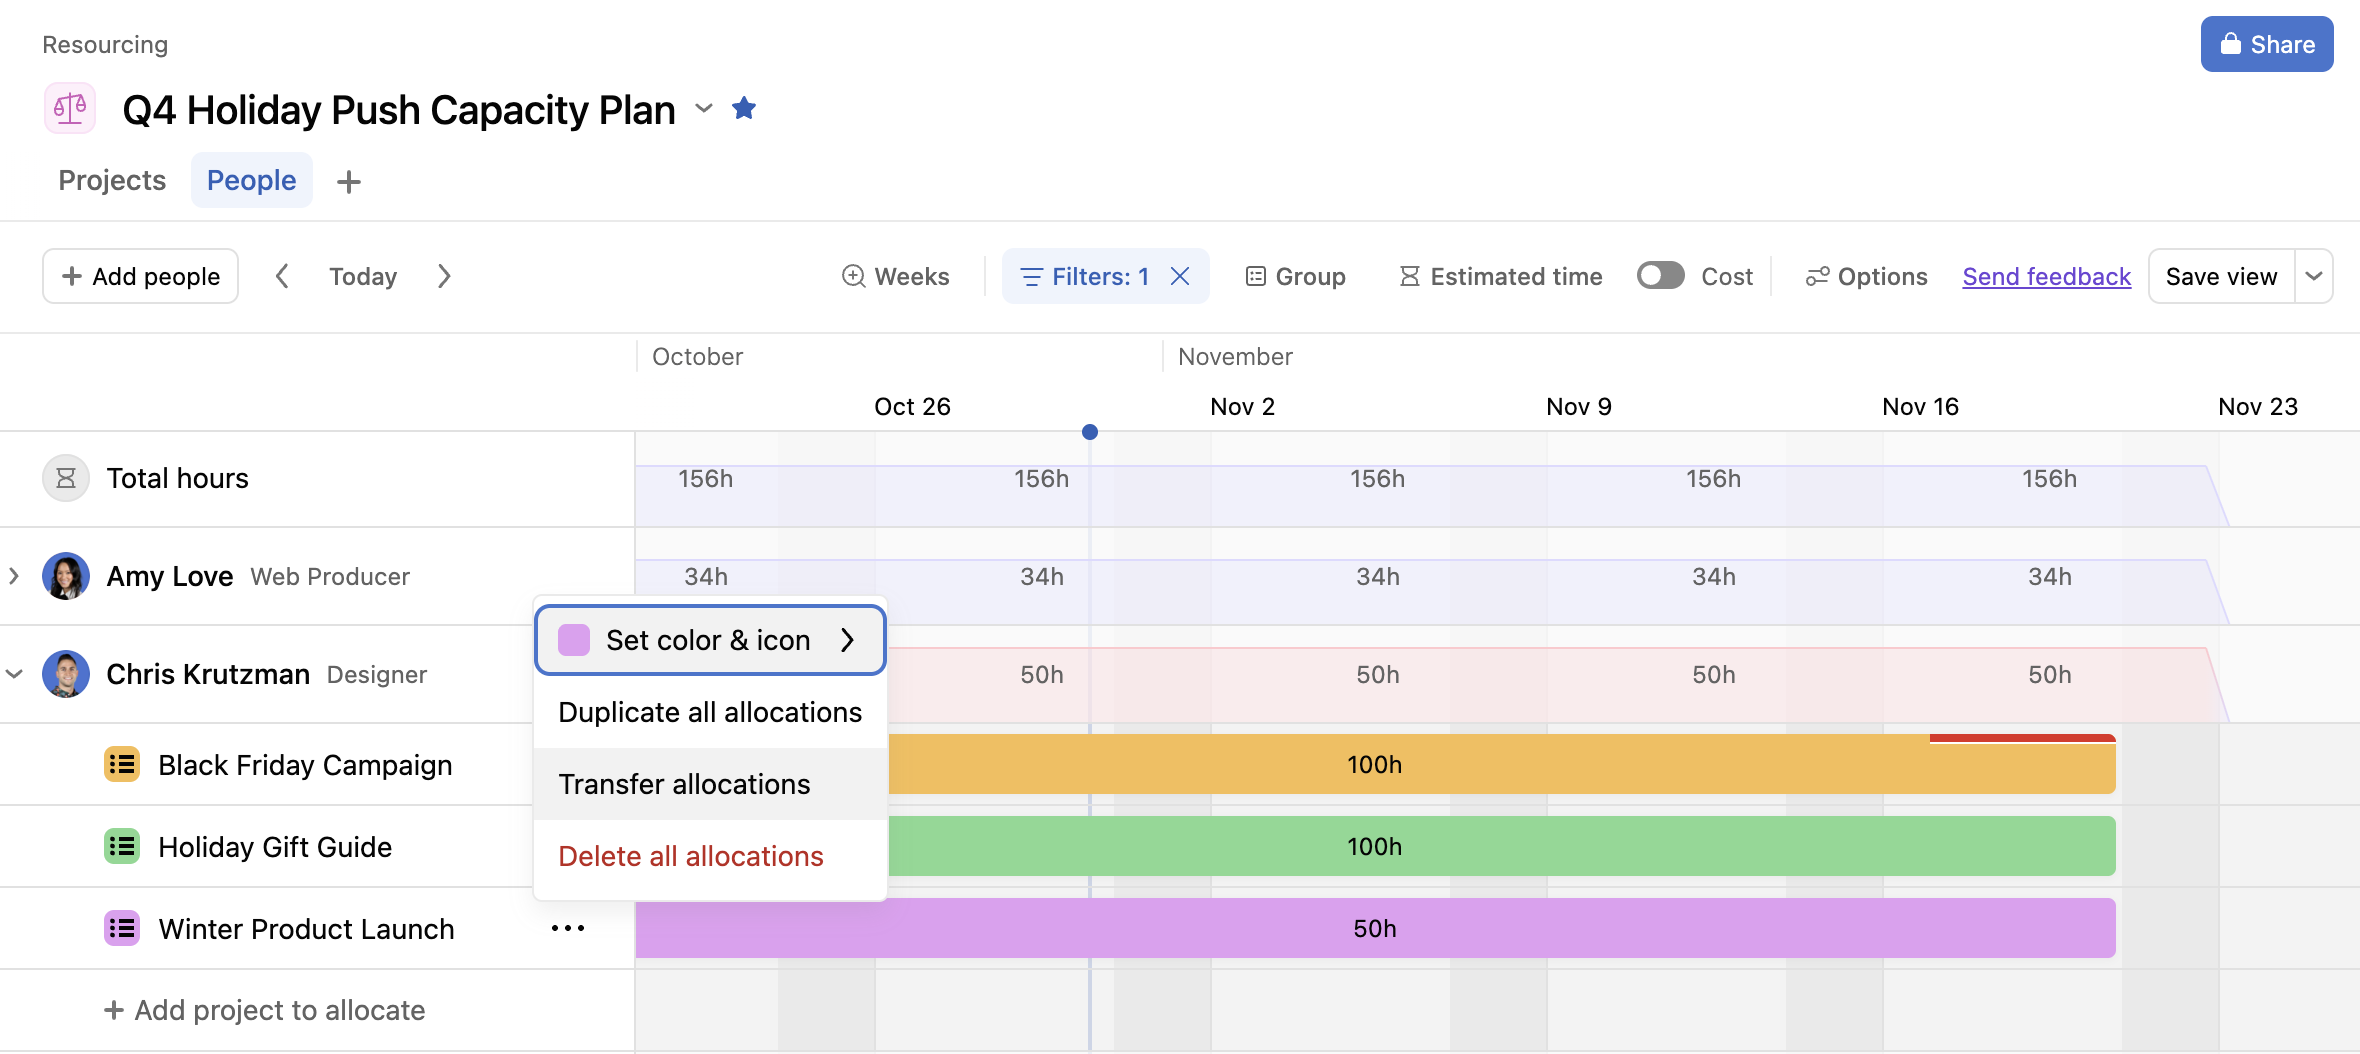
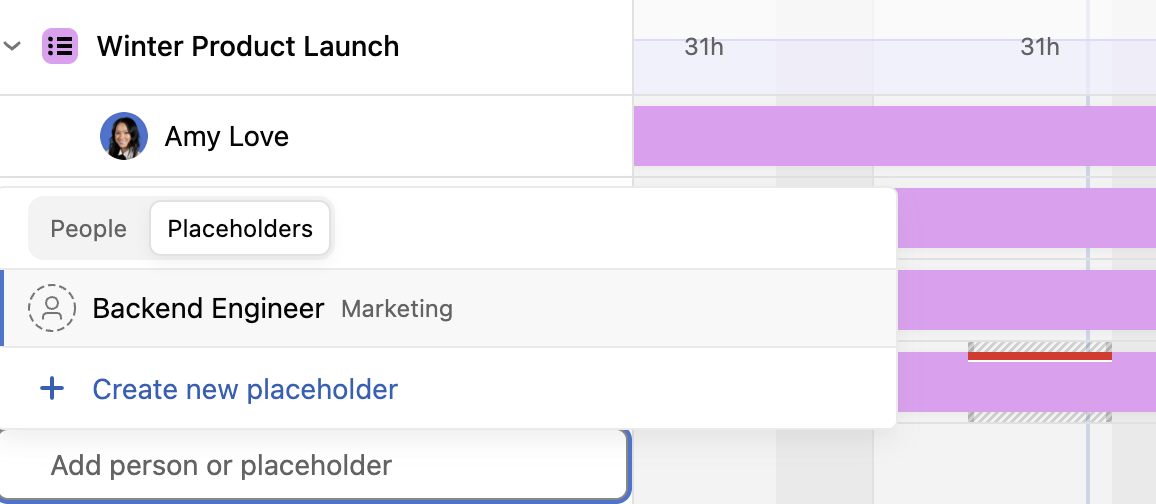
Under each project, add the people who will work on it. If you don't know who yet, add a placeholder such as "Freelance designer" and transfer the allocation to a real person later.
Click into the timeline to create an allocation, then drag its edges to match the dates.
Choose how you measure capacity. By default it's people count on the Projects tab and project count on the People tab, and you can switch to percent allocation or estimated hours. Then set each person's capacity, for example 40 hours a week.
Open the People tab. Anyone over capacity turns red, and you can expand their row to see which projects are adding up.
When someone is overloaded you have two simple fixes. Move part of the allocation to another person, or stretch the allocation over more days so the weekly load drops.
Things I wish more teams knew about capacity plans
Nobody gets notified. Adding someone to a capacity plan sends no inbox notification or email. You can test as many staffing scenarios as you like without confusing anyone.
Allocations live on the project, not the plan. If a colleague builds another capacity plan with the same person, they'll see the same allocation, as long as they can see the project.
Sharing has two roles. Plans start private. You can share with specific people or your whole organization as Viewers, who can only look, or as Admins, who can change allocations.
Grouping helps leadership read it. Group projects by a custom field such as priority, and your high priority work sits at the top.
Cost view is an add-on. With the Timesheets and Budgets add-on and hourly rates set for each person, you can look at the plan as cost instead of hours.
Asana workload vs capacity planning: what's the difference?
Capacity planning is the plan, and workload is what's actually happening. One works with whole projects before the work is broken down, and the other works with the tasks people are assigned today.
| Workload | Capacity planning | |
|---|---|---|
| What you assign | Tasks and subtasks | People to whole projects |
| Question it answers | Is anyone overloaded with the work assigned right now? | Can our team staff the projects we've planned? |
| Best moment to use it | During execution, week to week | Quarterly or project planning, before tasks exist |
| Where it lives | Project tab, portfolio tab, or Resourcing (universal) | Portfolio, or Resourcing (universal) |
| Plans | Project and portfolio: Advanced, Enterprise, Enterprise+. Universal: Enterprise, Enterprise+ | Portfolio and universal: Enterprise, Enterprise+ |
| How effort is measured | Task count, estimated time, percent, or a number field | Percent allocation, estimated hours, people or project count |
| Notifications | Reassigning a task notifies the new assignee | Allocations notify nobody |
The two views aren't connected automatically. Someone can be allocated to a project in a capacity plan and still have no tasks assigned there, or the other way around. That gap is exactly what you want to spot, and the Compare button is how you spot it.
One recommendation from client work: use the same measure in both. If your capacity plan uses estimated hours, set workload to estimated time too. Everyone reads the numbers the same way, and the comparison actually lines up.
How does the Compare button work in Asana workload?
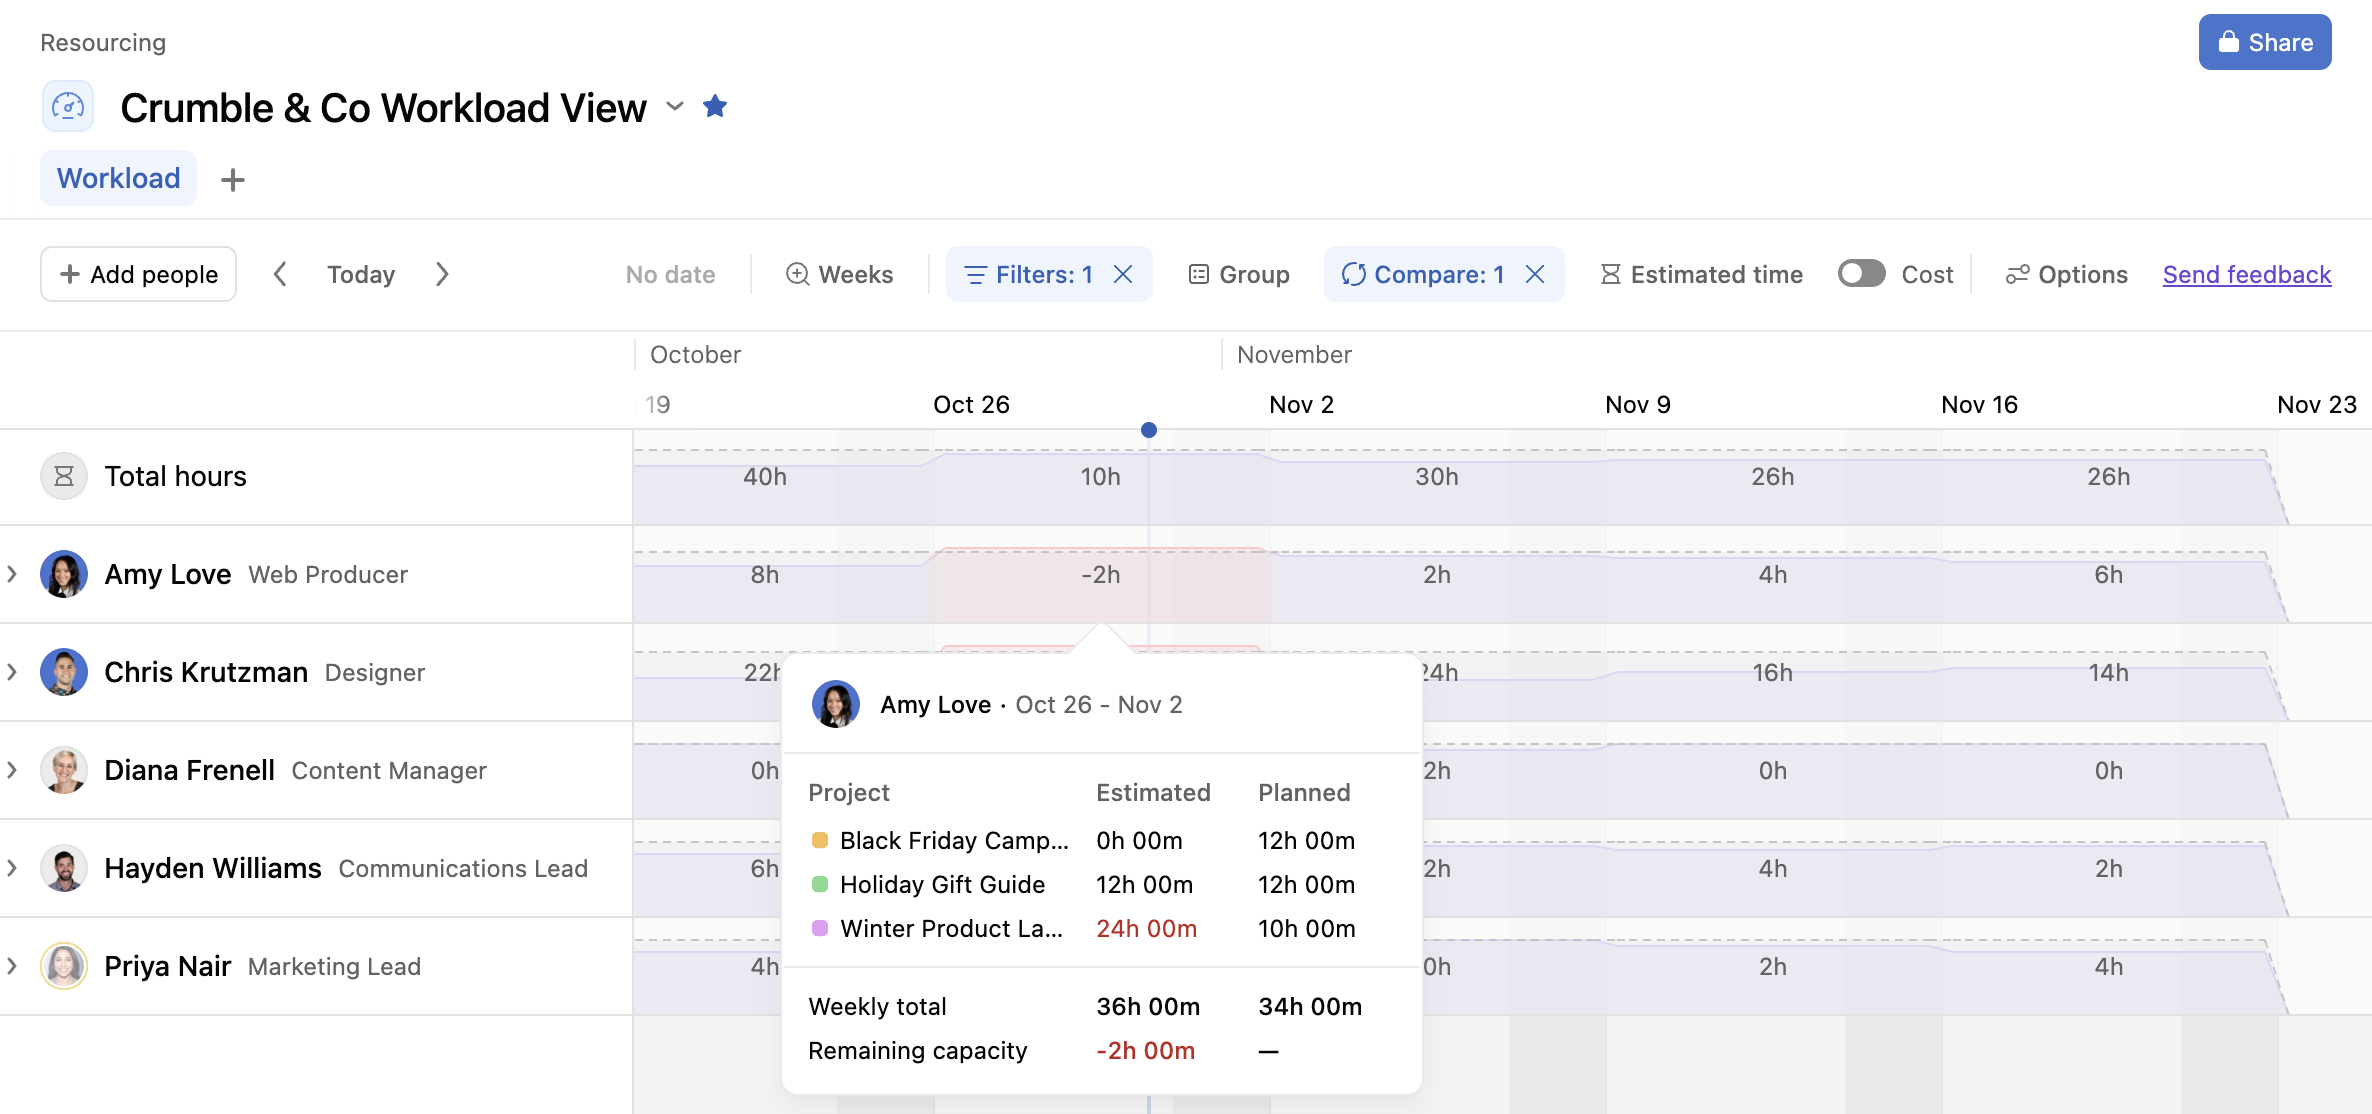
The Compare button shows your plan and your real workload on the same screen, so you can see who is over or under allocated and if execution matches what you planned.
Before it existed, you had to jump between the capacity plan and the workload tab and reconcile the numbers in your head. Now it's one click.
1. Open a portfolio workload or a universal workload.
2. Click Compare in the toolbar.
3. Pick what to compare against: the capacity plan, or estimated time against actual time.
The planned effort appears as a dotted line over the workload. Click any cell to open a breakdown by project, with the estimated time on tasks next to the planned time from the capacity plan, a daily total and the capacity that's left.
Two requirements to keep in mind. Comparing against a capacity plan needs Enterprise or Enterprise+. And the Compare option only appears when your workload uses a supported effort type: percentage, estimated time, estimated cost, actual time or actual cost.
Here's how I use it. At the end of each cycle, open Compare and look for the biggest gaps. If someone was planned at 10 hours a week on a project and the tasks actually needed 24, that's the input for your next planning session, not just a one week fix.
How to add estimated time in Asana automatically
Workload is only as good as the effort data on your tasks, and nobody wants to type an estimate into every single task. The fix is to make Asana fill it in for you, with templates and automations.
This is where most resourcing setups quietly fail. The views are built, but half the tasks have no estimate, so the bars look calmer than reality. Build the estimate into the workflow once, and the data stays complete without anyone thinking about it.
Option 1: put the estimate in your templates
For work that repeats, set the estimated time directly on the task templates and on the tasks inside your project templates. A blog post task can always start at 6 hours and a design review at 2. People adjust it when they need to, but they never start from a blank field.
Option 2: set it with a regular automation
For work that arrives through a form or moves through stages, use an automation that sets the estimated time when something happens. A few examples I like:
| When this happens | Set this | Good for |
|---|---|---|
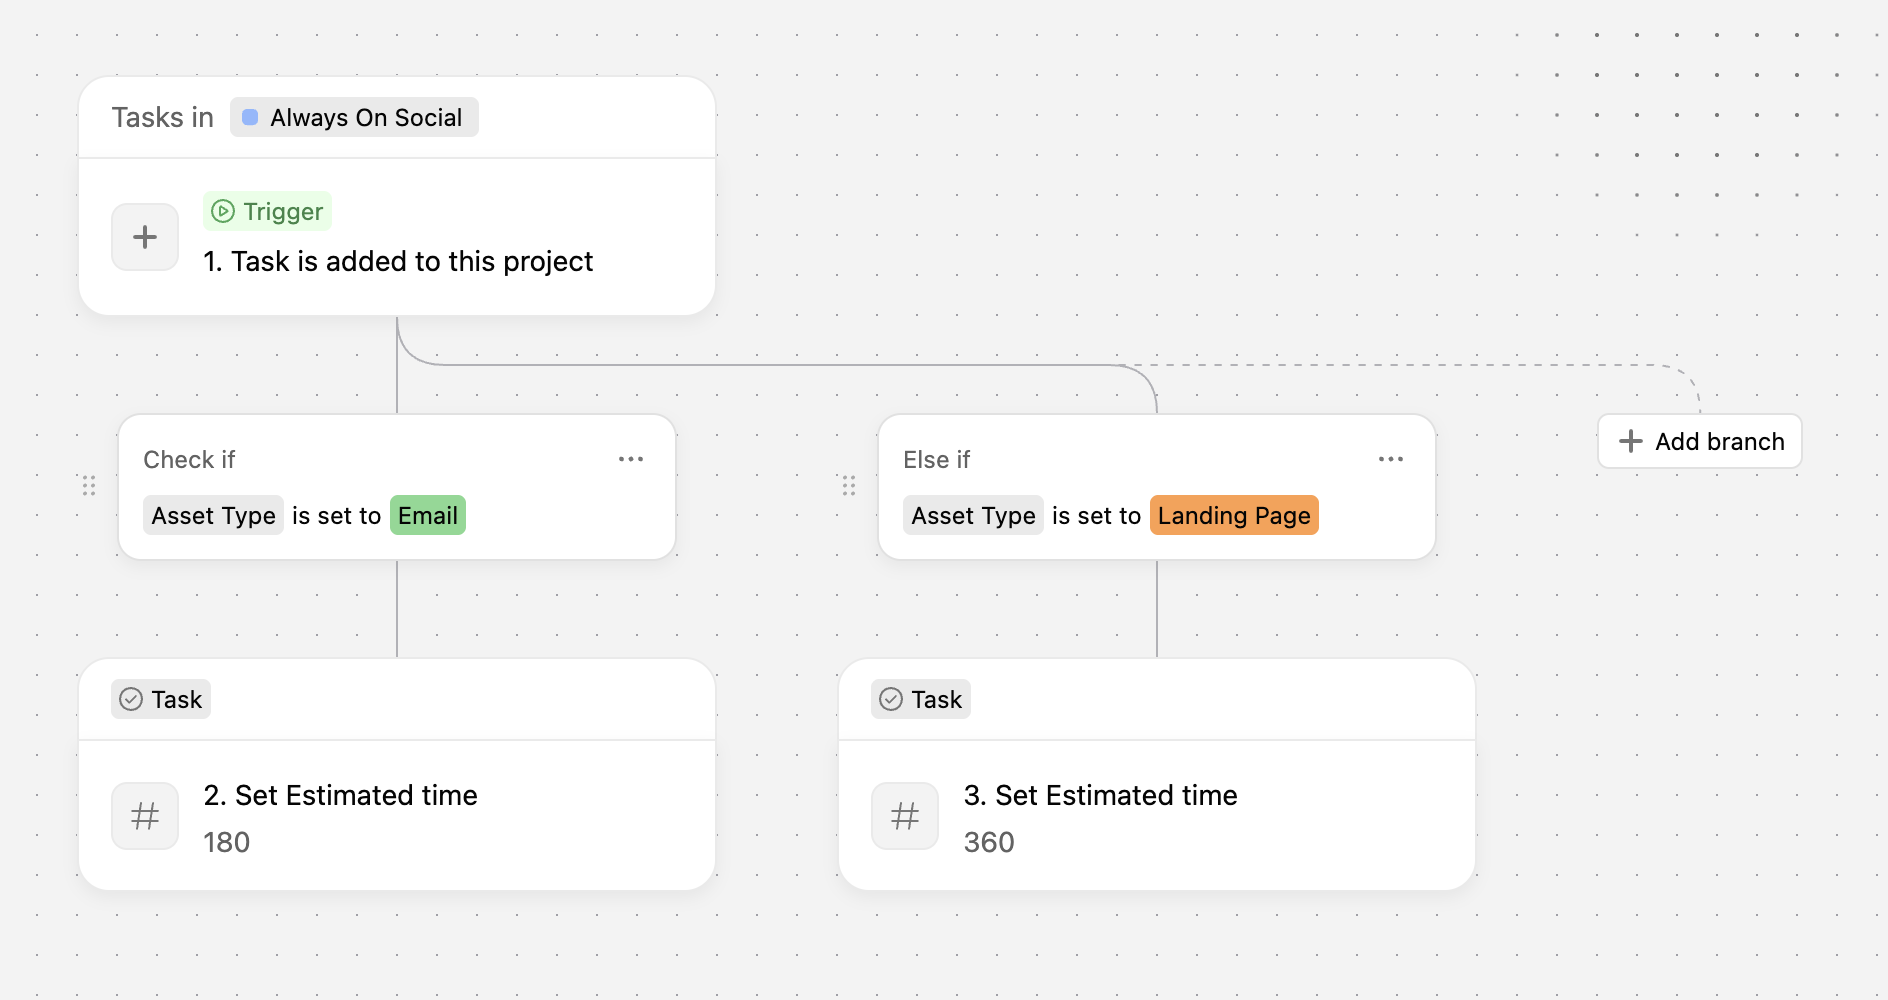
| Task is added to the project from the request form | Estimated time based on the request type | Intake and creative requests |
| A Size field changes to Small, Medium or Large | Estimated time of 2, 8 or 16 hours | Teams that size work before scheduling it |
| Task moves to the In production section | Percent allocation for the assignee's share of the week | Longer pieces of work spread over several days |
Use conditions and branching so one automation covers every size or request type. To roll the same setup out across many projects, package the fields, templates and automations in a bundle, so every new project inherits it.
Option 3: let AI Studio estimate it
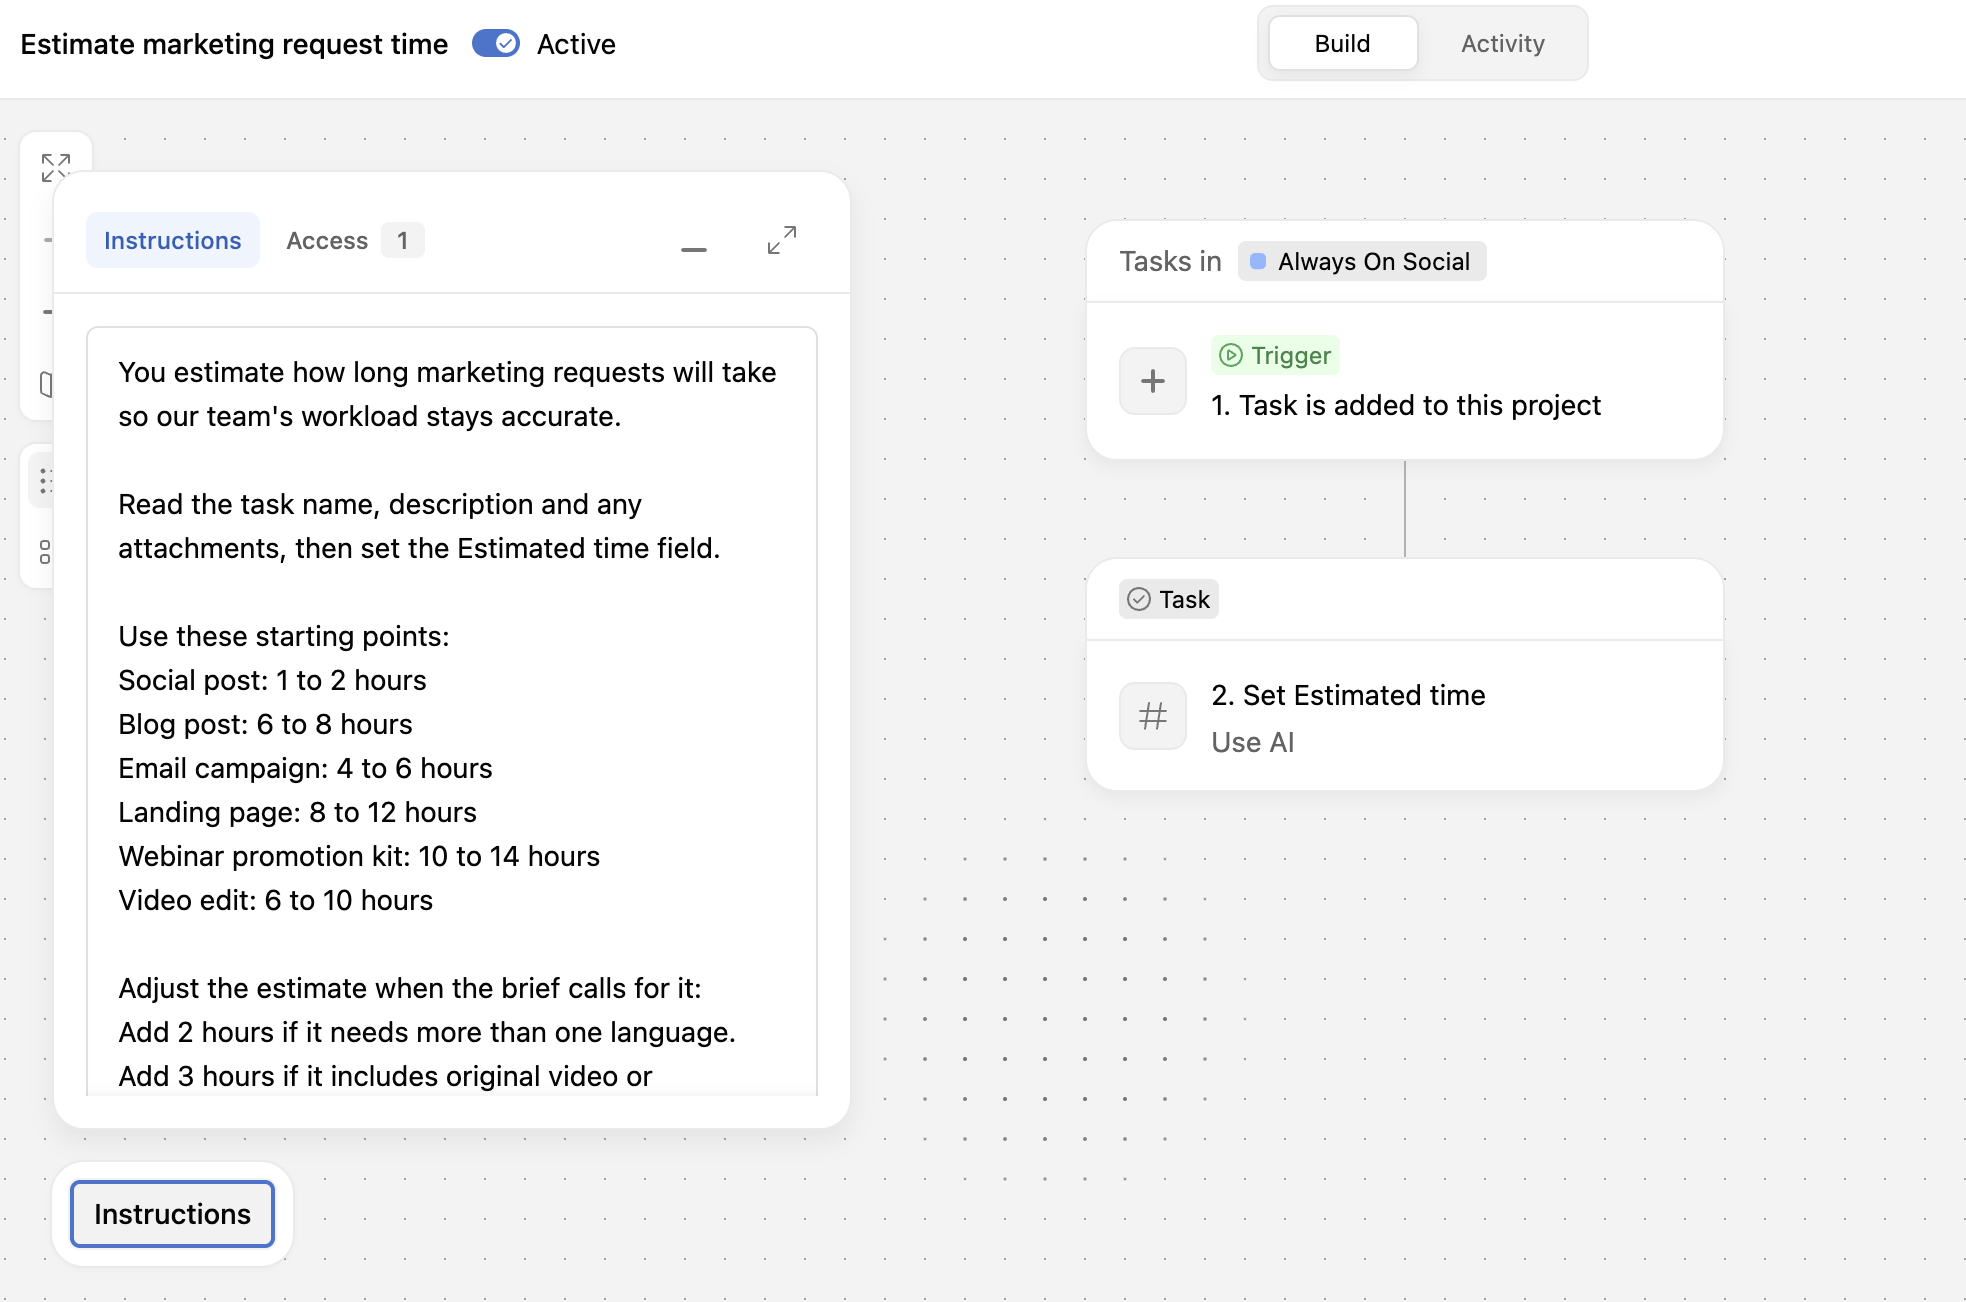
A fixed number works when the work is predictable. When it varies, an AI Studio automation can read the task and set the estimate for you, based on guidance you write instead of a single value.
For example, your instructions could say that a social post usually takes 1 to 2 hours, a landing page 8 to 12, and that it should add time when the brief mentions several languages or a video. Each new request then gets an estimate that fits what's actually in it, and your team only adjusts it when needed.
If you're new to AI Studio, our guide to Asana AI Studio explains how these automations work.
Can Asana AI Teammates help with resource management?
Yes. Asana now has a prebuilt AI Teammate called Capacity Planner that tracks utilization, flags allocation conflicts and models staffing scenarios using your live work data.
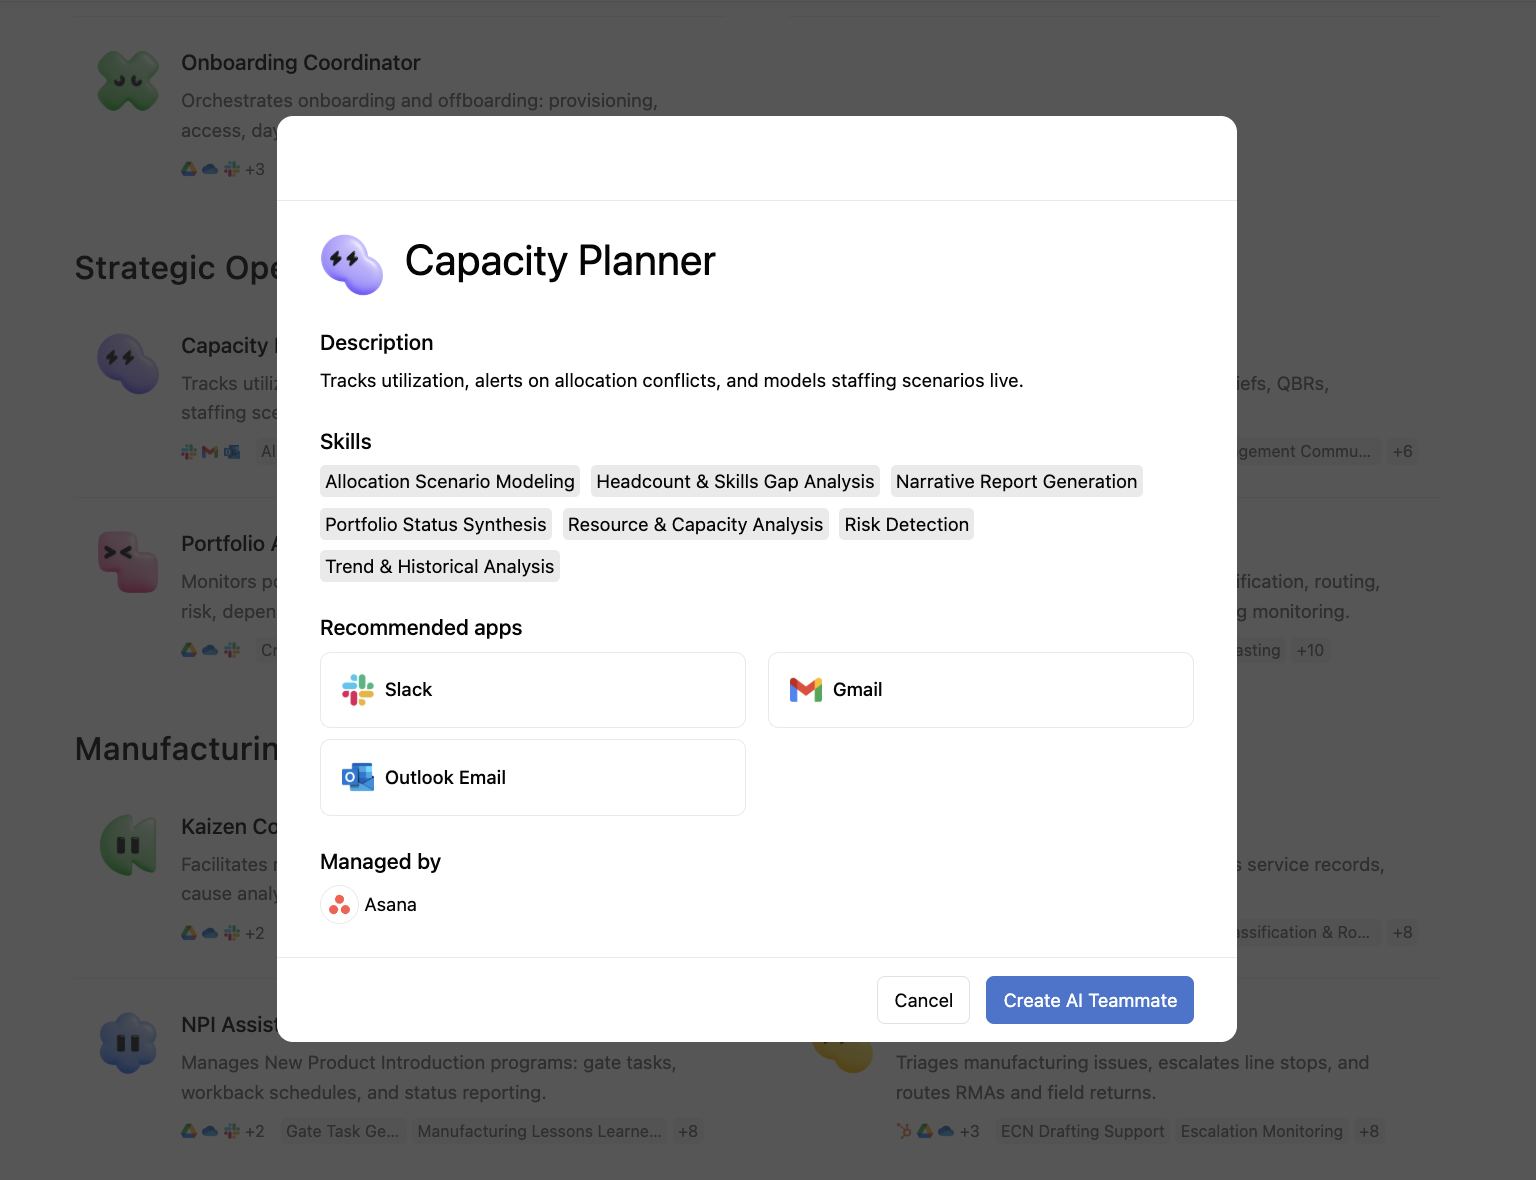
This matters because building the views is only half the job. Someone still has to read them every week, compare the plan with the workload and decide what to move. Plenty of managers have time to set up the capacity plan and the workload view, and then never get around to analyzing them.
You'll find Capacity Planner when you create a new AI Teammate, under the PMO and strategic operations templates. Use it out of the box or adjust its skills to match how your team works.
A simple way to start:
1. Create the Capacity Planner AI Teammate and give it access to your workload view and your capacity plan.
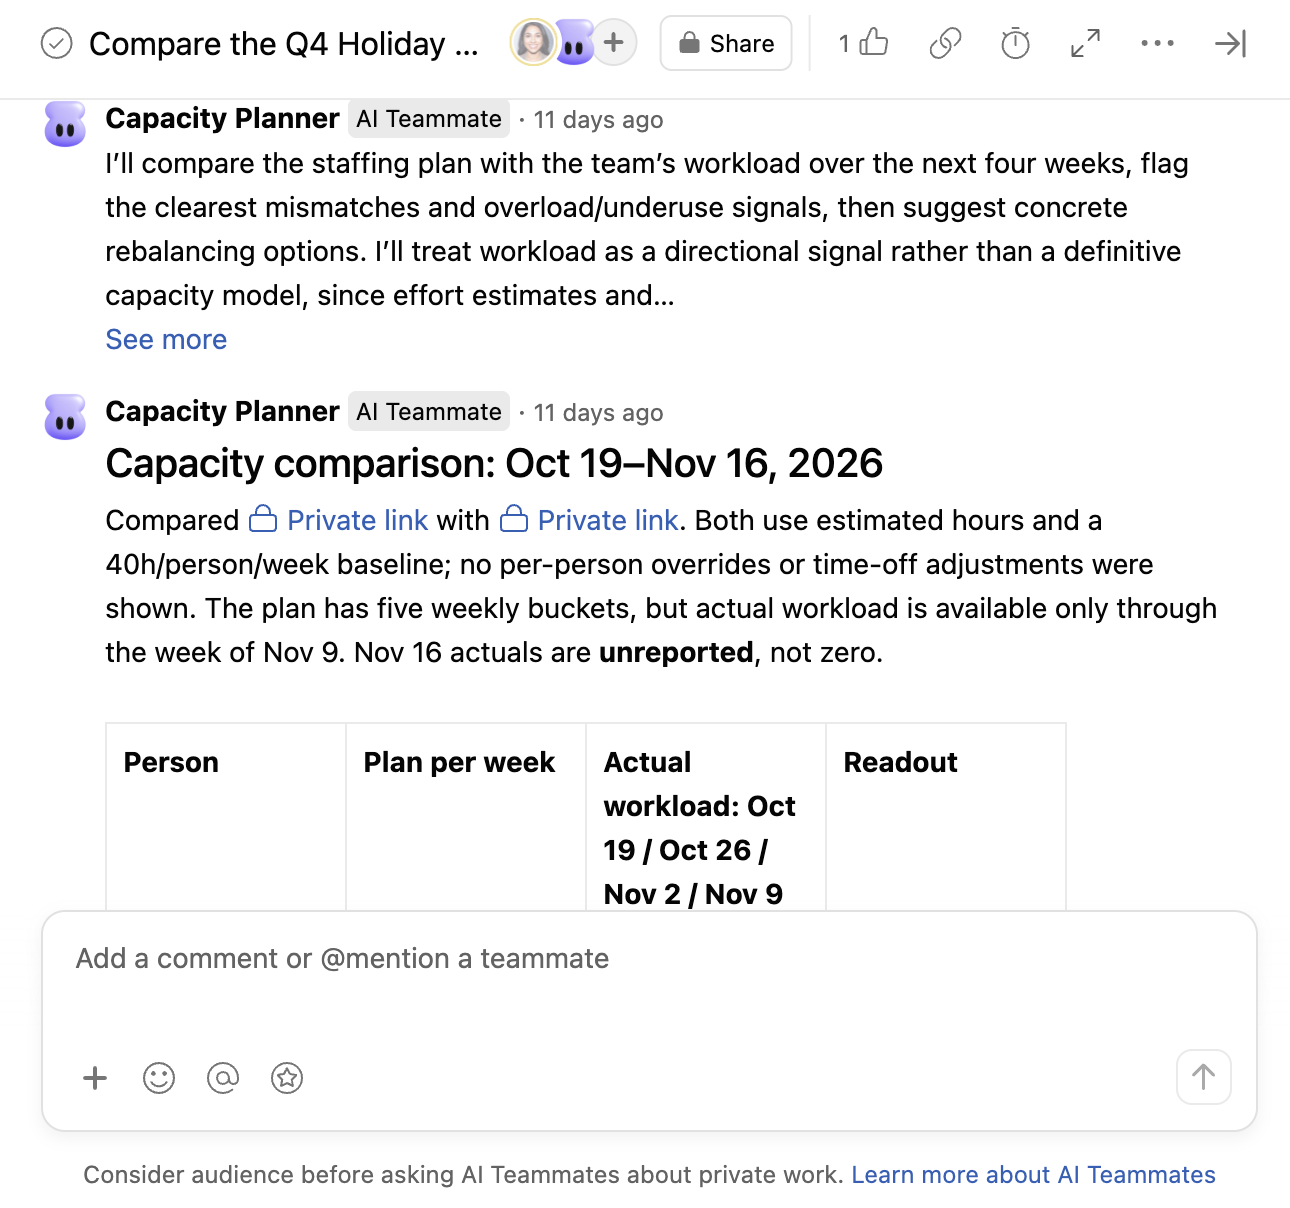
2. Assign it a task such as: "Compare the workload view with the capacity plan. Tell me what doesn't match, what's at risk, and what changes you'd suggest."
3. Review what comes back. In my tests it returns a table per person with planned allocation next to actual workload, a list of mismatches and risks, and rebalancing options you can approve, such as reassigning a task or moving its dates.
You stay in charge of the decision. The AI Teammate does the reading and the math, and you choose what to change.
AI Teammates are available on Starter, Advanced, Enterprise and Enterprise+. If you want to understand how they compare with automations and AI Studio, read our Asana automation guide
Start resourcing the work you already planned
You don't need a big rollout to get value from these features. Start with one portfolio, switch workload to estimated time, set capacities, and look at it once a week. When that habit sticks, and if you're on Enterprise or Enterprise+, add a capacity plan for next quarter and use Compare to close the loop.
If you want help setting up workload, capacity plans or the automations that keep the effort data clean, book a call with our team. For more on reporting, our guide to Asana dashboards and reporting covers the other half of the picture.
And if you'd like tips like these every week, join our newsletter, All Systems Go.

Asana workload and capacity planning FAQ
Which Asana plans include workload?
Project and portfolio workload are included on Asana Advanced, Enterprise and Enterprise+. Universal workload, which pulls tasks from across your whole organization, is only on Enterprise and Enterprise+.
Do I need Enterprise for capacity planning in Asana?
Yes. Capacity planning, both inside a portfolio and as a universal plan in Resourcing, is available on Asana Enterprise and Enterprise+. On Advanced, you can still use project and portfolio workload to see who has too much on their plate.
What is the difference between workload and capacity planning in Asana?
Capacity planning allocates people to whole projects over time, usually before the tasks exist. Workload shows the tasks each person is actually assigned, day by day, against their capacity. Use capacity planning to build the plan and workload to manage the work.
Should I measure effort in hours or percent allocation?
Estimated hours work best when your team plans week by week and estimates tasks in time. Percent allocation is simpler when people split their week across a few projects. Pick one and use it in both workload and capacity plans so the numbers compare.
Why doesn't a task show up in my Asana workload?
A task only counts in workload, at project, portfolio or universal level, when it is assigned, has a due date and belongs to a project. You also need permission to see the task, otherwise it stays hidden from your view.
Does adding someone to a capacity plan notify them?
No. Allocations in a capacity plan send no inbox notification or email. You can test staffing scenarios freely before sharing the plan.
Can Asana fill in estimated time automatically?
Yes. You can set estimated time on task templates and project templates, or use an automation that sets it when a task is added, moves sections or changes a field such as size. For work that varies, an AI Studio automation can read each task and set the estimate based on guidance you write. Bundles let you apply the same setup across many projects.
Which Asana AI Teammate helps with resourcing?
Capacity Planner is the prebuilt AI Teammate for resourcing. It tracks utilization, flags allocation conflicts and models staffing scenarios, and it can compare your workload view with your capacity plan and suggest rebalancing options.